Love this? Save it for later!
Share the inspiration with your friends
My neighbor, Mrs. Vega, had claimed she hated pan de muerto for fifteen years. Fifteen years. She said it was dry, that it never tasted like anything but flour and sugar, and that people only made it because they felt obligated around Día de Muertos. I believed her, honestly. I’d had my share of sad, dusty versions that crumbled the wrong way and left you reaching for coffee just to choke them down. But last October, I got it in my head to try my hand at a proper one, mostly because I’d found a bag of orange blossom water at the back of my pantry and needed a reason to use it. I figured I’d make a small test loaf, just for myself, and if it failed, no one would know. The kitchen smelled incredible, I mean, really incredible — like flowers and butter and something almost tropical. I pulled it from the oven, let it cool, and brushed on the glaze. Then I carried a slice next door, more out of politeness than anything else. I found her standing at her screen door, fork in hand, asking when I was going to bake another one. Caught in the act of proving herself wrong. That moment, right there, is why this recipe stuck.
Why You’ll Love This Recipe
This isn’t just another holiday bread. I tested this recipe seven times before I got the crumb right — soft, tender, with just enough give to pull apart without crumbling into a mess. I wanted a pan de muerto that actually tasted like something, you know? Not just a vehicle for sugar. The orange blossom glaze soaks into the warm bread, creating this almost pudding-like softness on top while the inside stays light and airy. It’s the kind of bread that makes you close your eyes after the first bite.
- Simple Ingredients : No fancy grocery trips. Flour, butter, eggs, yeast, orange zest, and orange blossom water — most of this is probably already in your kitchen.
- Perfect for Día de Muertos : This bread is the heart of the ofrenda. It’s traditional, meaningful, and honestly, it’s what people remember.
- Crowd-Pleaser : I’ve served this to skeptical relatives and picky kids. It disappears. The glaze makes it feel like a pastry, not just bread.
- Foolproof Dough : I’ve included all my tested tips so you don’t end up with a dry, dense loaf. This version is forgiving, even if you’re new to yeasted doughs.
- Unbelievably Fragrant : The orange blossom water is the secret. It’s floral without being soapy, and it pairs perfectly with the warm, buttery base.
This recipe is the one that changed Mrs. Vega’s mind. It’s the one that makes people ask for the recipe before they’ve even finished their slice. It’s comfort food with a little bit of soul, and it’s easier than you think.
What Ingredients You Will Need
This recipe uses simple, pantry-friendly ingredients, but the magic comes from a few key players. The orange blossom water is non-negotiable here — it’s what gives this bread its signature floral aroma. Don’t skip the fresh orange zest either; it brightens the whole thing.
- For the Dough:
- 4 cups (500g) all-purpose flour, plus more for dusting
- 1/2 cup (100g) granulated sugar
- 1 packet (2 1/4 tsp) active dry yeast (I use Red Star for consistent results)
- 1/2 teaspoon salt
- 1/2 cup (120ml) whole milk, warmed to 110°F (adds richness)
- 1/4 cup (60ml) water, warmed to 110°F
- 3 large eggs, room temperature (important for smooth dough)
- 1/3 cup (75g) unsalted butter, softened (use European-style for extra flavor)
- 1 tablespoon orange blossom water
- Zest of 1 large orange (about 1 tablespoon)
- 1 teaspoon vanilla extract
- For the Orange Blossom Glaze:
- 1 cup (120g) powdered sugar, sifted
- 2 tablespoons orange blossom water
- 1 tablespoon fresh orange juice
- Pinch of salt (balances the sweetness)
- For Decoration (optional but traditional):
- 1 tablespoon melted butter for brushing before baking
- Granulated sugar mixed with a little orange zest for sprinkling
Substitution Guidance: If you don’t have orange blossom water, you can use 2 teaspoons of orange extract mixed with 1 tablespoon of water, but honestly, the flavor won’t be quite the same. For a dairy-free version, use oat milk and vegan butter. The texture will be slightly less tender, but still delicious. I’ve also made this with bread flour instead of all-purpose, and it gives a chewier crumb — great if you prefer that.
Equipment Needed
You don’t need a lot of fancy tools for this, which is part of why I love making it. Here’s what you’ll need:
- Large mixing bowl (glass or ceramic works best — it holds heat better)
- Stand mixer with dough hook (you can knead by hand, but it takes about 15 minutes of solid work)
- Measuring cups and spoons
- Kitchen scale (I highly recommend this for flour — it’s more accurate)
- Rolling pin (for shaping the bone decorations)
- Baking sheet lined with parchment paper
- Pastry brush (for the glaze)
- Wire cooling rack
- Plastic wrap or a clean kitchen towel for proofing
If you don’t have a stand mixer, kneading by hand is totally doable. I actually prefer it sometimes — there’s something meditative about working the dough. Just make sure you’re using a light touch; over-kneading can make the bread tough. A cheap digital thermometer is also a lifesaver for checking milk temperature. Too hot and you’ll kill the yeast; too cold and it won’t activate.
Preparation Method
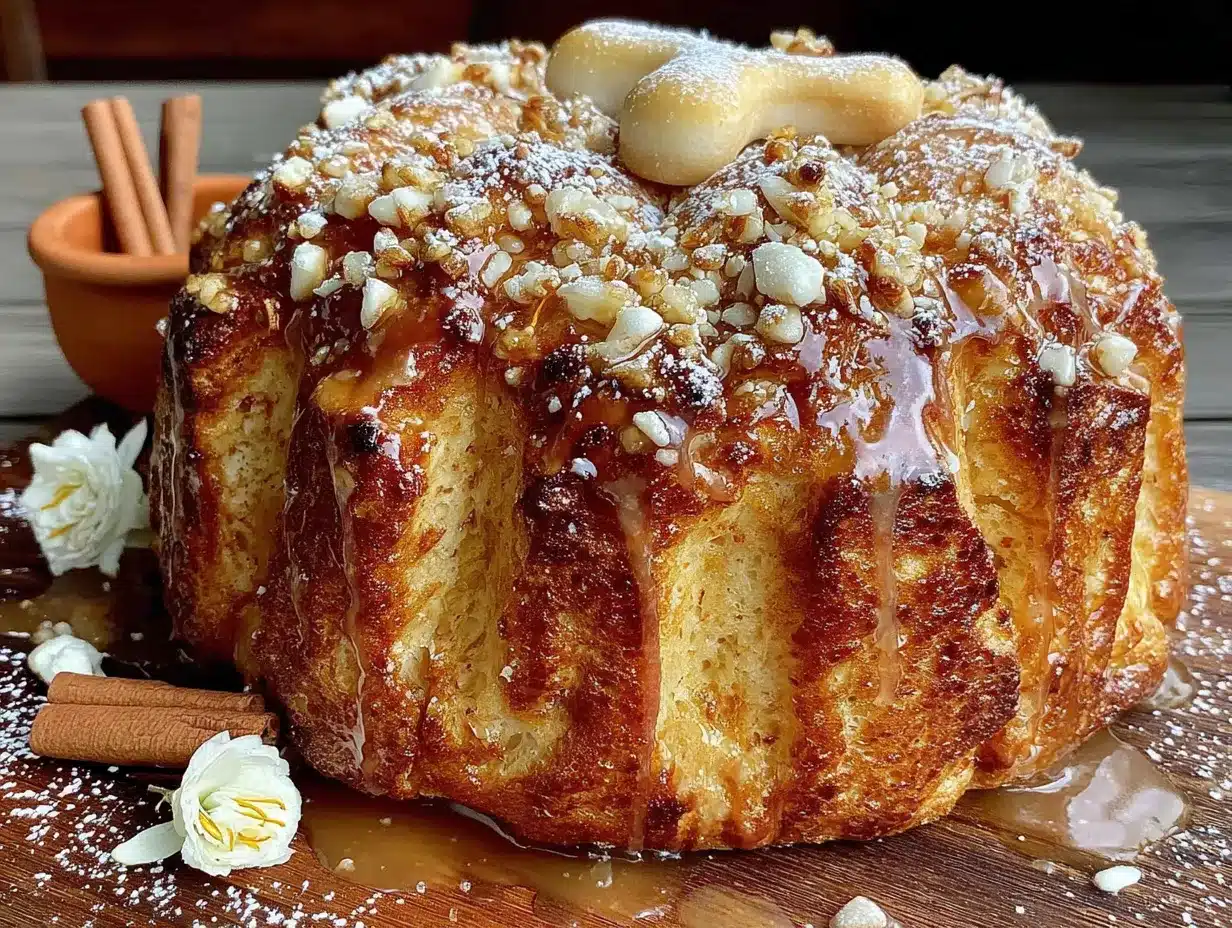
Let’s get to the good part. I’ve broken this down into clear steps so you don’t miss anything. Trust me, I’ve made every mistake in the book so you don’t have to.
- Activate the yeast. In a small bowl, combine the warm milk (110°F), warm water, and 1 tablespoon of the sugar. Sprinkle the yeast on top and let it sit for 5-10 minutes until it’s foamy. If it doesn’t foam, your yeast is dead — start over with fresh yeast. I learned this the hard way.
- Mix the dry ingredients. In your stand mixer bowl (or a large bowl if kneading by hand), whisk together the flour, remaining sugar, and salt. Make a well in the center.
- Combine wet ingredients. In a separate bowl, whisk the eggs, orange blossom water, orange zest, and vanilla extract until smooth.
- Bring it together. Pour the yeast mixture and the egg mixture into the well of dry ingredients. Mix on low speed with the dough hook until a shaggy dough forms. This takes about 2 minutes. Scrape down the sides if needed.
- Add the butter. With the mixer running on low, add the softened butter one tablespoon at a time. Wait until each piece is mostly incorporated before adding the next. The dough will look greasy and messy for a minute — that’s normal. Keep going.
- Knead the dough. Increase speed to medium and knead for 8-10 minutes (or 12-15 minutes by hand). The dough should be smooth, elastic, and slightly tacky but not sticky. It should pass the windowpane test — stretch a small piece; if it forms a thin, translucent membrane without tearing, it’s ready.
- First rise. Shape the dough into a ball and place it in a lightly oiled bowl. Cover with plastic wrap and a kitchen towel. Let it rise in a warm, draft-free spot for 1 1/2 to 2 hours, until doubled in size. I put mine in the oven with the light on — perfect temperature every time.
- Shape the loaves. Punch down the dough gently. Turn it out onto a lightly floured surface. Divide it into two pieces — one larger piece (about 2/3 of the dough) for the base, and one smaller piece (1/3) for the decorations. Shape the larger piece into a round loaf and place it on your prepared baking sheet.
- Make the bone decorations. Divide the smaller piece into 4 equal parts. Roll each into a rope about 8 inches long. Cut each rope into 3 pieces — two shorter pieces for the “bones” and one longer piece for the “knuckle.” Arrange them in a cross shape on top of the loaf, pressing gently to adhere. It doesn’t have to be perfect; mine never is. That’s part of the charm.
- Second rise. Cover the shaped loaf loosely with plastic wrap and let it rise for another 45-60 minutes, until puffy and almost doubled. It should spring back slowly when poked.
- Bake. Preheat your oven to 350°F (175°C). Brush the loaf with melted butter. Bake for 25-30 minutes, until the top is deep golden brown and the loaf sounds hollow when tapped on the bottom. If it browns too quickly, tent it with foil after 15 minutes.
- Glaze while warm. While the bread is still warm (but not hot), whisk together the glaze ingredients until smooth. Brush it generously over the top. The glaze will soak in slightly, creating that signature soft, fragrant crust. Let it cool completely on a wire rack before slicing.
Cooking Tips & Techniques
I’ve made this bread more times than I can count, and I’ve learned a few things along the way. Here’s what I wish someone had told me:
Don’t rush the first rise. I know it’s tempting to cut it short, but under-proofed dough makes dense bread. The dough should be pillowy and soft, not tight. If your kitchen is cold, put the bowl in a slightly warm oven (just the light on, not the heat) or near a radiator.
Temperature matters for the butter. If your butter is too cold, it won’t incorporate properly and you’ll end up with greasy dough. If it’s too soft, it’ll melt and make the dough sticky. Aim for cool room temperature — it should give slightly when pressed but still hold its shape.
The glaze is not optional. I know some traditional recipes skip it, but trust me, the orange blossom glaze is what makes this bread unforgettable. It adds moisture, flavor, and that beautiful sheen. Brush it on while the bread is still warm so it absorbs. Don’t pour it all on at once — brush in layers, letting each one soak in.
My biggest failure: The first time I made this, I forgot the salt. The bread looked beautiful but tasted flat and lifeless. Salt isn’t just for flavor — it strengthens the gluten structure and controls yeast activity. Don’t skip it.
Multitasking tip: While the dough is rising for the first time, make your glaze and zest your orange. It saves you scrambling later. Also, line your baking sheet before you start shaping — trying to move a fully decorated loaf is a nightmare.
Variations & Adaptations
This recipe is pretty traditional, but I’ve played around with it over the years. Here are a few variations worth trying:
- Chocolate Orange Version: Add 1/4 cup of cocoa powder to the flour and reduce the flour by 2 tablespoons. The chocolate pairs beautifully with the orange blossom. I made this for a friend who doesn’t like floral flavors, and she devoured half the loaf.
- Vegan Adaptation: Use plant-based milk (oat or soy) and vegan butter. Replace each egg with a flax egg (1 tablespoon ground flaxseed + 3 tablespoons water per egg). The texture will be slightly denser, but the flavor is still lovely. I’ve tested this twice, and it works.
- Spiced Version: Add 1 teaspoon of cinnamon and 1/2 teaspoon of nutmeg to the flour. It gives the bread a warm, cozy vibe that’s perfect for fall. This is actually my favorite variation for Thanksgiving morning.
- Gluten-Free Option: Use a 1:1 gluten-free flour blend that contains xanthan gum. The dough will be stickier, so flour your hands generously. The rise will be shorter, and the crumb will be more cake-like, but it’s still delicious.
- Mini Loaves: Divide the dough into 6-8 small rounds instead of one large loaf. Bake for 15-18 minutes instead of 25-30. These are perfect for gift-giving or for smaller gatherings.
Serving & Storage Suggestions
This bread is best served the day it’s made, while the glaze is still soft and the crumb is tender. But let’s be real — leftovers are a thing, and they’re still pretty great.
Serving: Slice it thick and serve at room temperature. It’s wonderful with a cup of coffee or Mexican hot chocolate. For a truly special treat, toast a slice lightly and spread it with butter. The glaze caramelizes slightly in the toaster — trust me on this one.
Storage: Wrap the cooled loaf tightly in plastic wrap and store at room temperature for up to 3 days. Do not refrigerate — it will dry out the bread. If you live in a humid climate, store it in a paper bag instead to prevent the glaze from getting sticky.
Freezing: You can freeze the unglazed loaf for up to 2 months. Wrap it well in plastic wrap and then foil. When you’re ready to eat, thaw it at room temperature, then warm it in a 300°F oven for 10 minutes. Glaze it while it’s still warm. I’ve done this for Día de Muertos prep, and it works perfectly.
Flavor development: Honestly, the bread is even better the next day. The orange blossom flavor mellows and melds with the butter, creating a more complex taste. If you can resist eating it all on day one, you’re stronger than me.
Nutritional Information & Benefits
I’m not going to pretend this is health food — it’s a celebratory bread, meant to be enjoyed in good company. But here’s the breakdown if you’re curious:
- Per serving (1/8 of loaf): Approximately 320 calories, 10g fat, 52g carbohydrates, 7g protein, 2g fiber, 18g sugar.
- Key ingredients: Eggs provide high-quality protein and choline. Oranges are packed with vitamin C and antioxidants. The orange blossom water adds a unique aromatic compound called linalool, which has been studied for its calming effects.
- Dietary considerations: This recipe contains gluten, dairy, and eggs. See the variations section for vegan and gluten-free adaptations. It’s not low-carb, but it’s a once-a-year treat for most people.
- My perspective: Food is about more than numbers. This bread is about memory, tradition, and sharing something beautiful with the people you love. One slice won’t derail anything, but it might just make your day.
Conclusion
This pan de muerto with orange blossom glaze is the recipe that changed my neighbor’s mind and it might just change yours too. It’s soft, fragrant, and deeply satisfying — the kind of bread that makes you slow down and actually taste it. I love how forgiving the dough is, how the glaze soaks in and makes everything better, and how it fills my kitchen with that incredible floral smell.
I really hope you give this a try. Customize it however you like — add chocolate, spice it up, make mini versions for your friends. And when you do, come back and tell me how it went. Leave a comment below, share a photo, or tag me in your creation. I love seeing your versions, honestly. It’s the best part of sharing recipes.
Happy baking, and don’t forget to save a slice for the ofrenda.
Frequently Asked Questions
Can I make this bread ahead of time for Día de Muertos?
Absolutely. Bake it up to two days ahead and store it wrapped at room temperature. If you want it fresh, you can also freeze the unglazed loaf and glaze it the day you plan to serve it. The glaze is best applied fresh.
What if I can’t find orange blossom water?
It’s worth seeking out at a Latin grocery store or online, but if you’re in a pinch, use 2 teaspoons of orange extract mixed with 1 tablespoon of water. The flavor won’t be as floral, but it’ll still be good. You can also use rose water for a different but lovely twist.
My dough is too sticky. What did I do wrong?
Don’t panic. Sticky dough is often just under-kneaded. Keep kneading for another 3-5 minutes. If it’s still sticky after that, add flour one tablespoon at a time until it comes together. Humidity also affects dough, so you might need a little more flour on humid days.
Why didn’t my bread rise properly?
Most likely, your yeast was dead or your liquid was too hot. Check the temperature of your milk and water — it should be between 105°F and 115°F. If it’s hotter, it kills the yeast. Also, make sure your yeast is fresh. I always test mine by letting it foam in the warm liquid before adding it to the flour.
Can I use a bread machine for this recipe?
You can use the dough cycle to mix and knead, but I recommend shaping and baking it in the oven. The bread machine’s baking cycle won’t give you the same beautiful shape or crust. Use the dough cycle, then follow the shaping and baking instructions from step 8 onward.
Pin This Recipe!
Easy Traditional Pan de Muerto with Orange Blossom Glaze
This soft, fragrant pan de muerto with a floral orange blossom glaze is the recipe that changed my neighbor’s mind about this traditional Día de Muertos bread. It’s tender, forgiving, and filled with the warm aroma of orange zest and butter.
- Prep Time: 30 minutes
- Cook Time: 25-30 minutes
- Total Time: 3 hours 15 minutes (including rising time)
- Yield: 8 servings 1x
- Category: Bread
- Cuisine: Mexican
Ingredients
- 4 cups (500g) all-purpose flour, plus more for dusting
- 1/2 cup (100g) granulated sugar
- 1 packet (2 1/4 tsp) active dry yeast
- 1/2 teaspoon salt
- 1/2 cup (120ml) whole milk, warmed to 110°F
- 1/4 cup (60ml) water, warmed to 110°F
- 3 large eggs, room temperature
- 1/3 cup (75g) unsalted butter, softened
- 1 tablespoon orange blossom water
- Zest of 1 large orange (about 1 tablespoon)
- 1 teaspoon vanilla extract
- 1 cup (120g) powdered sugar, sifted
- 2 tablespoons orange blossom water
- 1 tablespoon fresh orange juice
- Pinch of salt
- 1 tablespoon melted butter for brushing before baking
- Granulated sugar mixed with a little orange zest for sprinkling
Instructions
- Activate the yeast: In a small bowl, combine the warm milk (110°F), warm water, and 1 tablespoon of the sugar. Sprinkle the yeast on top and let it sit for 5-10 minutes until it’s foamy.
- Mix the dry ingredients: In your stand mixer bowl, whisk together the flour, remaining sugar, and salt. Make a well in the center.
- Combine wet ingredients: In a separate bowl, whisk the eggs, orange blossom water, orange zest, and vanilla extract until smooth.
- Bring it together: Pour the yeast mixture and the egg mixture into the well of dry ingredients. Mix on low speed with the dough hook until a shaggy dough forms, about 2 minutes.
- Add the butter: With the mixer running on low, add the softened butter one tablespoon at a time, waiting until each piece is mostly incorporated before adding the next.
- Knead the dough: Increase speed to medium and knead for 8-10 minutes (or 12-15 minutes by hand). The dough should be smooth, elastic, and slightly tacky but not sticky. It should pass the windowpane test.
- First rise: Shape the dough into a ball and place it in a lightly oiled bowl. Cover with plastic wrap and a kitchen towel. Let it rise in a warm, draft-free spot for 1 1/2 to 2 hours, until doubled in size.
- Shape the loaves: Punch down the dough gently. Turn it out onto a lightly floured surface. Divide it into two pieces — one larger piece (about 2/3 of the dough) for the base, and one smaller piece (1/3) for the decorations. Shape the larger piece into a round loaf and place it on your prepared baking sheet.
- Make the bone decorations: Divide the smaller piece into 4 equal parts. Roll each into a rope about 8 inches long. Cut each rope into 3 pieces — two shorter pieces for the ‘bones’ and one longer piece for the ‘knuckle.’ Arrange them in a cross shape on top of the loaf, pressing gently to adhere.
- Second rise: Cover the shaped loaf loosely with plastic wrap and let it rise for another 45-60 minutes, until puffy and almost doubled.
- Bake: Preheat your oven to 350°F (175°C). Brush the loaf with melted butter. Bake for 25-30 minutes, until the top is deep golden brown and the loaf sounds hollow when tapped on the bottom. If it browns too quickly, tent it with foil after 15 minutes.
- Glaze while warm: While the bread is still warm (but not hot), whisk together the glaze ingredients until smooth. Brush it generously over the top. Let it cool completely on a wire rack before slicing.
Notes
Don’t rush the first rise; under-proofed dough makes dense bread. The glaze is not optional—it adds moisture, flavor, and sheen. Brush it on while the bread is still warm so it absorbs. If your kitchen is cold, put the bowl in a slightly warm oven (just the light on) or near a radiator. For the butter, aim for cool room temperature—it should give slightly when pressed but still hold its shape. Don’t forget the salt; it strengthens the gluten structure and controls yeast activity.
Nutrition
- Serving Size: 1/8 of loaf
- Calories: 320
- Sugar: 18
- Sodium: 180
- Fat: 10
- Saturated Fat: 5
- Carbohydrates: 52
- Fiber: 2
- Protein: 7
Keywords: pan de muerto, day of the dead bread, orange blossom bread, mexican sweet bread, dia de muertos recipe, traditional pan de muerto