Love this? Save it for later!
Share the inspiration with your friends
My neighbor Carol wasn’t trying to impress anyone. I’d stopped by to return her measuring cup—the one I’d borrowed three weeks ago and kept meaning to give back—and the smell hit me before I even got to her front door. It was October, leaves were piling up on her porch, and through her slightly open kitchen window came this warm, spicy-sweet cloud that stopped me mid-step. Cinnamon, ginger, nutmeg, and something else I couldn’t quite place. She opened the door holding a glass baking dish, spatula in hand, and said, “Oh good, you’re here. Tell me if these are too sweet.”
She was wearing an old sweatshirt with a coffee stain on the sleeve. The cheesecake bars weren’t for a party or a bake sale. She’d just woken up that morning craving something cozy and decided to throw them together before the kids got home from school. I stood in her kitchen eating one straight from the pan—still warm, the gingersnap crust crumbling a little, the pumpkin layer so silky it almost melted on my tongue—and honestly, I think I made some kind of involuntary noise. Carol just shrugged and said, “It’s just the box mix crust.” But it wasn’t. It was so much more than that. Let me tell you, that moment changed how I think about fall baking forever.
Maybe you’ve been there—standing in someone’s kitchen, eating something so unexpectedly perfect that you know you’ll be trying to recreate it for weeks. I asked Carol for the recipe, and she scribbled it on the back of an envelope while her dog nudged her leg for attention. She forgot to write down the oven temperature. I had to text her later. And you know what? That imperfect, scribbled-on-an-envelope recipe has become my most-made fall dessert. These cozy pumpkin cheesecake bars with gingersnap crust are the kind of thing you make when you want autumn on a plate without spending all day in the kitchen. They’re the reason I look forward to pumpkin season every single year.
Why You’ll Love This Recipe
I’ve made these bars more times than I can count, and every single time, they deliver. Here’s why they’ve earned a permanent spot in my fall baking rotation:
- Simple Ingredients, Big Flavor : You probably already have most of what you need in your pantry. No hunting down fancy extracts or specialty flours. Just honest, affordable ingredients that come together into something that tastes way more complicated than it is.
- Budget-Friendly for Family Baking : This recipe uses a can of pumpkin, a block of cream cheese, and a box of gingersnap cookies. That’s it for the heavy hitters. You can feed a crowd without blowing your grocery budget, and the leftovers reheat beautifully for lunchbox treats or after-school snacks.
- Perfect for Picky Eaters : The creamy cheesecake layer mellows out the pumpkin flavor just enough that even my friend’s kids—who “don’t like pumpkin stuff”—asked for seconds. The gingersnap crust adds a little spice kick that grown-ups love, but it’s not overpowering for little ones.
- Crowd-Pleaser Guaranteed : I’ve brought these to potlucks, Thanksgiving dinners, and casual get-togethers. They disappear fast. People always ask for the recipe, and I love watching their faces when I tell them how simple it is.
- Make-Ahead Friendly : These bars actually taste better the next day. The flavors meld together overnight, and the texture sets up perfectly. You can make them a day or two ahead and still have them taste fresh and amazing.
What makes these different from every other pumpkin cheesecake bar recipe out there? It’s the crust. Most recipes use a graham cracker crust, which is fine, but the gingersnap crust adds this deep, molasses-y warmth that perfectly complements the pumpkin. The slight crunch of the cookies against the silky cheesecake layer is just chef’s kiss. I’ve tested this with different ratios and baking times, and this version gives you that clean slice every time—no cracking, no sinking, no soggy bottom.
This is comfort food reimagined. It’s the dessert that makes you close your eyes after the first bite, that makes a Tuesday night feel like a celebration, that costs pennies to make but tastes like you spent hours. Honestly, it’s the kind of recipe that makes you look forward to fall all year long.
What Ingredients You Will Need
This recipe uses simple, wholesome ingredients to deliver bold flavor and satisfying texture without the fuss. Most of these are pantry staples, especially if you do any fall baking. Let me walk you through each one and share a few tips I’ve picked up along the way.
For the Gingersnap Crust
- 2 cups (about 200g) gingersnap cookie crumbs (I use Nabisco or store brand—both work great. You can crush them in a food processor or put them in a zip-top bag and go at them with a rolling pin. The food processor is faster, but the bag method is oddly satisfying.)
- 5 tablespoons (70g) unsalted butter, melted (Salted butter works too—just reduce the added salt elsewhere. I prefer unsalted so I can control the sodium level.)
- 2 tablespoons (25g) granulated sugar (This adds a little sweetness and helps the crust hold together. You can skip it if your cookies are already very sweet.)
- Pinch of salt (Just a tiny bit to balance the sweetness. If your butter is salted, you can skip this.)
For the Pumpkin Cheesecake Filling
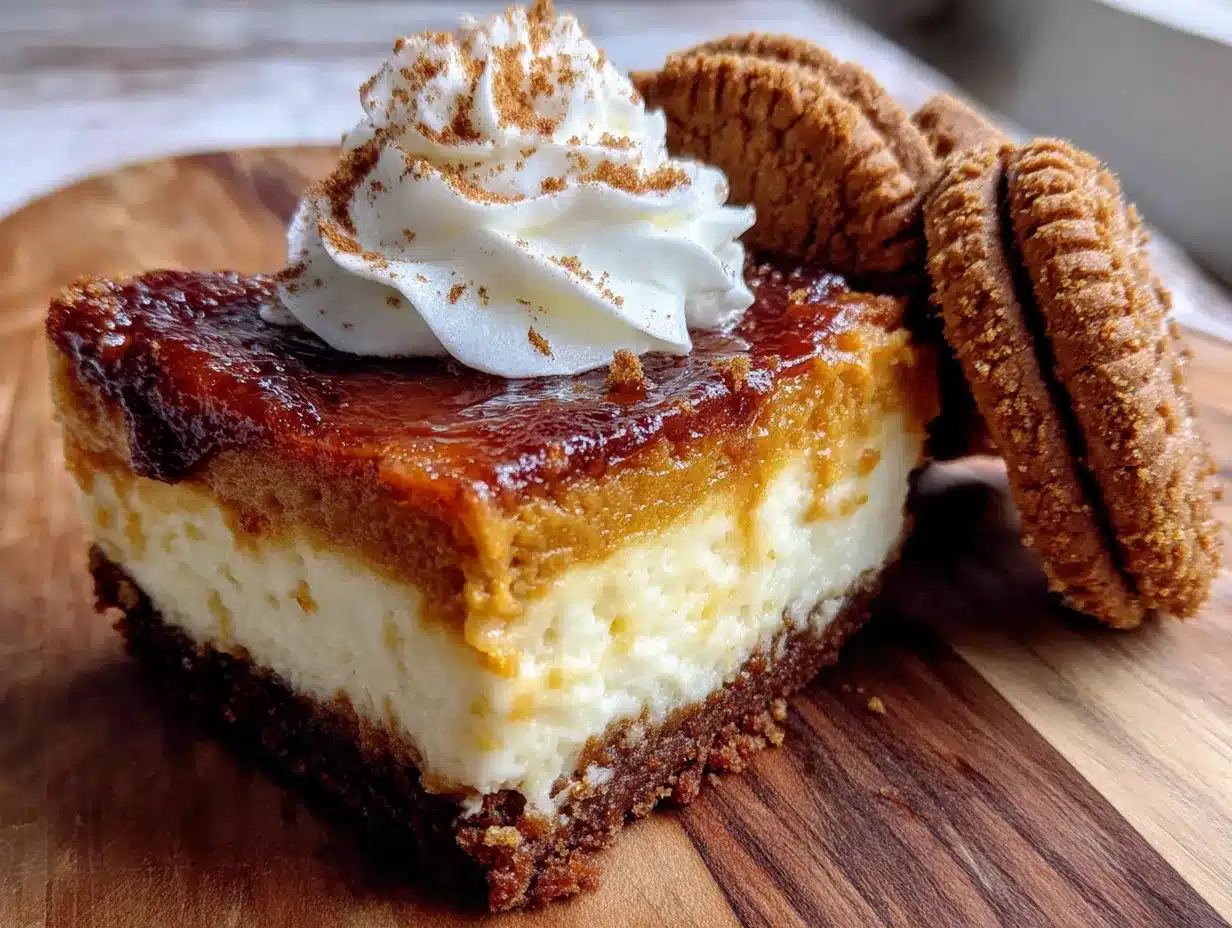
- 16 ounces (450g) cream cheese, softened to room temperature (This is crucial. Cold cream cheese will give you lumpy filling. Leave it on the counter for at least an hour before you start. I use Philadelphia, but any full-fat block cream cheese works.)
- 3/4 cup (150g) granulated sugar (Regular white sugar. You can reduce this to 1/2 cup if you prefer a less sweet dessert.)
- 1 teaspoon vanilla extract (Pure vanilla extract if you have it, but imitation works fine here. The pumpkin and spices are the stars anyway.)
- 2 large eggs, room temperature (Cold eggs can seize up the cream cheese mixture. I set mine out with the cream cheese.)
- 1 cup (245g) pumpkin puree (Not pumpkin pie filling! Make sure you grab plain pumpkin puree. Libby’s is my go-to, but store brands work just as well. One 15-ounce can gives you a little extra—use it in oatmeal or smoothies.)
- 1 teaspoon ground cinnamon (I buy mine in bulk from the spice aisle. It loses potency over time, so if your cinnamon is more than a year old, consider replacing it.)
- 1/2 teaspoon ground ginger (This adds warmth without being overpowering. Fresh ginger isn’t a good substitute here—it’s too watery.)
- 1/4 teaspoon ground nutmeg (Freshly grated is amazing if you have it, but pre-ground works perfectly.)
- 1/4 teaspoon ground cloves (Just a pinch. Cloves are strong, so don’t go overboard.)
- 1/4 teaspoon salt (This balances the sweetness and brings out the pumpkin flavor.)
For the Optional Topping
- 1/2 cup (120ml) heavy cream (For whipped cream. You can also use store-bought whipped topping in a pinch.)
- 1 tablespoon powdered sugar (To sweeten the whipped cream.)
- Additional crushed gingersnaps for garnish (A little crunch on top looks pretty and adds texture.)
Ingredient Tips I’ve Learned the Hard Way: Don’t overmix the filling once you add the eggs. Overmixing incorporates too much air, which can cause cracks during baking. Also, make sure your pumpkin puree isn’t watery. If you see liquid pooling on top of the opened can, spoon it off or blot it with a paper towel. Too much moisture makes the bars soggy. And here’s a little trick—if you’re short on time, you can soften cream cheese in the microwave on low power for about 15 seconds. Just watch it carefully so it doesn’t melt.
Equipment Needed
You don’t need a fancy kitchen to make these bars. Here’s what you’ll need, plus a few alternatives if you’re working with limited tools.
- 9×9-inch baking pan (An 8×8 works too, but your bars will be slightly thicker and may need a few extra minutes of baking time. I’ve used both and prefer the 9×9 for even layers.)
- Parchment paper (This is non-negotiable for easy removal. Let the paper hang over two opposite sides so you can lift the whole block out.)
- Mixing bowls (One medium for the crust, one large for the filling. Glass or stainless steel works best.)
- Electric hand mixer or stand mixer (You can mix by hand with a whisk, but it takes elbow grease to get the cream cheese smooth. I’ve done it both ways—the mixer is easier, but hand-mixing builds character.)
- Food processor or zip-top bag and rolling pin (For crushing the cookies. The food processor is faster, but the bag method is great for letting kids help.)
- Spatula (A rubber spatula for scraping the bowl clean. Don’t waste a single bit of that filling.)
- Measuring cups and spoons (Standard set. I like metal ones for dry ingredients and glass for liquids.)
Budget-Friendly Tips: If you don’t have a food processor, you can buy already-crushed gingersnap crumbs in the baking aisle. They’re usually right next to the graham cracker crumbs. And if you don’t have a 9×9 pan, a disposable aluminum pan from the grocery store works perfectly. Just keep an eye on the baking time since metal pans conduct heat differently.
Preparation Method
Let me walk you through this step by step. I’ve made these bars so many times that I’ve got the timing down to a science. Set aside about 45 minutes of active time, plus cooling and chilling time.
- Preheat your oven to 350°F (175°C). Line your 9×9-inch baking pan with parchment paper, leaving a 2-inch overhang on two opposite sides. This creates handles so you can lift the whole thing out later. Lightly spray the parchment with non-stick spray if you’re feeling extra cautious.
- Make the crust. In a medium bowl, combine 2 cups of gingersnap crumbs, 5 tablespoons melted butter, 2 tablespoons sugar, and a pinch of salt. Stir with a fork until the mixture looks like wet sand. Every crumb should be coated. If it looks dry, add another tablespoon of melted butter. If it looks greasy, add a few more crumbs. You want it to hold together when you press it between your fingers.
- Press the crust into the pan. Dump the crust mixture into your prepared pan. Use the bottom of a measuring cup or a flat-bottomed glass to press it down firmly and evenly. Don’t just pat it—really press it. A tight crust holds together better when you cut the bars. Press it all the way to the edges and into the corners. Bake for 10 minutes, then set aside to cool slightly while you make the filling. The crust should be fragrant and just barely starting to brown at the edges.
- Beat the cream cheese. In a large bowl, beat 16 ounces of softened cream cheese with an electric mixer on medium speed until smooth and creamy, about 2 minutes. Scrape down the sides and bottom of the bowl with a spatula. There should be no lumps. This is the most important step—lumpy cream cheese means lumpy filling.
- Add the sugar and vanilla. Add 3/4 cup sugar and 1 teaspoon vanilla extract. Beat on medium speed until combined, about 1 minute. Scrape the bowl again. The mixture should look light and fluffy.
- Add the eggs one at a time. Crack one egg into the bowl and beat on low speed just until incorporated. Add the second egg and beat again. Don’t overmix! Overmixing at this stage incorporates too much air, which can cause the cheesecake to puff up and crack during baking. You want to mix just until the yolk disappears into the batter.
- Add the pumpkin and spices. Add 1 cup pumpkin puree, 1 teaspoon cinnamon, 1/2 teaspoon ginger, 1/4 teaspoon nutmeg, 1/4 teaspoon cloves, and 1/4 teaspoon salt. Beat on low speed until just combined. The batter should be a beautiful pale orange color. Scrape the bowl one more time to make sure everything is evenly mixed.
- Pour the filling over the crust. Pour the pumpkin cheesecake filling over the pre-baked crust. Use your spatula to spread it evenly to the edges. Give the pan a gentle tap on the counter to release any air bubbles.
- Bake. Bake at 350°F for 35-40 minutes. The edges should be set and slightly puffed, but the center should still jiggle slightly when you gently shake the pan. That jiggle is your friend—it means the center is still creamy and will set up perfectly as it cools. If the center looks completely firm and doesn’t move at all, you’ve overbaked it. Start checking at 30 minutes if your oven runs hot.
- Cool completely. Place the pan on a wire rack and let it cool to room temperature. This takes about 1-2 hours. Don’t rush this step. If you put warm cheesecake bars in the fridge, condensation will form on the surface and make them watery.
- Chill. Once the bars are at room temperature, cover the pan with plastic wrap or aluminum foil and refrigerate for at least 4 hours, preferably overnight. This is the hardest part—waiting. But trust me, the bars need this time to set up properly. Cutting them too early will give you a messy, crumbly slice.
- Slice and serve. When you’re ready to serve, lift the bars out of the pan using the parchment paper handles. Place them on a cutting board. Use a sharp knife to cut into 16 squares (4 rows by 4 rows). Wipe the knife clean between cuts for neat edges. If you want extra-clean slices, dip the knife in hot water and dry it before each cut.
Cooking Tips & Techniques
After making these bars more times than I care to count, I’ve collected a few tips that make the process smoother and the results more reliable. Let me share the ones that made the biggest difference for me.
The Room Temperature Rule is Real. I know it’s tempting to use cold cream cheese straight from the fridge, but don’t. Cold cream cheese doesn’t blend smoothly, and you’ll end up with little white lumps in your filling. Same goes for the eggs. Set everything out on the counter an hour before you start. If you forget, you can soften the cream cheese in the microwave on 50% power for 10-15 seconds, but watch it carefully. You want it soft, not melted.
Don’t Overmix the Batter. This was my biggest mistake early on. I’d beat the filling until it was perfectly smooth, thinking more mixing was better. But overmixing incorporates air, which causes the cheesecake to puff up during baking and then crack as it cools. Mix just until each ingredient is incorporated, then stop. A few tiny lumps are better than a cracked surface.
The Water Bath Shortcut. Traditional cheesecake recipes call for a water bath to prevent cracking. I’ve found that for these bars, a water bath isn’t necessary if you follow a few simple rules: don’t overmix, don’t overbake, and cool slowly. But if you’re worried about cracking, you can place a shallow pan of hot water on the oven rack below the cheesecake bars. The steam keeps the oven moist and reduces the chance of cracks.
Check for Doneness the Right Way. The center should jiggle like Jell-O when you gently shake the pan. If it’s completely firm, it’s overbaked. If it’s liquidy and sloshes around, it needs more time. The edges should be set and slightly puffed. I usually start checking at 30 minutes and then every 3-5 minutes after that until the center has that perfect jiggle.
Patience Pays Off. I once cut into these bars after only 2 hours of chilling because I couldn’t wait. Big mistake. The slices were messy, the crust crumbled, and the filling was too soft. Now I always make them the day before I need them. Overnight chilling gives you those clean, beautiful slices that look like they came from a bakery.
Variations & Adaptations
One of the things I love about this recipe is how adaptable it is. Here are some variations I’ve tried and loved.
Gluten-Free Version: Use gluten-free gingersnap cookies for the crust. Many brands are available now, or you can make your own with gluten-free flour. The rest of the ingredients are naturally gluten-free, so this is an easy swap. I’ve tested this with my celiac friend, and she said it was the best pumpkin dessert she’d had in years.
Dairy-Free Adaptation: Use dairy-free cream cheese (like Kite Hill or Tofutti) and a plant-based butter substitute. The texture will be slightly less creamy, but the flavor is still fantastic. I’ve made this for a dairy-free Thanksgiving and nobody noticed the difference.
Pumpkin Spice Latte Version: Add 1 tablespoon of instant espresso powder dissolved in 1 tablespoon of hot water to the filling along with the pumpkin. The coffee flavor deepens the pumpkin spice notes and adds a subtle mocha undertone. This is my personal favorite variation for chilly mornings with a cup of coffee.
Less Sweet Version: Reduce the sugar in the filling to 1/2 cup. The pumpkin and spices are flavorful enough that you won’t miss the extra sweetness. I’ve also used coconut sugar for a deeper, caramel-like sweetness.
Crumb Topping Variation: Reserve 1/2 cup of the crust mixture before pressing it into the pan. Sprinkle it over the top of the filling before baking. It creates a crunchy, buttery topping that adds texture. Just be careful not to press it into the filling—let it sit on top.
Mini Bars for Parties: Use a mini muffin tin lined with paper liners. Press a small amount of crust into each cup, add a spoonful of filling, and bake for about 15-18 minutes. These are perfect for holiday parties or lunchbox treats. You’ll get about 24 mini bars.
Serving & Storage Suggestions
These bars are versatile enough for any occasion. Here’s how I like to serve and store them.
Serving Temperature: I prefer these bars cold, straight from the fridge. The filling is firm and creamy, and the crust stays crunchy. But they’re also delicious at room temperature—the filling softens slightly and becomes almost mousse-like. For a special treat, warm a slice in the microwave for 10-15 seconds and top with a scoop of vanilla ice cream.
Presentation Ideas: Cut the bars into clean squares and arrange them on a platter. Top each one with a dollop of whipped cream and a sprinkle of cinnamon or crushed gingersnaps. For Thanksgiving, I like to dust the tops with a little powdered sugar through a fine-mesh strainer. It makes them look elegant with almost no effort.
What to Serve With Them: A cup of hot coffee or spiced chai is the perfect pairing. The bitterness of the coffee balances the sweetness of the bars. For a dessert spread, serve them alongside apple crisp or pumpkin bread. They also pair beautifully with a glass of cold milk—my kids’ preferred method.
Storage Instructions: Store the bars in an airtight container in the refrigerator for up to 5 days. Layer them between sheets of parchment paper so they don’t stick together. The flavor actually improves after a day or two as the spices meld with the cheesecake.
Freezing Instructions: These bars freeze beautifully. Wrap individual slices tightly in plastic wrap, then place them in a freezer-safe bag or container. They’ll keep for up to 3 months. To thaw, transfer a slice to the refrigerator overnight or let it sit at room temperature for about 30 minutes. The crust stays surprisingly crunchy even after freezing.
Reheating Tips: If you like warm cheesecake bars, microwave individual slices for 10-15 seconds. Don’t overheat or the filling will become runny. For a larger crowd, let the bars sit at room temperature for 20 minutes before serving—they’ll soften slightly without becoming too warm.
Nutritional Information & Benefits
While these bars are definitely a treat, they do offer some nutritional benefits worth noting. Here’s the estimated breakdown per bar (based on 16 servings).
| Nutrient | Amount Per Bar |
|---|---|
| Calories | 285 |
| Total Fat | 18g |
| Saturated Fat | 10g |
| Cholesterol | 70mg |
| Sodium | 220mg |
| Total Carbohydrates | 28g |
| Dietary Fiber | 1g |
| Sugars | 18g |
| Protein | 4g |
| Vitamin A | 35% DV |
Health Highlights: Pumpkin is packed with vitamin A, which supports eye health and immune function. It’s also a good source of fiber and antioxidants. The cream cheese provides calcium and protein, though it’s also high in saturated fat, so moderation is key. The ginger in the crust and filling has anti-inflammatory properties and can aid digestion—perfect after a heavy holiday meal.
Dietary Considerations: This recipe contains dairy and gluten. For a gluten-free version, use gluten-free gingersnaps. For a dairy-free version, use plant-based cream cheese and butter. The recipe is nut-free as written, making it safe for school bake sales.
I believe in balance—these bars are a special treat, not an everyday snack. They’re perfect for holidays, gatherings, or those times when you just need a little comfort. One bar is plenty satisfying, and the richness means you won’t be tempted to go back for seconds.
Conclusion
These cozy pumpkin cheesecake bars with gingersnap crust have become my signature fall dessert, and I think they’ll become yours too. They’re the recipe I turn to when I want to impress without stress, when I want to make something special without spending a whole day in the kitchen, when I want to capture that cozy autumn feeling in every single bite.
What I love most about this recipe is how forgiving it is. The first time I made it, I forgot to set out the cream cheese and had to soften it in the microwave. The second time, I overbaked it by about 5 minutes. Both times, the bars were still delicious. This isn’t a fussy, high-maintenance recipe. It’s a reliable, forgiving, always-delicious recipe that makes you look like a hero.
I’d love to hear how yours turn out. Did you try any of the variations? Did you add your own twist? Drop a comment below and let me know. And if you share a photo on Pinterest or Instagram, tag me—I love seeing your creations. Honestly, this recipe is meant to be shared, adapted, and made your own. So go ahead, preheat that oven, and make some cozy magic. Your kitchen is about to smell incredible.
Frequently Asked Questions
Can I use a different type of cookie for the crust?
Absolutely. Graham crackers, vanilla wafers, or even shortbread cookies work well. The gingersnap adds a unique spice that complements the pumpkin, but you can experiment with whatever you have on hand. If you use a milder cookie, consider adding 1/2 teaspoon of cinnamon and 1/4 teaspoon of ginger to the crust mixture.
Why did my cheesecake bars crack on top?
Cracks usually happen from overmixing the batter or overbaking. Mix just until the ingredients are combined, and take the bars out of the oven when the center still has a slight jiggle. Cooling them slowly—first at room temperature, then in the fridge—also helps prevent cracks. If they do crack, don’t worry. A dollop of whipped cream covers a multitude of sins.
Can I make these bars ahead of time?
Yes, and I actually recommend it. These bars taste even better the next day after the flavors have had time to meld. You can make them up to 2 days ahead and store them in the refrigerator. They also freeze well for up to 3 months. Just thaw in the refrigerator overnight before serving.
How do I get clean, neat slices?
Use a sharp knife and wipe it clean between each cut. For the cleanest slices, dip the knife in hot water and dry it off before making each cut. Make sure the bars are fully chilled—at least 4 hours, preferably overnight. Cutting them too soon will give you messy edges.
Can I use fresh pumpkin instead of canned?
You can, but you’ll need to roast and puree the pumpkin first, then drain any excess liquid. Fresh pumpkin has a higher water content than canned, which can make the filling watery. If you use fresh, spread the puree on a paper towel-lined plate and let it sit for 10 minutes to absorb some of the moisture before adding it to the batter.
Pin This Recipe!
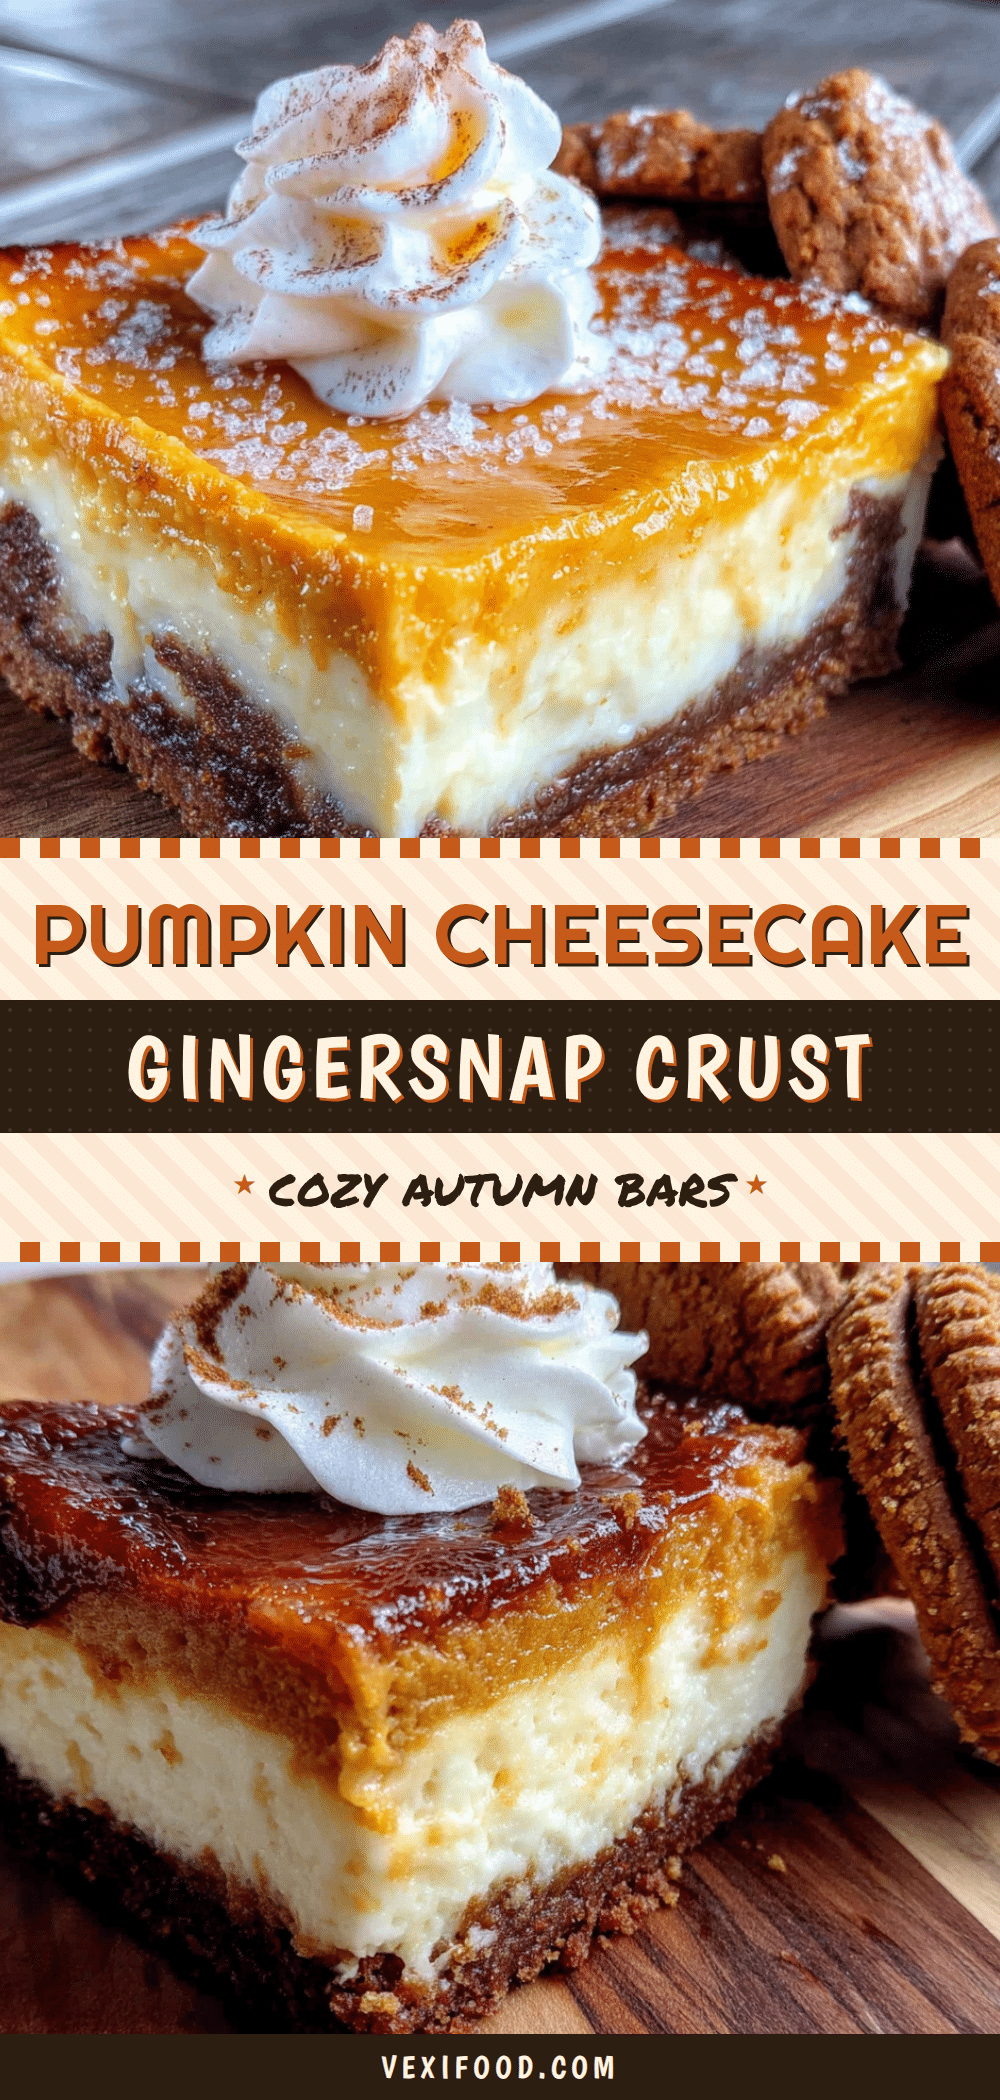
Cozy Pumpkin Cheesecake Bars with Gingersnap Crust
These cozy pumpkin cheesecake bars feature a spiced gingersnap crust and a silky pumpkin cheesecake filling. They’re the perfect fall dessert—simple to make, budget-friendly, and guaranteed to impress.
- Prep Time: 45 minutes
- Cook Time: 35-40 minutes
- Total Time: 1 hour 20 minutes (plus 4 hours chilling)
- Yield: 16 servings 1x
- Category: Dessert
- Cuisine: American
Ingredients
- 2 cups (about 200g) gingersnap cookie crumbs
- 5 tablespoons (70g) unsalted butter, melted
- 2 tablespoons (25g) granulated sugar
- Pinch of salt
- 16 ounces (450g) cream cheese, softened to room temperature
- 3/4 cup (150g) granulated sugar
- 1 teaspoon vanilla extract
- 2 large eggs, room temperature
- 1 cup (245g) pumpkin puree
- 1 teaspoon ground cinnamon
- 1/2 teaspoon ground ginger
- 1/4 teaspoon ground nutmeg
- 1/4 teaspoon ground cloves
- 1/4 teaspoon salt
- 1/2 cup (120ml) heavy cream (optional, for topping)
- 1 tablespoon powdered sugar (optional, for topping)
- Additional crushed gingersnaps for garnish (optional)
Instructions
- Preheat your oven to 350°F (175°C). Line a 9×9-inch baking pan with parchment paper, leaving a 2-inch overhang on two opposite sides. Lightly spray with non-stick spray if desired.
- In a medium bowl, combine 2 cups gingersnap crumbs, 5 tablespoons melted butter, 2 tablespoons sugar, and a pinch of salt. Stir until the mixture looks like wet sand.
- Press the crust mixture firmly and evenly into the prepared pan using the bottom of a measuring cup or a flat-bottomed glass. Bake for 10 minutes, then set aside to cool slightly.
- In a large bowl, beat 16 ounces softened cream cheese with an electric mixer on medium speed until smooth and creamy, about 2 minutes. Scrape down the sides and bottom of the bowl.
- Add 3/4 cup sugar and 1 teaspoon vanilla extract. Beat on medium speed until combined, about 1 minute. Scrape the bowl again.
- Add the eggs one at a time, beating on low speed just until incorporated after each addition. Do not overmix.
- Add 1 cup pumpkin puree, 1 teaspoon cinnamon, 1/2 teaspoon ginger, 1/4 teaspoon nutmeg, 1/4 teaspoon cloves, and 1/4 teaspoon salt. Beat on low speed until just combined. Scrape the bowl.
- Pour the filling over the pre-baked crust and spread evenly. Gently tap the pan on the counter to release air bubbles.
- Bake at 350°F for 35-40 minutes, until the edges are set and the center jiggles slightly when shaken. Start checking at 30 minutes.
- Cool the pan on a wire rack to room temperature, about 1-2 hours.
- Cover the pan with plastic wrap or foil and refrigerate for at least 4 hours, preferably overnight.
- When ready to serve, lift the bars out using the parchment paper handles. Cut into 16 squares (4×4) with a sharp knife, wiping the knife clean between cuts.
Notes
For best results, ensure cream cheese and eggs are at room temperature. Do not overmix the batter to prevent cracking. The bars taste even better the next day. For gluten-free, use gluten-free gingersnaps. For dairy-free, use plant-based cream cheese and butter.
Nutrition
- Serving Size: 1 bar
- Calories: 285
- Sugar: 18
- Sodium: 220
- Fat: 18
- Saturated Fat: 10
- Carbohydrates: 28
- Fiber: 1
- Protein: 4
Keywords: pumpkin cheesecake bars, gingersnap crust, fall dessert, pumpkin dessert, cheesecake bars, easy pumpkin recipe



