Love this? Save it for later!
Share the inspiration with your friends
It was 11:47 PM on a rainy Wednesday in October, and I had a sudden, desperate need to make something ridiculous. The kind of need that hits you when the weather is gross, the kids are finally asleep, and your inner child is screaming for attention. I didn’t have any fancy piping tips or food coloring gels, but I had a roll of store-bought sugar cookie dough, a bag of powdered sugar, and the absolute worst idea I could think of. I wanted to make something that would make my neighbor, Karen, do a double-take when I brought them to the block party.
Honestly, I wasn’t even trying to be a hero. I was just bored. But as I sat there, staring at a tube of red gel food coloring and a bag of chocolate chips, the idea hit me. Monster eyeball cookies. It was so simple, so perfectly gross, and so wonderfully silly that I laughed out loud. I mean, I scared the cat. But in that moment, I knew I was onto something. Maybe you’ve been there—that late-night, slightly unhinged creative burst where the best, weirdest recipes are born.
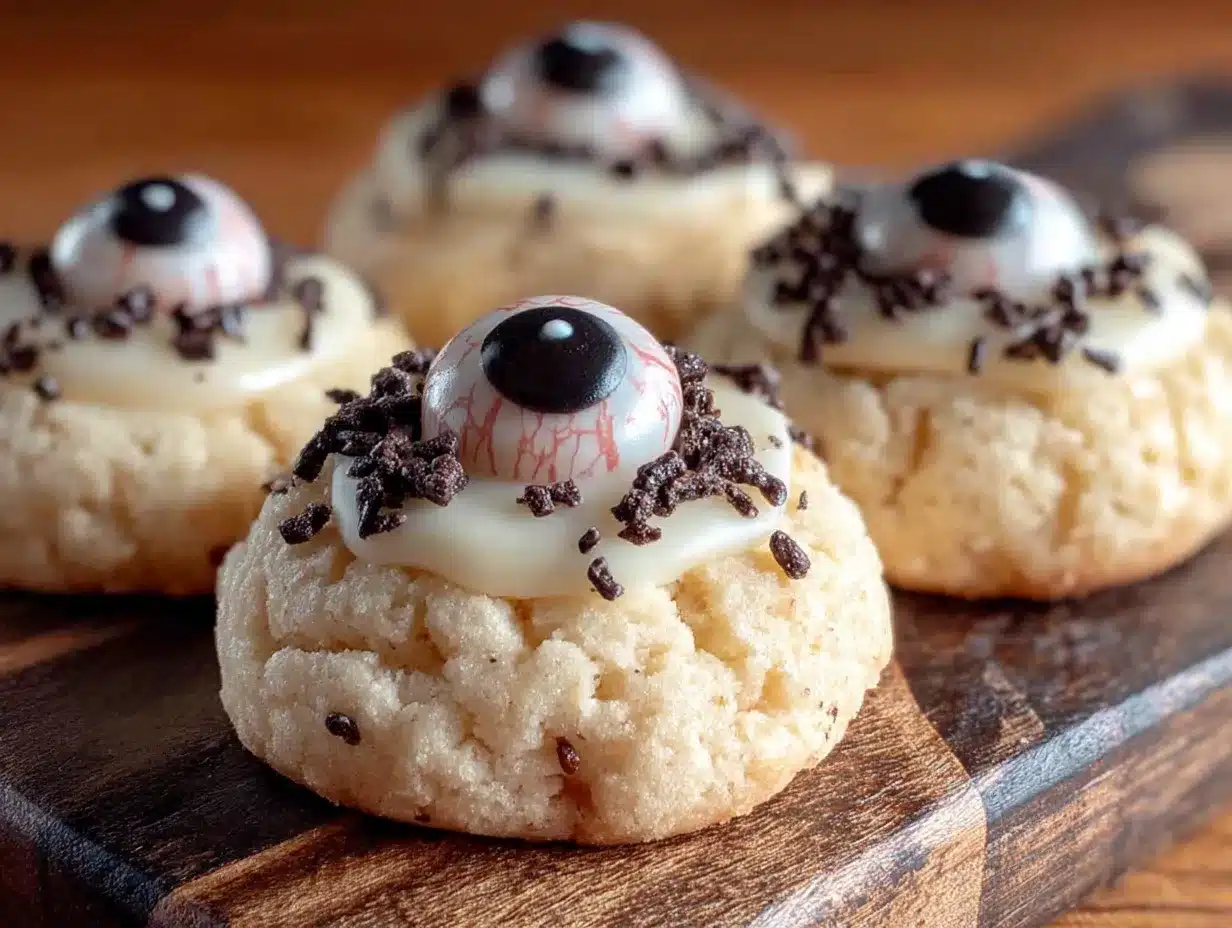
These Spooky Monster Eyeball Sugar Cookies aren’t just a treat; they’re a statement. They’re the kind of cookie that makes people stop, point, and laugh before they even take a bite. And when they do take a bite? They get a perfectly soft, buttery sugar cookie with a sweet, gooey center. It’s the perfect balance of spooky and delicious, and I’ve been making them every Halloween since that rainy night. They’re the recipe that keeps on giving—mostly in the form of horrified delight.
Why You’ll Love This Recipe
Let’s be real for a second. Halloween baking can be a huge pain. Between the intricate piping, the multiple colors of frosting, and the time it takes to make everything look “perfect,” it’s easy to get overwhelmed. These Spooky Monster Eyeball Sugar Cookies are the exact opposite of that. They are designed to be fun, forgiving, and absolutely foolproof.
- Quick & Easy: From start to finish, you’re looking at about 30 minutes of active time. The dough comes together in a snap, and the decorating is so simple a five-year-old can do it (and have a blast).
- Simple Ingredients: You probably already have everything in your pantry. No fancy extracts, no hard-to-find sprinkles. Just butter, sugar, flour, and a few pantry staples.
- Perfect for Halloween Parties: These cookies are the undisputed star of any Halloween gathering. They are guaranteed to get a reaction—whether it’s a laugh, a scream, or a “how did you do that?”
- Crowd-Pleaser: Forget the picky eaters. Everyone loves a sugar cookie, and the “gross” factor makes them even more appealing to kids and adults alike.
- Unbelievably Delicious: Underneath all that spooky fun is a genuinely excellent sugar cookie. It’s soft in the center, slightly crisp on the edges, and has a rich, buttery flavor that disappears way too fast.
What makes these different from every other Halloween cookie out there? It’s the texture. I use a special trick—a tiny dollop of jam or red gel in the center of the “eyeball”—that creates a sticky, gooey, slightly unsettling “pupil” that makes the cookie look disturbingly real. It’s a small detail, but it makes all the difference. This isn’t just another decorated cookie; it’s an experience. It’s the kind of treat that makes you close your eyes after the first bite, not because it’s scary, but because it’s so darn good.
What Ingredients You Will Need
This recipe uses simple, wholesome ingredients to create a canvas for your spooky masterpiece. You likely have most of these in your pantry already, which makes this a perfect last-minute Halloween project.
- For the Sugar Cookie Dough:
- 1 cup (226g) unsalted butter, softened (I prefer using Kerrygold for its superior flavor, but any good quality butter works). Make sure it’s truly soft—you should be able to press a finger into it easily.
- 1 cup (200g) granulated sugar (Regular white sugar is perfect. Don’t use brown sugar; it will change the color and texture of the cookie).
- 1 large egg, room temperature (If you forget to take it out of the fridge, place it in a bowl of warm water for 5 minutes).
- 1 teaspoon vanilla extract (Pure vanilla extract is best, but imitation works in a pinch).
- 2 ½ cups (312g) all-purpose flour (Spoon and level it into your measuring cup for the most accurate measurement).
- ½ teaspoon baking powder (Make sure it’s not expired—test it by dropping a little in hot water; it should fizz).
- ¼ teaspoon salt (I use fine sea salt. It balances the sweetness perfectly).
- For the “Eyeball” Decoration:
- 1 cup (120g) powdered sugar (For the basic icing. Sift it first to avoid lumps).
- 2-3 tablespoons milk (Whole milk gives the best consistency, but any milk works. Add it slowly until you get a thick, pipeable paste).
- Red gel food coloring (This is non-negotiable for the “bloodshot” effect. I recommend Americolor Super Red for a vibrant, true red).
- Black gel food coloring (For the pupils. Again, gel is better than liquid for a deep, dark color).
- 1 jar (12 oz) strawberry or raspberry jam (This is my secret weapon! The jam creates a sticky, glossy “pupil” that looks disturbingly real. Apricot jam works too, but the red color is better).
- Optional: Small piping bags or zip-top bags (For easy decorating).
Equipment Needed
You don’t need a professional bakery setup to make these cookies. Just a few basic tools that you probably already have in your kitchen.
- Mixing bowls: One large for the dough, one small for the icing.
- Electric hand mixer or stand mixer: A hand mixer is perfectly fine. I’ve made these with a whisk and a lot of elbow grease, and it works, but a mixer makes the creaming process much easier.
- Measuring cups and spoons: For accuracy. Baking is a science, after all.
- Baking sheets: I use two standard half-sheet pans. Line them with parchment paper for easy cleanup.
- Parchment paper or silicone baking mat: A silicone mat is a game-changer for preventing sticking and ensuring even baking.
- Wire cooling rack: Essential for letting the cookies cool completely before decorating.
- Small piping bags or zip-top bags: For the icing and jam. Snip a tiny corner off the bag for precise piping.
- Toothpicks or a small skewer: For swirling the icing and creating the “vein” effect.
A tip from experience: if you’re using a zip-top bag for piping, don’t fill it more than halfway. It’s much easier to control the flow, and you won’t end up with a giant mess on your hands. Trust me on this one.
Preparation Method
Alright, let’s get to the fun part. Follow these steps, and you’ll have a batch of the creepiest, most delicious cookies on the block.
- Make the Dough: In a large bowl, beat the softened butter and granulated sugar together with an electric mixer on medium speed until light and fluffy—about 2-3 minutes. You want it to look pale and almost creamy. Scrape down the sides of the bowl. Add the egg and vanilla extract, and beat until just combined. Don’t overmix here, or the cookies will be tough.
- Add the Dry Ingredients: In a separate bowl, whisk together the flour, baking powder, and salt. Gradually add the dry ingredients to the wet ingredients, mixing on low speed until a soft dough forms. The dough should come together easily and not be sticky. If it feels too sticky, add a tablespoon more of flour. If it feels dry and crumbly, add a teaspoon of milk.
- Chill the Dough (Optional but Recommended): Wrap the dough in plastic wrap and refrigerate for at least 30 minutes. This step is not strictly necessary, but it makes the dough much easier to handle and prevents the cookies from spreading too much in the oven. I’ve skipped it in a pinch, and the cookies still turned out great—just a little flatter.
- Preheat & Shape: Preheat your oven to 350°F (175°C). Line your baking sheets with parchment paper. Roll the dough into 1-inch balls (about the size of a walnut). Place them on the prepared baking sheets, leaving about 2 inches of space between each ball. You don’t need to flatten them; they will spread on their own.
- Bake: Bake for 8-10 minutes, or until the edges are just barely starting to turn golden brown. The centers will look slightly puffy and underdone—that’s perfect. Don’t overbake them! Overbaked cookies will be dry and hard, and they won’t hold the decoration well. Let them cool on the baking sheet for 5 minutes before transferring them to a wire cooling rack to cool completely.
- Make the Icing: While the cookies are cooling, make the icing. In a small bowl, whisk together the powdered sugar and 2 tablespoons of milk. Add more milk, one teaspoon at a time, until you have a thick, smooth paste. It should be thick enough to hold its shape when piped, but not so thick that it’s hard to squeeze out of the bag. Divide the icing into two bowls. Color one bowl with red gel food coloring and the other with black gel food coloring. Transfer each color to its own piping bag or zip-top bag.
- Create the “Eyeball”: Once the cookies are completely cool, it’s time to decorate. Take a cooled cookie and pipe a small circle of white icing in the center. This will be the “white” of the eyeball. Don’t worry if it’s not perfect—the messier, the better! It adds to the monster effect.
- Add the “Pupil”: While the white icing is still wet, use a toothpick or a small skewer to dab a tiny drop of red jam into the center of the white icing. The jam will spread slightly and create a glossy, bloody-looking pupil. If you want a more cartoonish look, pipe a small dot of black icing instead. But trust me, the jam is the secret to the truly “spooky” effect.
- Create the “Bloodshot” Veins: Using the red icing, pipe a few thin lines radiating out from the center of the “eyeball.” Use a toothpick to gently swirl the red lines into the white icing, creating a veiny, bloodshot effect. Don’t over-swirl—you want it to look organic and a little messy.
- Let the Icing Set: Allow the decorated cookies to sit at room temperature for at least 30 minutes so the icing can set. This will prevent the design from smudging when you stack them. And that’s it! You’ve just made a batch of the most horrifyingly delightful cookies ever.
Cooking Tips & Techniques
I’ve made these cookies about a dozen times now, and I’ve learned a few things the hard way. Here are my best tips for guaranteed success.
- Don’t Overbake! This is the number one mistake. Pull the cookies out when the edges are just barely golden. They will continue to cook on the hot baking sheet as they cool. Overbaked cookies are crumbly and won’t hold the icing well.
- Use Room Temperature Ingredients: Cold butter won’t cream properly with the sugar, and cold egg can seize the dough. It makes a surprisingly big difference in the texture of the final cookie.
- The Jam is Key: I know it sounds weird, but the jam is what makes these cookies look like real, gooey eyeballs. Don’t skip it. If you don’t have strawberry or raspberry jam, you can use a drop of red gel food coloring mixed with a tiny bit of corn syrup.
- Work in Batches: Don’t try to decorate all the cookies at once. Decorate 4-5 cookies at a time, letting the icing set before moving on. This prevents the icing from bleeding together and creating a muddy mess.
- The Toothpick is Your Best Friend: For creating the veins, a toothpick gives you way more control than a piping bag. Use it to drag the red icing through the white, creating thin, natural-looking lines.
I once made the mistake of using liquid food coloring instead of gel. The icing turned into a watery mess, and the colors bled everywhere. It looked like a crime scene on a cookie sheet. Learn from my failure—always use gel food coloring for vibrant, stable colors.
Variations & Adaptations
One of the best things about this recipe is how easy it is to adapt. Here are a few fun variations I’ve tried over the years.
- Gluten-Free Monster Eyeballs: Substitute the all-purpose flour with a 1:1 gluten-free baking flour blend. I’ve used Bob’s Red Mill 1-to-1 Baking Flour with great results. The texture will be slightly more tender, but they still taste amazing.
- Vegan Eyeball Cookies: Use vegan butter and a flax egg (1 tablespoon ground flaxseed mixed with 3 tablespoons water) instead of the regular egg. The cookies will be a little denser, but they’re still deliciously spooky.
- Chocolate Monster Eyeballs: Replace ¼ cup of the all-purpose flour with ¼ cup of unsweetened cocoa powder. The dark chocolate cookie base makes the red and white icing pop even more. It’s like a double dose of spooky!
- Different “Pupil” Colors: Instead of red jam, try using blueberry jam for a blue eyeball, or a drop of green gel food coloring for an alien-like look. You can even use a small candy eyeball on top of the icing for a different texture.
- Spicy Eyeballs: Add ½ teaspoon of cayenne pepper or a pinch of chili powder to the dough. The sweet and spicy combination is surprisingly addictive and adds a whole new level of “monster” to the cookie.
My personal favorite variation is the chocolate one. I made it last Halloween for a “zombie” themed party, and they were gone in minutes. The dark dough makes the red veins look even more gruesome—it’s perfect.
Serving & Storage Suggestions
These cookies are best served at room temperature, but they’re also delicious straight from the fridge (the icing gets a little firmer, which is nice).
- Serving: Arrange them on a platter with some fake spiderwebs and plastic spiders for maximum spooky effect. They’re perfect for Halloween parties, school bake sales, or just a fun family movie night. Pair them with a glass of cold milk or a warm mug of apple cider.
- Storage: Store the decorated cookies in an airtight container at room temperature for up to 5 days. Place a sheet of parchment paper between layers to prevent the icing from sticking. Do not refrigerate them, as the cookies will dry out and the icing can get sticky.
- Freezing: You can freeze the undecorated, baked cookies for up to 3 months. Just let them cool completely, place them in a single layer in a freezer-safe bag, and thaw them at room temperature before decorating. The icing itself does not freeze well, so always decorate after thawing.
I’ve found that the flavors actually meld together better after a day or two. The jam soaks into the cookie slightly, and the icing sets into a perfect, glossy shell. So don’t be afraid to make them a day ahead of your party!
Nutritional Information & Benefits
Let’s be honest: these are a treat, not a health food. But that doesn’t mean they can’t have some redeeming qualities!
- Estimated Nutritional Values (per cookie, based on 24 cookies): Calories: 180, Fat: 8g, Carbohydrates: 26g, Protein: 2g, Sugar: 15g. (These are estimates and will vary based on your specific ingredients and portion sizes).
- Health Benefits: The butter provides a good source of Vitamin A, and the egg adds a little protein. The jam, believe it or not, contains some fruit antioxidants. It’s a small comfort, but it’s there!
- Dietary Considerations: This recipe contains gluten, dairy, and eggs. For gluten-free or vegan options, please see the Variations section above. They are not low-carb or keto-friendly.
- Potential Allergens: Contains wheat, milk, and eggs. May contain traces of nuts if you use a nut-based milk alternative.
My personal take? These cookies are about joy, not nutrition. They’re a special treat for a special occasion. Eat one, enjoy it, and don’t feel bad about it. Life is too short to not eat monster eyeball cookies.
Conclusion
These Spooky Monster Eyeball Sugar Cookies are more than just a recipe—they’re a memory in the making. They’re the cookies you’ll bring to the party and watch everyone’s face light up. They’re the cookies your kids will beg to make every single October. And they’re the cookies you’ll secretly look forward to all year long.
I love this recipe because it’s a perfect blend of my two favorite things: baking and being a little bit silly. It reminds me that cooking doesn’t have to be serious. It can be messy, weird, and absolutely hilarious. So go ahead—embrace the chaos. Make a mess. And then eat the evidence.
I’d love to see your creations! Drop a comment below and tell me how your monster eyeballs turned out. Did you try a fun variation? Did your kids freak out? Share your stories and photos—I can’t wait to see them. Happy Halloween, and happy baking!
Frequently Asked Questions
Can I use a pre-made sugar cookie dough?
Absolutely! If you’re short on time, a roll of store-bought sugar cookie dough works perfectly. Just follow the baking instructions on the package and proceed with the decorating steps. The taste will be slightly different, but the spooky factor remains the same.
My cookies spread too much in the oven. What went wrong?
This usually happens if the butter was too soft or the dough wasn’t chilled long enough. Make sure your butter is just softened, not melted, and don’t skip the chilling step. If your kitchen is warm, pop the dough balls in the fridge for 10 minutes before baking.
Can I make the icing ahead of time?
Yes, you can make the icing up to 2 days in advance. Store it in an airtight container in the refrigerator. When you’re ready to use it, let it come to room temperature and give it a good stir. You may need to add a drop or two of milk to thin it out.
My red icing looks pink, not red. How do I fix that?
This is a common issue! The key is to use gel food coloring, not liquid. Start with a small amount and add more until you reach your desired shade. For a true, deep red, you might need to use a lot of gel. Don’t be afraid to be generous—it won’t affect the taste.
Can I use candy eyeballs instead of making my own?
Definitely! If you want a quicker, easier option, you can buy pre-made candy eyeballs at most craft stores or online. Just press them gently into the wet icing on top of the cookie. They won’t look as “gooey” and realistic, but they’re still super cute and spooky.
Pin This Recipe!

Spooky Monster Eyeball Cookies | Easy Halloween Recipe

These Spooky Monster Eyeball Sugar Cookies are a fun, easy Halloween treat that combines a soft, buttery sugar cookie with a gooey, jam-filled ‘eyeball’ center. Perfect for parties, they’re guaranteed to get a laugh and a double-take.
- Prep Time: 30 minutes
- Cook Time: 10 minutes
- Total Time: 40 minutes
- Yield: 24 cookies 1x
- Category: Dessert
- Cuisine: American
Ingredients
- 1 cup (226g) unsalted butter, softened
- 1 cup (200g) granulated sugar
- 1 large egg, room temperature
- 1 teaspoon vanilla extract
- 2 ½ cups (312g) all-purpose flour
- ½ teaspoon baking powder
- ¼ teaspoon salt
- 1 cup (120g) powdered sugar
- 2–3 tablespoons milk
- Red gel food coloring
- Black gel food coloring
- 1 jar (12 oz) strawberry or raspberry jam
Instructions
- Make the Dough: In a large bowl, beat the softened butter and granulated sugar together with an electric mixer on medium speed until light and fluffy—about 2-3 minutes. Scrape down the sides of the bowl. Add the egg and vanilla extract, and beat until just combined.
- Add the Dry Ingredients: In a separate bowl, whisk together the flour, baking powder, and salt. Gradually add the dry ingredients to the wet ingredients, mixing on low speed until a soft dough forms.
- Chill the Dough (Optional but Recommended): Wrap the dough in plastic wrap and refrigerate for at least 30 minutes.
- Preheat & Shape: Preheat your oven to 350°F (175°C). Line your baking sheets with parchment paper. Roll the dough into 1-inch balls. Place them on the prepared baking sheets, leaving about 2 inches of space between each ball.
- Bake: Bake for 8-10 minutes, or until the edges are just barely starting to turn golden brown. Let them cool on the baking sheet for 5 minutes before transferring them to a wire cooling rack to cool completely.
- Make the Icing: In a small bowl, whisk together the powdered sugar and 2 tablespoons of milk. Add more milk, one teaspoon at a time, until you have a thick, smooth paste. Divide the icing into two bowls. Color one bowl with red gel food coloring and the other with black gel food coloring. Transfer each color to its own piping bag or zip-top bag.
- Create the ‘Eyeball’: Once the cookies are completely cool, pipe a small circle of white icing in the center of each cookie.
- Add the ‘Pupil’: While the white icing is still wet, use a toothpick or a small skewer to dab a tiny drop of red jam into the center of the white icing.
- Create the ‘Bloodshot’ Veins: Using the red icing, pipe a few thin lines radiating out from the center of the ‘eyeball.’ Use a toothpick to gently swirl the red lines into the white icing, creating a veiny, bloodshot effect.
- Let the Icing Set: Allow the decorated cookies to sit at room temperature for at least 30 minutes so the icing can set.
Notes
Don’t overbake! Pull the cookies out when the edges are just barely golden. Use room temperature ingredients for best texture. The jam is key for the realistic ‘eyeball’ effect. Work in batches to prevent icing from bleeding. Use gel food coloring for vibrant colors.
Nutrition
- Serving Size: 1 cookie
- Calories: 180
- Sugar: 15
- Sodium: 80
- Fat: 8
- Saturated Fat: 5
- Carbohydrates: 26
- Protein: 2
Keywords: Halloween cookies, monster eyeball cookies, sugar cookies, easy Halloween recipe, spooky cookies