Love this? Save it for later!
Share the inspiration with your friends
I wasn’t expecting cooking advice from the woman at the garden nursery, but there I was, elbow-deep in a bin of heirloom tomato seedlings, listening to her describe exactly how to make a skillet peach cobbler. Her name was Margaret, and she’d been running that nursery for forty years. She had dirt under her fingernails and a no-nonsense way of talking about food that made you believe every word. She said the secret wasn’t in the fruit—it was in the pan. A cast iron skillet, she told me, had memory. It remembered every peach that had ever caramelized in it.
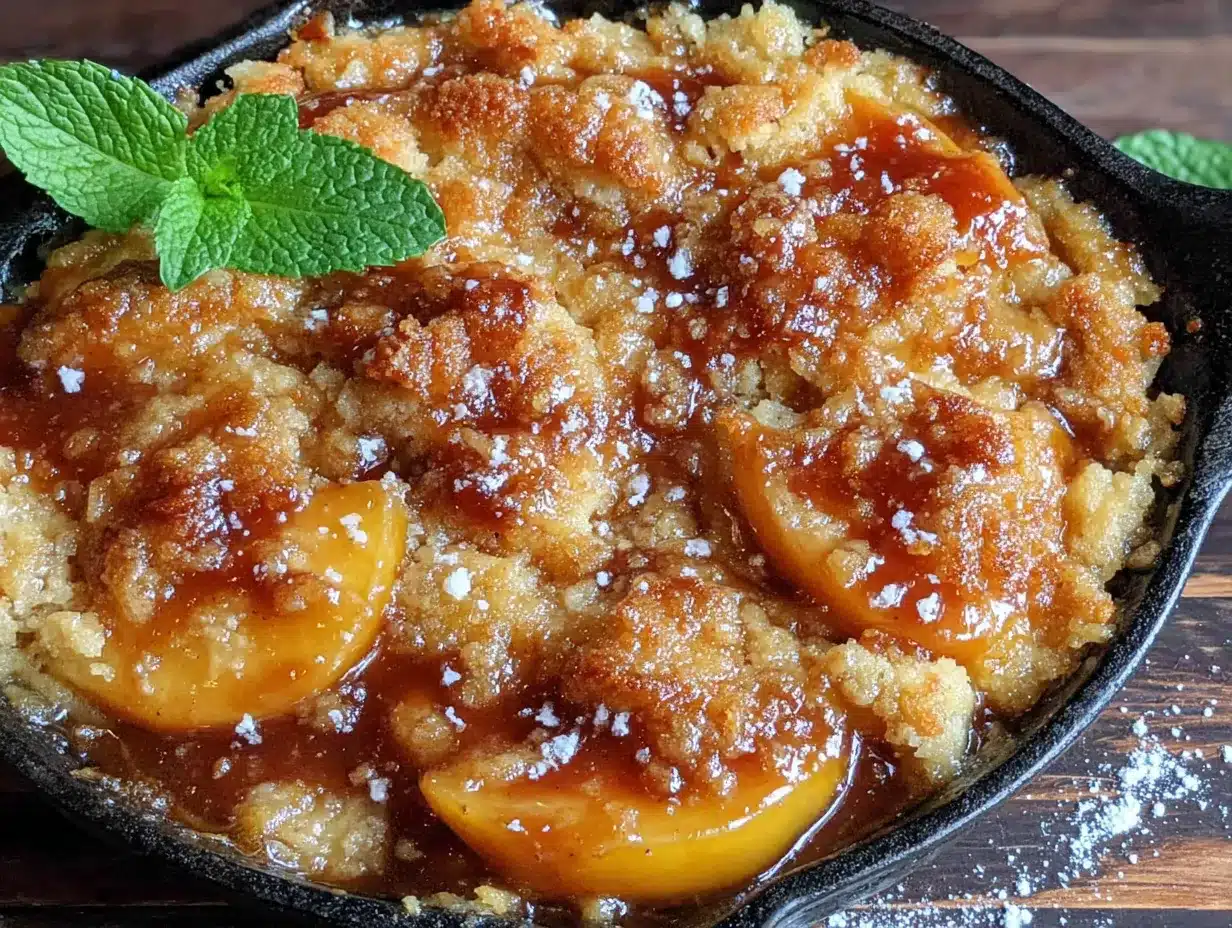
I bought a flat of peach trees that day. Honestly, I didn’t even have space for them. But Margaret had painted such a vivid picture of summer evenings and bubbling fruit that I couldn’t resist. The trees went into the ground that weekend, and for two years I waited. That first harvest was a mess—some were too soft, others not sweet enough—but I made that cobbler anyway. And you know what? It was still the best thing I’d ever baked. There’s something about a skillet that forces the fruit to behave. The heat distribution is uneven in the best way, creating pockets of jammy sweetness and crispy, golden edges.
This recipe is the result of many summers of trial and error. I’ve tweaked Margaret’s original advice, added a few tricks of my own, and landed on a version that works every single time. The batter is simple—flour, sugar, butter, a splash of milk—but the magic happens when you pour it over hot, bubbling peaches and let the oven do the rest. The edges get this incredible crust, almost like a cross between a biscuit and a pancake, while the center stays soft and tender. Maybe you’ve been there, standing over a hot skillet, spoon in hand, trying to decide if it’s cool enough to eat. It never is. But you eat it anyway.
Why You’ll Love This Recipe
I’ve tested this skillet peach cobbler more times than I care to admit, and I can tell you with confidence: this is the one. It’s not just another fruit dessert—it’s the kind that makes people close their eyes after the first bite. Here’s why this recipe stands out:
- Quick & Easy: From start to table in about 45 minutes. No complicated steps, no fancy techniques. Just simple, honest cooking.
- Simple Ingredients: You probably have everything in your pantry right now. Flour, sugar, butter, milk, and peaches. That’s it. No trips to specialty stores required.
- Perfect for Summer Gatherings: This cobbler was made for backyard barbecues, porch dinners, and lazy Sunday afternoons. It’s the dessert everyone gravitates toward.
- Crowd-Pleaser: I’ve served this to picky kids, skeptical in-laws, and professional chefs. Every single person has asked for the recipe. It’s that good.
- Unbelievably Delicious: The contrast between the juicy, caramelized peaches and the buttery, golden crust is pure comfort food magic. It’s the kind of dessert that makes you forget about store-bought versions forever.
What makes this cobbler different from the rest? It’s the skillet technique. By preheating the butter in the cast iron pan before adding the batter, you create an instant, crispy edge that regular baking dishes just can’t replicate. The batter rises up around the fruit, creating pockets of soft dough and crunchy bits. It’s a texture lover’s dream. And because we’re using fresh or frozen peaches, you can make this year-round. This isn’t just another version of peach cobbler—it’s the version you’ll come back to again and again.
What Ingredients You Will Need
This recipe uses simple, wholesome ingredients that work together to create something truly special. Most of these are pantry staples, which makes this cobbler perfect for spontaneous baking.
For the Peach Filling:
- 6 cups fresh peaches, peeled and sliced (about 6-7 medium peaches) — Use ripe but firm peaches for the best texture. If peaches aren’t in season, frozen sliced peaches work beautifully. Just thaw and drain them first.
- 1/2 cup granulated sugar — Adjust based on the sweetness of your fruit. If your peaches are super ripe, you can cut this back to 1/3 cup.
- 1 tablespoon lemon juice — Fresh squeezed is best. It brightens the fruit and prevents browning.
- 1 teaspoon vanilla extract — Pure vanilla adds warmth and depth. I use Nielsen-Massey for the best flavor.
- 1 tablespoon cornstarch — This helps thicken the juices so the cobbler isn’t runny.
- 1/2 teaspoon ground cinnamon — Optional, but I love the warmth it adds. You can also use nutmeg or cardamom.
For the Batter:
- 1 cup all-purpose flour — Spoon and level for accuracy. Too much flour makes the batter dense.
- 1 cup granulated sugar — This creates a slightly crisp top crust.
- 1 teaspoon baking powder — Make sure it’s fresh for proper rise.
- 1/2 teaspoon salt — Balances the sweetness and enhances flavor.
- 1 cup whole milk — Whole milk gives the richest texture. You can use 2% or oat milk in a pinch.
- 1/2 cup unsalted butter — This goes into the skillet to melt while the oven preheats. Use salted butter if that’s what you have, just reduce the added salt to 1/4 teaspoon.
- 1 teaspoon vanilla extract — For that extra layer of flavor.
Optional Toppings:
- Vanilla ice cream — The classic pairing. The cold creaminess against warm cobbler is unbeatable.
- Whipped cream — For a lighter option.
- Caramel drizzle — If you’re feeling extra indulgent.
- Fresh mint leaves — For a pop of color and freshness.
Equipment Needed
You don’t need much for this recipe, which is part of its charm. Here’s what you’ll want to have on hand:
- 10-inch cast iron skillet — This is non-negotiable for the best results. The even heat distribution and heat retention create that perfect crispy edge. If you don’t have one, a 9×13 baking dish will work, but the texture won’t be quite the same.
- Large mixing bowl — For combining the peaches and dry ingredients.
- Medium mixing bowl — For the batter.
- Whisk — For smoothing out the batter.
- Rubber spatula — For scraping every last bit of batter into the skillet.
- Paring knife — For peeling and slicing peaches.
- Measuring cups and spoons — Accuracy matters in baking.
- Oven mitts — The skillet handle gets dangerously hot.
If you’re new to cast iron cooking, don’t be intimidated. A well-seasoned skillet is naturally non-stick and gets better with use. I found mine at a thrift store for ten dollars, and it’s my most-used pan. Just avoid using soap when cleaning it—a stiff brush and hot water are all you need. Dry it immediately and rub a thin layer of oil inside to prevent rust.
Preparation Method
Let’s walk through this step by step. I’ve included all the little details that make the difference between a good cobbler and a great one.
- Preheat your oven to 375°F (190°C). Place your 10-inch cast iron skillet in the oven with the butter. Let the butter melt while the oven heats up. This takes about 10 minutes. Don’t rush this step—the hot butter is what creates that golden, crispy bottom crust.
- Prepare the peaches. While the oven is preheating, peel and slice your peaches. If you’re using fresh peaches, score a small X on the bottom of each one, drop them in boiling water for 30 seconds, then transfer to an ice bath. The skins will slip right off. Slice them into 1/2-inch thick wedges. You want them thick enough to hold their shape but thin enough to cook through.
- Make the filling. In a large bowl, combine the sliced peaches, 1/2 cup sugar, lemon juice, vanilla extract, cornstarch, and cinnamon. Toss gently to coat. Let this sit while you make the batter. The sugar will draw out the peach juices, creating that luscious syrup.
- Make the batter. In a medium bowl, whisk together the flour, 1 cup sugar, baking powder, and salt. Add the milk and vanilla extract. Whisk until just combined. A few lumps are fine—overmixing will make the cobbler tough. The batter should be thin, like a loose pancake batter.
- Assemble the cobbler. Carefully remove the hot skillet from the oven. The butter should be fully melted and bubbling. Pour the batter directly over the melted butter. Do not stir. The batter will start to cook immediately from the heat of the pan, creating that signature crispy edge.
- Add the peaches. Spoon the peach mixture evenly over the batter. Again, do not stir. The batter will rise up around the fruit as it bakes, creating pockets of soft dough. This is the magic of skillet cobbler.
- Bake. Place the skillet in the oven and bake for 35-40 minutes. The cobbler is done when the top is golden brown and the edges are bubbling. The center should be set but still slightly jiggly. A toothpick inserted into the batter (not the fruit) should come out clean.
- Cool and serve. Let the cobbler cool on a wire rack for at least 15 minutes. This allows the filling to set up. Serve warm, with a scoop of vanilla ice cream if you’re feeling extra. The contrast between hot cobbler and cold ice cream is pure heaven.
Cooking Tips & Techniques
After making this cobbler more times than I can count, I’ve learned a few things the hard way. Here are my best tips for success:
- Don’t skip the hot skillet step. I know it’s tempting to just melt the butter in the microwave and pour it in, but trust me—the hot skillet is what creates that incredible crispy crust. The batter starts cooking the second it hits the pan, forming a barrier that keeps the bottom from getting soggy.
- Use a mix of ripe and firm peaches. If all your peaches are super ripe, the cobbler can turn mushy. If they’re all firm, it won’t be sweet enough. A mix gives you the best of both worlds—some jammy, tender pieces and some that hold their shape.
- Watch the baking time. Ovens vary wildly. Start checking at 30 minutes. If the top is browning too quickly, tent it loosely with foil. If it’s still pale at 40 minutes, give it another 5.
- Let it rest. I know it’s hard to wait, but letting the cobbler cool for at least 15 minutes is crucial. The filling needs time to set up, otherwise you’ll end up with a soupy mess. Trust me, I’ve made that mistake more than once.
- Don’t overmix the batter. Lumps are your friend. Overmixing develops gluten, which makes the cobbler tough and chewy. You want it tender and soft, like a warm biscuit.
One of my biggest failures with this recipe happened early on. I was in a hurry and skipped the step where you let the peaches sit with the sugar and cornstarch. The result? A watery, bland cobbler that looked sad on the plate. That 10-minute rest is non-negotiable—it draws out the natural juices and allows the cornstarch to start working its thickening magic.
Variations & Adaptations
One of the best things about this cobbler is how adaptable it is. Here are some variations I’ve tried and loved:
- Gluten-Free Option: Swap the all-purpose flour for a 1:1 gluten-free baking flour. I’ve had great results with Bob’s Red Mill. The texture is slightly more crumbly, but the flavor is still fantastic.
- Dairy-Free Version: Use a plant-based butter (like Miyoko’s) and oat milk. The cobbler won’t be quite as rich, but it’s still delicious. Just make sure your plant-based butter has a high fat content for the best results.
- Mixed Berry Cobbler: Replace half the peaches with fresh or frozen blueberries, raspberries, or blackberries. The combination of sweet peaches and tart berries is incredible. Adjust the sugar down by 2 tablespoons if using very sweet berries.
- Spiced Peach Cobbler: Add 1/4 teaspoon of ground ginger and a pinch of cardamom to the filling. It gives the cobbler a warm, chai-like flavor that’s perfect for fall.
- Savory-Sweet Twist: Add a tablespoon of fresh thyme leaves to the peach filling. It sounds weird, but the herbal notes cut through the sweetness beautifully. I tried this on a whim and it’s become my secret-weapon version.
- Individual Skillets: Divide the recipe among four 6-inch cast iron skillets. Reduce the baking time to 20-25 minutes. These are perfect for dinner parties—everyone gets their own little cobbler.
Serving & Storage Suggestions
This cobbler is best served warm, straight from the skillet. The contrast between the hot, bubbly fruit and cold ice cream is unbeatable. Here are my favorite ways to serve it:
- With vanilla ice cream: The classic pairing. The cold creaminess balances the warm, sweet fruit perfectly.
- With whipped cream: For a lighter option, a dollop of freshly whipped cream is lovely.
- On its own: Honestly, this cobbler is so good you don’t need anything else. The buttery crust and juicy peaches are enough.
- For breakfast: Don’t judge me. Leftover cobbler with a cup of coffee is one of life’s great pleasures.
For storage, let the cobbler cool completely, then cover the skillet tightly with foil or plastic wrap. It will keep in the refrigerator for up to 3 days. The texture will soften slightly, but the flavor actually gets better as the peaches meld with the batter. To reheat, place the skillet in a 350°F oven for 10-15 minutes, or microwave individual portions for 30 seconds. If you’re reheating in the oven, the edges will crisp back up nicely.
You can also freeze this cobbler. Let it cool completely, then wrap the entire skillet in plastic wrap and foil. Freeze for up to 3 months. To serve, thaw overnight in the refrigerator, then reheat in a 350°F oven until warm and bubbly. The texture won’t be quite as perfect as fresh, but it’s still a wonderful dessert to have on hand.
Nutritional Information & Benefits
While this cobbler is certainly a treat, it does have some redeeming qualities. Peaches are packed with vitamins A and C, which support immune health and skin health. They’re also a good source of fiber, especially if you leave the skins on (though I prefer them peeled for texture).
Here are the approximate nutritional values per serving (based on 8 servings):
- Calories: 320
- Fat: 12g
- Saturated Fat: 7g
- Carbohydrates: 52g
- Fiber: 2g
- Sugar: 38g
- Protein: 3g
This recipe is vegetarian and can be made dairy-free and gluten-free with the substitutions mentioned above. It contains wheat and dairy in its standard form. If you’re watching your sugar intake, you can reduce the sugar in the filling by a third—the peaches provide plenty of natural sweetness.
I personally love that this cobbler uses real, whole ingredients. There’s nothing artificial here, just butter, flour, fruit, and sugar. It’s the kind of dessert that feels indulgent but also honest. And honestly, life needs more of that.
Conclusion
This skillet peach cobbler is more than just a dessert—it’s a summer tradition waiting to happen. It’s the kind of recipe that brings people together, that makes ordinary evenings feel special. Whether you’re serving it at a backyard barbecue, a family dinner, or just because it’s Tuesday, this cobbler delivers every single time.
I love this recipe because it’s forgiving. You can use fresh or frozen peaches, swap in different fruits, adjust the sugar to your taste—it always works. It’s the kind of recipe that builds confidence in the kitchen. And that first bite, with the warm, jammy fruit and the buttery, crispy crust? It’s pure joy.
So go ahead—preheat that oven, grab your skillet, and make some memories. I’d love to hear how it turns out. Did you try a variation? Use a different fruit? Share your version in the comments below. And if you loved this recipe, please share it with someone who needs a little summer sweetness in their life. Happy baking!
Frequently Asked Questions
Can I use frozen peaches instead of fresh?
Absolutely. Frozen peaches work great, especially when fresh ones aren’t in season. Just thaw them completely and drain off any excess liquid before using. You may need to add an extra tablespoon of cornstarch to account for the extra moisture.
Why did my cobbler turn out soupy?
This usually happens for one of two reasons: either the peaches were too watery (especially if using frozen) or the cobbler wasn’t baked long enough. Make sure to let the cobbler cool for at least 15 minutes before serving—this allows the filling to set up properly.
Can I make this cobbler ahead of time?
Yes, but it’s best served warm. You can assemble the cobbler (without baking) up to 4 hours ahead, then bake it just before serving. Or bake it fully, let it cool, and reheat individual portions in the microwave or oven.
Do I have to use a cast iron skillet?
For the best texture, yes. The cast iron skillet creates that signature crispy edge that makes this cobbler special. But if you don’t have one, a 9×13 baking dish will work. Just note that the bottom won’t be as crispy, and you may need to add 5-10 minutes to the baking time.
Can I reduce the sugar in this recipe?
Definitely. The sugar in the filling can be reduced by up to half, especially if your peaches are very ripe. The batter needs the full amount of sugar for proper texture, but you can experiment with reducing it by 2-3 tablespoons if needed.
Pin This Recipe!

Easy Homemade Skillet Peach Cobbler Recipe

This skillet peach cobbler features a buttery, golden crust and juicy, caramelized peaches, all made in a cast iron skillet for the perfect crispy edge. It’s a simple, crowd-pleasing dessert that comes together in about 45 minutes.
- Prep Time: 15 minutes
- Cook Time: 35-40 minutes
- Total Time: 50-55 minutes
- Yield: 8 servings 1x
- Category: Dessert
- Cuisine: American
Ingredients
- 6 cups fresh peaches, peeled and sliced (about 6–7 medium peaches)
- 1/2 cup granulated sugar (for filling)
- 1 tablespoon lemon juice
- 1 teaspoon vanilla extract (for filling)
- 1 tablespoon cornstarch
- 1/2 teaspoon ground cinnamon (optional)
- 1 cup all-purpose flour
- 1 cup granulated sugar (for batter)
- 1 teaspoon baking powder
- 1/2 teaspoon salt
- 1 cup whole milk
- 1/2 cup unsalted butter
- 1 teaspoon vanilla extract (for batter)
Instructions
- Preheat your oven to 375°F (190°C). Place your 10-inch cast iron skillet in the oven with the butter. Let the butter melt while the oven heats up, about 10 minutes.
- While the oven is preheating, peel and slice your peaches. If using fresh peaches, score a small X on the bottom of each one, drop them in boiling water for 30 seconds, then transfer to an ice bath. The skins will slip right off. Slice them into 1/2-inch thick wedges.
- In a large bowl, combine the sliced peaches, 1/2 cup sugar, lemon juice, vanilla extract, cornstarch, and cinnamon. Toss gently to coat. Let this sit while you make the batter.
- In a medium bowl, whisk together the flour, 1 cup sugar, baking powder, and salt. Add the milk and vanilla extract. Whisk until just combined. A few lumps are fine.
- Carefully remove the hot skillet from the oven. The butter should be fully melted and bubbling. Pour the batter directly over the melted butter. Do not stir.
- Spoon the peach mixture evenly over the batter. Do not stir.
- Place the skillet in the oven and bake for 35-40 minutes. The cobbler is done when the top is golden brown and the edges are bubbling. The center should be set but still slightly jiggly. A toothpick inserted into the batter (not the fruit) should come out clean.
- Let the cobbler cool on a wire rack for at least 15 minutes. Serve warm, with a scoop of vanilla ice cream if desired.
Notes
Don’t skip the hot skillet step—it creates the crispy crust. Use a mix of ripe and firm peaches for best texture. Let the cobbler rest for at least 15 minutes before serving to allow the filling to set. For frozen peaches, thaw and drain well, and add an extra tablespoon of cornstarch.
Nutrition
- Serving Size: 1 serving (1/8 of re
- Calories: 320
- Sugar: 38
- Sodium: 200
- Fat: 12
- Saturated Fat: 7
- Carbohydrates: 52
- Fiber: 2
- Protein: 3
Keywords: peach cobbler, skillet cobbler, cast iron cobbler, summer dessert, easy peach cobbler, homemade cobbler