Love this? Save it for later!
Share the inspiration with your friends
I wasn’t expecting cooking advice from my accountant, but there I was, halfway through a meeting about quarterly taxes, watching him sketch a diagram on a sticky note. “You gotta try these buffalo chicken peppers,” he said, sliding the note across his cluttered desk. I stared at it—a rough drawing of a pepper with arrows pointing to “cream cheese layer” and “buffalo sauce soak.” It was the last place on earth I expected to find appetizer inspiration. Honestly, I almost laughed. But something about his earnestness—the way he insisted this was the only thing his picky teenagers actually fought over—made me tuck that sticky note into my wallet.
Later that week, staring into my fridge with zero dinner plans, I remembered the accountant’s scribble. I had some mini bell peppers, a block of cream cheese, and a half-empty bottle of Frank’s RedHot. Maybe you’ve been there—staring at random ingredients, hoping they’ll magically become something worth eating. I figured I’d give it a shot. Twenty minutes later, I was standing over the baking sheet, burning my tongue on the first pepper because I couldn’t wait for it to cool. That’s when I knew this recipe was a keeper.
The thing about this easy buffalo chicken dip stuffed mini peppers recipe is that it takes everything you love about classic buffalo chicken dip—the creamy tang, the spicy kick, the shredded chicken—and packs it into a crunchy, colorful, totally edible bowl. No chips required. No double-dipping disasters. Just pure, handheld buffalo bliss. I’ve made this for game days, potlucks, and even a book club meeting where everyone ignored the book and just ate peppers. It’s that good. And honestly? It came from an accountant who probably hasn’t set foot in a kitchen since 2003. Go figure.
Why You’ll Love This Recipe
Let me tell you why this recipe has earned a permanent spot in my rotation. First off, it’s ridiculously fast. We’re talking 20 minutes from start to finish. I’ve tested this timing multiple times—once while trying to get dinner on the table before my kids’ soccer practice, and again when unexpected guests showed up at 7 PM. Both times, it saved the day.
- Quick & Easy: Comes together in under 20 minutes, perfect for last-minute cravings or surprise visitors. No marinating, no complicated steps—just mix, stuff, and bake.
- Simple Ingredients: You probably already have most of these in your fridge or pantry. Cream cheese, hot sauce, shredded chicken, cheddar, and mini peppers. No fancy grocery trips needed.
- Perfect for Game Day: These little peppers are the ultimate finger food. They’re sturdy enough to hold up on a crowded snack table, and they don’t leave sticky residue on people’s fingers.
- Crowd-Pleaser: I’ve served these to everyone from spice-averse relatives to buffalo wing fanatics. The cream cheese mellows out the heat just enough that nobody’s reaching for a glass of milk.
- Unbelievably Delicious: The contrast between the crisp, sweet pepper and the warm, creamy, spicy filling is next-level comfort food. You’ll close your eyes after the first bite—I guarantee it.
What makes this version different from every other buffalo chicken dip out there? It’s the vessel. Instead of scooping dip onto chips that get soggy after five minutes, you’re biting into a fresh pepper that holds everything together. The pepper adds sweetness, crunch, and a pop of color that makes the whole dish look like you spent way more effort than you actually did. It’s comfort food reimagined—faster, healthier, and with the same soul-soothing satisfaction.
This isn’t just another appetizer. It’s the kind of recipe that makes people ask for the recipe. And when they do, you get to smile and say, “Oh, it’s nothing—just 20 minutes and five ingredients.”
What Ingredients You Will Need
This recipe uses simple, everyday ingredients to deliver bold buffalo flavor without any fuss. Most of these are pantry staples or things you might already have on hand from your last game day spread.
For the Buffalo Chicken Filling
- 8 oz cream cheese, softened to room temperature (this is key for smooth mixing—cold cream cheese leaves lumps)
- 1/2 cup buffalo hot sauce (I prefer Frank’s RedHot for that classic wing flavor, but any cayenne-based sauce works)
- 2 cups cooked shredded chicken (rotisserie chicken is my go-to shortcut; you can also use canned chicken in a pinch)
- 1 cup shredded cheddar cheese, divided (sharp cheddar adds more flavor, but mild works fine too)
- 1/4 cup ranch or blue cheese dressing (optional, but it adds creaminess and balances the heat—use blue cheese for a bolder flavor)
- 1/2 teaspoon garlic powder
- 1/4 teaspoon onion powder
- Salt and black pepper to taste
For the Peppers
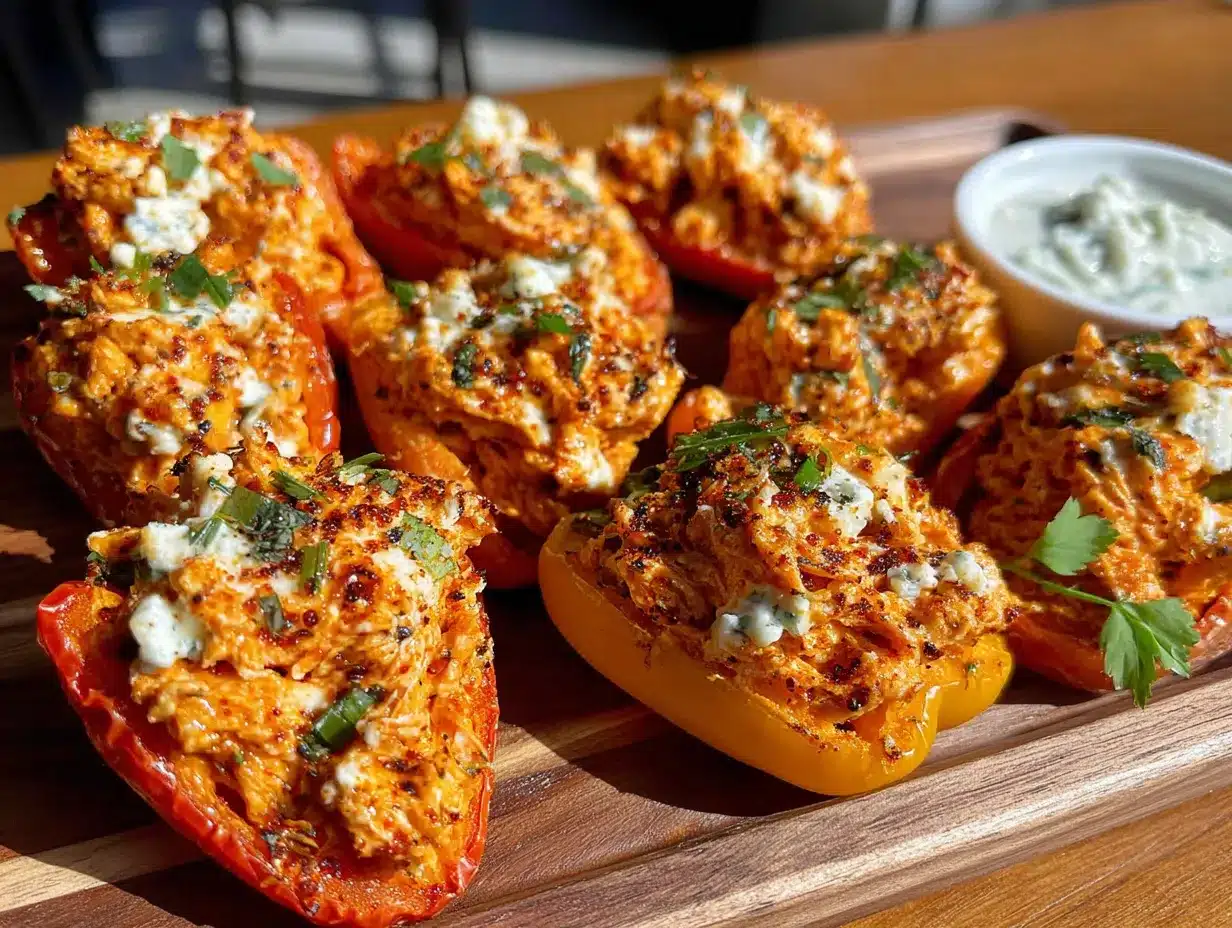
- 12-15 mini sweet bell peppers (look for ones that are firm, bright-colored, and roughly the same size for even cooking—red, yellow, and orange are sweeter than green)
- 1 tablespoon olive oil (for brushing the peppers before baking)
For Garnish (Optional but Recommended)
- 2 tablespoons chopped green onions
- 1 tablespoon crumbled blue cheese (if you didn’t use it in the filling)
- Extra drizzle of buffalo sauce
A few ingredient notes from my kitchen to yours: If you’re using rotisserie chicken, remove the skin and shred the meat while it’s still warm—it shreds much easier. For a dairy-free version, use vegan cream cheese and dairy-free cheddar shreds (I’ve tried Kite Hill and Violife, and both work well). And if you’re watching your sodium, opt for low-sodium hot sauce and skip the added salt until the end—you can always adjust.
One thing I learned the hard way: don’t skip softening the cream cheese. I once tried to mix cold cream cheese straight from the fridge, and I ended up with lumpy filling that wouldn’t pipe smoothly into the peppers. Let it sit on the counter for 20-30 minutes, or microwave it in 10-second bursts until it’s soft but not melted.
Equipment Needed
You don’t need a fancy kitchen to make these stuffed peppers. Here’s what you’ll need:
- Baking sheet (a standard half-sheet pan works perfectly; line it with parchment paper for easier cleanup)
- Mixing bowl (medium-sized, for combining the filling)
- Spatula or wooden spoon (for mixing the filling until smooth)
- Paring knife (for slicing the peppers in half and removing seeds—a small knife gives you more control)
- Small spoon or piping bag (a teaspoon works fine for stuffing; if you want to get fancy, use a piping bag with a wide tip for a cleaner look)
- Pastry brush (for brushing the peppers with olive oil; you can also use your fingers in a pinch)
- Cutting board
If you don’t have a piping bag, don’t sweat it. I’ve stuffed these peppers with a butter knife, a small cookie scoop, and even my fingers (washed, of course). The filling is forgiving, and nobody’s judging how it gets inside the pepper. For the baking sheet, any rimmed pan will do—just make sure it has edges so the olive oil doesn’t drip onto your oven floor.
Preparation Method
Alright, let’s get cooking. This whole process takes about 20 minutes, and I’ve broken it down into simple steps so you can follow along without any hiccups.
- Preheat your oven to 400°F (200°C). While it’s heating, line a baking sheet with parchment paper. This step saves you from scrubbing later—trust me on this.
- Prepare the mini peppers. Wash and dry 12-15 mini sweet bell peppers. Using a paring knife, slice each pepper in half lengthwise. Gently remove the seeds and white membranes with your fingers or the tip of the knife. Try to keep the pepper halves intact—they’re your edible bowls. Place them cut-side up on the prepared baking sheet. Brush the insides lightly with olive oil and sprinkle with a pinch of salt. This step adds flavor and helps the peppers soften without getting mushy.
- Make the buffalo chicken filling. In a medium mixing bowl, combine 8 oz softened cream cheese, 1/2 cup buffalo hot sauce, and 1/4 cup ranch or blue cheese dressing (if using). Mix with a spatula until smooth and fully combined. Add 2 cups shredded cooked chicken, 1/2 cup of the shredded cheddar cheese, 1/2 teaspoon garlic powder, and 1/4 teaspoon onion powder. Stir until everything is evenly distributed. Taste the filling—it should be creamy with a noticeable kick. If it’s not spicy enough, add another tablespoon of hot sauce. If it’s too spicy, stir in an extra tablespoon of cream cheese.
- Stuff the peppers. Using a small spoon or piping bag, fill each pepper half with the buffalo chicken mixture. Don’t overstuff—you want the filling to be level with the top of the pepper, not mounded too high, or it might spill during baking. A generous teaspoon per pepper half is usually perfect. Arrange the stuffed peppers on the baking sheet, leaving a little space between each one for even heat circulation.
- Top with cheese and bake. Sprinkle the remaining 1/2 cup shredded cheddar cheese over the stuffed peppers. Pop the baking sheet into the preheated oven and bake for 10-12 minutes. You’ll know they’re done when the cheese is melted and bubbly, and the peppers are slightly tender but still hold their shape. The edges of the peppers should look slightly wrinkled but not collapsed.
- Garnish and serve. Remove the baking sheet from the oven and let the peppers cool for 2-3 minutes—this is important because the filling is molten hot straight out of the oven. Sprinkle with chopped green onions and crumbled blue cheese if using. Drizzle with a little extra buffalo sauce for that Instagram-worthy finish. Serve warm.
A quick tip from my burn-your-tongue experience: those first few minutes of cooling are non-negotiable. The cream cheese filling holds heat like a little lava pocket. I learned this the hard way when I bit into a pepper straight from the oven and spent the next five minutes drinking ice water. Let them rest, and you’ll actually be able to taste the layers of flavor.
Cooking Tips & Techniques
Over the dozens of times I’ve made these peppers (and trust me, I’ve lost count), I’ve picked up a few tricks that make the process smoother and the results better. Here’s what I wish someone had told me from the start.
Don’t overcook the peppers. The goal is tender-crisp, not mushy. At 10 minutes, start checking them. The peppers should be bright and slightly softened, but they should still offer some resistance when you bite into them. If they’re wrinkly and limp, you’ve gone too far. Every oven runs differently, so check at the 8-minute mark if your oven runs hot.
Use room temperature cream cheese. I cannot stress this enough. Cold cream cheese creates lumpy filling that’s impossible to pipe smoothly. Set it out 30 minutes before you start, or microwave it in 10-second bursts until it’s soft to the touch. Your filling will be silky and much easier to work with.
Shred your chicken while it’s warm. If you’re using rotisserie chicken (my favorite shortcut), shred it while it’s still warm from the store. Cold chicken shreds into clumpy, uneven pieces. Warm chicken practically falls apart with a fork, giving you those perfect, tender shreds that blend seamlessly into the filling.
Line your baking sheet. I know I mentioned this already, but it deserves repeating. The cheese will bubble and potentially stick to the pan. Parchment paper makes cleanup a breeze—just lift it off and toss it. No soaking, no scrubbing.
Make the filling ahead of time. This is my favorite multitasking hack. You can prepare the buffalo chicken filling up to two days in advance and store it in the refrigerator. When you’re ready to serve, just stuff the peppers and bake. This makes game day hosting so much less stressful.
One mistake I made early on: I tried using pre-shredded cheese from a bag. Don’t do it. Pre-shredded cheese contains anti-caking agents that prevent it from melting smoothly. Buy a block of cheddar and shred it yourself. It takes two extra minutes, and the difference in meltiness is night and day.
Variations & Adaptations
This recipe is incredibly flexible. Here are some ways I’ve adapted it for different diets, occasions, and cravings.
Low-Carb / Keto Version: This recipe is already pretty low-carb since the peppers themselves are relatively low in sugar. To make it keto-friendly, use full-fat cream cheese, skip the ranch dressing (which often contains sugar), and use a sugar-free buffalo sauce. The pepper-to-filling ratio works perfectly for a keto snack.
Vegetarian Option: Swap the shredded chicken for 2 cups of canned or cooked chickpeas, mashed slightly with a fork. You can also use crumbled tofu or a plant-based chicken substitute. The texture will be different, but the buffalo flavor is strong enough to carry it. I’ve made this for a vegetarian friend, and she asked for the recipe.
Extra Spicy Version: If you’re a heat seeker like my brother-in-law, mix an additional tablespoon of cayenne pepper or a teaspoon of crushed red pepper flakes into the filling. You can also use a hotter buffalo sauce like Dave’s Insanity or add a few drops of ghost pepper sauce. Just be warned—this version is not for the faint of heart.
Bacon Lover’s Version: Cook 4-5 strips of bacon until crispy, crumble them, and mix half into the filling. Sprinkle the remaining bacon bits on top along with the cheese before baking. The smoky, salty bacon adds another layer of flavor that pairs beautifully with the buffalo sauce.
Air Fryer Adaptation: If you prefer using an air fryer, cook the stuffed peppers at 375°F (190°C) for 6-8 minutes. Check them at the 6-minute mark—air fryers cook faster and more evenly than ovens. No need to preheat if your air fryer heats up quickly.
I tried the air fryer version last Super Bowl, and honestly, I might never go back to the oven. The peppers came out perfectly tender with slightly charred edges, and the cheese was bubbly in half the time. Just make sure your peppers fit in a single layer without overcrowding.
Serving & Storage Suggestions
These stuffed peppers are best served warm, straight from the oven. The contrast between the warm, creamy filling and the crisp-tender pepper is what makes them so addictive. Arrange them on a platter with a small bowl of extra ranch or blue cheese dressing for dipping. I like to scatter extra green onions and a few celery sticks around the platter for color and crunch.
For a full appetizer spread, pair these peppers with classic buffalo wings, celery sticks with ranch dip, and maybe some loaded potato skins. If you’re serving them as a main dish (which I’ve definitely done on lazy nights), a simple side salad with a tangy vinaigrette balances out the richness.
Storage: Leftover stuffed peppers can be stored in an airtight container in the refrigerator for up to 3 days. The peppers will soften over time, but the flavor actually gets better as the filling melds together. I’ve been known to eat them cold straight from the fridge the next day—don’t judge me until you’ve tried it.
Reheating: To reheat, place the peppers on a baking sheet and warm them in a 350°F (175°C) oven for 5-7 minutes, or until heated through. You can also use the microwave, but the peppers will be softer. For the air fryer, reheat at 350°F (175°C) for 3-4 minutes. Avoid reheating multiple times—only warm up what you plan to eat.
Freezing: These peppers freeze surprisingly well. Arrange the stuffed (but unbaked) peppers on a baking sheet and freeze until solid, about 2 hours. Transfer the frozen peppers to a freezer-safe bag or container. They’ll keep for up to 2 months. To bake from frozen, add 5-7 minutes to the baking time—no need to thaw first. I keep a batch in my freezer for emergency appetizer situations, and they’ve saved me more than once.
One thing I’ve noticed: the flavors meld and deepen overnight. If you can make these a day ahead and reheat them before serving, you’ll get an even more cohesive buffalo flavor throughout the filling. Just don’t tell anyone—they’ll think you slaved over them all day.
Nutritional Information & Benefits
Here’s an approximate nutritional breakdown per serving (based on 3 pepper halves):
- Calories: 310
- Protein: 22g
- Fat: 22g
- Carbohydrates: 8g
- Fiber: 2g
- Sugar: 4g
- Sodium: 720mg
These numbers will vary based on the specific brands you use and whether you include optional ingredients like blue cheese or extra ranch dressing. If you’re watching your sodium, use low-sodium hot sauce and skip the added salt.
From a health perspective, mini bell peppers are packed with vitamin C—one pepper provides about 150% of your daily needs. They’re also rich in beta-carotene, which supports eye health and immune function. The chicken adds lean protein, while the cream cheese and cheddar provide calcium and fat-soluble vitamins. It’s not health food by any stretch, but it’s a more nutrient-dense option than traditional buffalo wings or chips and dip.
For those with dietary restrictions: this recipe is naturally gluten-free (check your hot sauce label to be sure). To make it dairy-free, use vegan cream cheese and dairy-free cheddar. For a lower-fat version, use reduced-fat cream cheese and part-skim cheddar—the texture will be slightly less creamy, but the flavor will still shine.
Conclusion
So there you have it—the easy buffalo chicken dip stuffed mini peppers recipe that started with a sticky note from my accountant. It’s funny how the best recipes come from the most unexpected places. I’ve made these peppers for Super Bowl parties, summer barbecues, and quiet Tuesday nights when I just needed something satisfying without a lot of effort. Every single time, they disappear within minutes.
What I love most about this recipe is how adaptable it is. You can make it spicy or mild, with chicken or without, baked in the oven or zapped in the air fryer. It’s forgiving enough for a beginner cook but impressive enough to serve at a party. And honestly? It makes me look like I spent way more time in the kitchen than I actually did. That’s my favorite kind of recipe.
I’d love to hear how these turn out for you. Did you try a variation I didn’t mention? Did your picky eater actually ask for seconds? Drop a comment below and let me know—I read every single one, and your stories keep me experimenting in the kitchen. And if you’re feeling generous, share this recipe with someone who needs a last-minute appetizer idea. You might just make their day (and their snack table).
Now go stuff some peppers. Your taste buds will thank you.
Frequently Asked Questions
Can I use regular bell peppers instead of mini peppers?
Absolutely. If you use full-sized bell peppers, cut them into quarters or thick strips instead of halves. You’ll need to adjust the baking time slightly—about 12-15 minutes instead of 10-12. The larger peppers take a bit longer to soften. Just keep an eye on them so they don’t get too mushy.
Can I make this recipe ahead of time for a party?
Yes! You can prepare the filling up to two days in advance and store it in the refrigerator. When you’re ready to serve, stuff the peppers and bake. You can also assemble the stuffed peppers completely (including the cheese topping) and refrigerate them unbaked for up to 24 hours. Just add an extra 2-3 minutes to the baking time if they’re going into the oven cold.
What’s the best way to shred chicken for this recipe?
I prefer using a rotisserie chicken from the store—it’s already cooked, seasoned, and easy to shred. If you’re cooking your own chicken, poach boneless, skinless chicken breasts in simmering water or broth for 15-20 minutes until cooked through. Let them cool slightly, then shred with two forks. For an even faster option, use a hand mixer on low speed to shred warm chicken in seconds—just be careful not to overmix.
Can I freeze these stuffed peppers?
Yes! Freeze them unbaked for the best results. Arrange the stuffed peppers on a baking sheet and freeze until solid, then transfer to a freezer bag. They’ll keep for up to 2 months. Bake from frozen at 400°F (200°C) for 15-17 minutes, or until heated through. I always keep a batch in my freezer for unexpected guests—it’s like having a secret weapon.
How can I make this recipe less spicy for kids or sensitive eaters?
Easy! Use a mild hot sauce or reduce the amount to 1/4 cup. You can also substitute the buffalo sauce with a combination of ketchup and a dash of hot sauce for a milder flavor. Another trick: increase the cream cheese to 10 oz to mellow out the heat even more. My kids (ages 6 and 9) eat these with just 1/4 cup of mild buffalo sauce, and they love them.
Pin This Recipe!

Easy Buffalo Chicken Dip Stuffed Mini Peppers: Best 20-Minute Appetizer

These easy buffalo chicken dip stuffed mini peppers combine creamy, spicy buffalo chicken filling with crunchy, sweet mini bell peppers for a perfect 20-minute appetizer. No chips needed—just pure, handheld buffalo bliss.
- Prep Time: 10 minutes
- Cook Time: 10-12 minutes
- Total Time: 20 minutes
- Yield: 4 servings (about 3 pepper halves per serving) 1x
- Category: Appetizer
- Cuisine: American
Ingredients
- 8 oz cream cheese, softened to room temperature
- 1/2 cup buffalo hot sauce (preferably Frank’s RedHot)
- 2 cups cooked shredded chicken (rotisserie chicken recommended)
- 1 cup shredded cheddar cheese, divided
- 1/4 cup ranch or blue cheese dressing (optional)
- 1/2 teaspoon garlic powder
- 1/4 teaspoon onion powder
- Salt and black pepper to taste
- 12–15 mini sweet bell peppers
- 1 tablespoon olive oil
- 2 tablespoons chopped green onions (optional garnish)
- 1 tablespoon crumbled blue cheese (optional garnish)
- Extra drizzle of buffalo sauce (optional garnish)
Instructions
- Preheat your oven to 400°F (200°C). Line a baking sheet with parchment paper.
- Wash and dry 12-15 mini sweet bell peppers. Slice each pepper in half lengthwise and remove seeds and white membranes. Place cut-side up on the prepared baking sheet. Brush insides lightly with olive oil and sprinkle with a pinch of salt.
- In a medium mixing bowl, combine 8 oz softened cream cheese, 1/2 cup buffalo hot sauce, and 1/4 cup ranch or blue cheese dressing (if using). Mix until smooth. Add 2 cups shredded cooked chicken, 1/2 cup shredded cheddar cheese, 1/2 teaspoon garlic powder, and 1/4 teaspoon onion powder. Stir until evenly distributed. Taste and adjust seasoning.
- Using a small spoon or piping bag, fill each pepper half with the buffalo chicken mixture. Do not overstuff—a generous teaspoon per half is ideal.
- Sprinkle the remaining 1/2 cup shredded cheddar cheese over the stuffed peppers. Bake for 10-12 minutes, until cheese is melted and bubbly and peppers are slightly tender but still hold their shape.
- Remove from oven and let cool for 2-3 minutes. Garnish with chopped green onions, crumbled blue cheese, and an extra drizzle of buffalo sauce if desired. Serve warm.
Notes
Don’t skip softening the cream cheese—cold cream cheese creates lumpy filling. Let the peppers cool for 2-3 minutes after baking to avoid burning your tongue. For best results, shred your own cheddar cheese from a block instead of using pre-shredded cheese. The filling can be made up to 2 days ahead and stored in the refrigerator.
Nutrition
- Serving Size: 3 pepper halves
- Calories: 310
- Sugar: 4
- Sodium: 720
- Fat: 22
- Carbohydrates: 8
- Fiber: 2
- Protein: 22
Keywords: buffalo chicken dip, stuffed mini peppers, easy appetizer, game day snack, 20-minute recipe, buffalo chicken, mini bell peppers