Love this? Save it for later!
Share the inspiration with your friends
My neighbor Sarah wasn’t trying to impress anyone. I’d stopped by to borrow a ladder—our fence had blown down in a storm the night before—and the smell hit me before I even got to her front door. It was warm, spiced, and sweet, like autumn had been distilled into something you could breathe. I stood there on her porch for a second, just inhaling, before I even knocked.
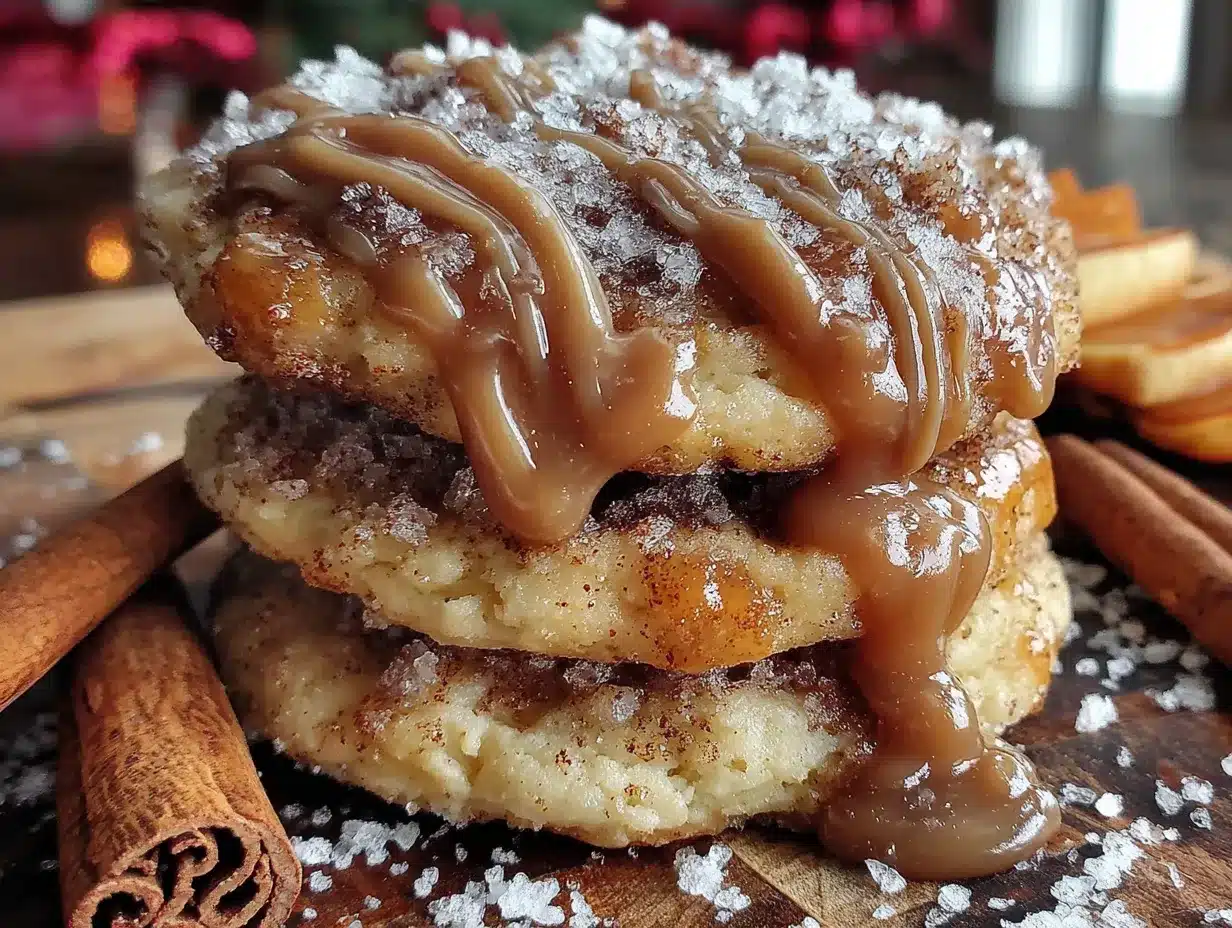
When she opened the door, she was holding a cooling rack covered in these little golden cookies. “Oh, those are just something I threw together,” she said, waving her hand like it was nothing. She offered me one—still slightly warm—and honestly, let me tell you, I almost forgot about the ladder entirely. The cookie was soft and pillowy, with this deep, almost nutty glaze on top that I couldn’t quite place. It tasted like apple cider had been concentrated into every single bite.
“What’s in the glaze?” I asked, trying to sound casual.
“Brown butter,” she said, like it was the most obvious thing in the world.
I mean, brown butter. Of course. She’d made these Iced Apple Cider Cookies like it was no big deal, like she hadn’t just created something that was going to haunt my dreams for weeks. I went home with the ladder and a napkin full of cookies, and I spent the next three days trying to recreate them. This is my version—tested, tweaked, and absolutely worthy of your next gathering.
Maybe you’ve been there, standing in someone’s kitchen, watching them be completely nonchalant about something extraordinary. That’s the energy of these cookies. They look like they took hours, but they come together in about 30 minutes of active work. They’re the kind of cookie you bring to a dinner party and watch disappear in minutes, while everyone asks for the recipe. And the best part? You can make them look like a bakery display without breaking a sweat.
Why You’ll Love This Recipe
These aren’t just another apple cookie. I’ve made plenty of those—dry, bland, disappointing versions that promised fall flavor and delivered nothing. This recipe is different. I tested it six times before I got the texture right, adjusting flour ratios and chilling times until every bite was soft, tender, and packed with apple cider flavor.
- Quick & Easy: These cookies come together in about 30 minutes of active prep time. The dough needs a quick chill—just 30 minutes—so you can mix, chill, bake, and glaze in under two hours total.
- Simple Ingredients: No weird specialty items. You likely have most of these in your kitchen right now. The star ingredient is just good apple cider, the kind you’d buy for breakfast.
- Perfect for Fall Gatherings: These are made for dinner parties, Friendsgiving, potlucks, and festive get-togethers. They look impressive on a platter and taste even better.
- Crowd-Pleaser: I’ve served these to kids, adults, and picky in-laws. Every single person has asked for the recipe. They’re not too sweet, not too spicy—just right.
- Unbelievably Delicious: The brown butter glaze is the real star here. It adds a nutty, caramel-like depth that takes these cookies from good to unforgettable. You’ll want to put it on everything.
What makes these different from the rest is the technique. I reduce the apple cider on the stove to concentrate the flavor, so you get that intense apple taste without adding extra liquid that would make the dough sticky. And the brown butter glaze? It’s not just butter browned and mixed with sugar—there’s a little trick to getting it silky and smooth every time.
These cookies are the kind that make you close your eyes after the first bite. They’re comfort food reimagined—familiar enough to feel nostalgic, but special enough to steal the table at any gathering.
What Ingredients You Will Need
This recipe uses simple, wholesome ingredients to deliver bold flavor and satisfying texture without the fuss. Most of these are pantry staples, especially during apple season. Here’s what you’ll need and why each one matters.
For the Cookies
- Apple cider, 1 cup (240 ml) — Use fresh, unfiltered apple cider for the best flavor. You’ll reduce this on the stove to concentrate it, so don’t skip this step. Store-bought apple juice won’t give you the same depth.
- Unsalted butter, ¾ cup (170 grams), softened — I use Kerrygold or Land O’Lakes for consistent results. Let it sit at room temperature for about 30 minutes before starting.
- Granulated sugar, ½ cup (100 grams) — Adds sweetness and helps with browning. You could use coconut sugar for a deeper flavor, but the texture will be slightly different.
- Light brown sugar, ½ cup (100 grams), packed — This adds moisture and a hint of molasses that pairs beautifully with the apple cider. Dark brown sugar works too, but the cookies will be a bit darker.
- Large egg, 1, room temperature — Room temperature eggs incorporate better into the butter mixture, creating a smoother dough. Take yours out of the fridge 15 minutes before using.
- Vanilla extract, 1 teaspoon — Pure vanilla extract is worth it here. The flavor cuts through the apple and brown butter beautifully.
- All-purpose flour, 2 cups (250 grams) — Spoon and level your flour for the most accurate measurement. Scooping directly from the bag can pack in too much flour, making dry cookies.
- Baking soda, 1 teaspoon — Helps the cookies spread just enough and stay tender.
- Ground cinnamon, 1 teaspoon — The classic apple spice. I prefer Saigon cinnamon for its stronger, sweeter flavor.
- Ground nutmeg, ½ teaspoon — Freshly grated if you have it. The difference is noticeable.
- Ground cloves, ¼ teaspoon — A little goes a long way. This adds that warm, almost peppery note that makes fall baking so cozy.
- Salt, ½ teaspoon — Balances the sweetness and enhances all the other flavors. I use fine sea salt.
For the Brown Butter Glaze
- Unsalted butter, ¼ cup (57 grams) — You’ll brown this on the stove, so keep a close eye on it. Butter can go from browned to burnt in seconds.
- Powdered sugar, 1½ cups (180 grams), sifted — Sifting prevents lumps in your glaze. Trust me on this one.
- Vanilla extract, ½ teaspoon — Adds warmth and depth to the glaze.
- Milk, 2-3 tablespoons (30-45 ml) — Whole milk gives the creamiest glaze, but any milk works. Add it slowly to reach your desired consistency.
- Pinch of salt — Just a tiny pinch to balance the sweetness.
Equipment Needed
You don’t need anything fancy for these cookies, but a few key tools will make the process smoother. Here’s what I use every time I make them.
- Large mixing bowls — You’ll need two: one for dry ingredients, one for wet. I prefer glass or stainless steel because they don’t retain odors.
- Electric hand mixer or stand mixer — A hand mixer works perfectly here. If you’re using a stand mixer, use the paddle attachment. You can do this by hand with a wooden spoon, but your arm will get tired.
- Small saucepan — For reducing the apple cider and browning the butter. A light-colored pan helps you see the color change when browning butter.
- Baking sheets — Two standard half-sheet pans. Line them with parchment paper for easy cleanup.
- Cooling rack — Essential for letting the glaze set properly. If you don’t have one, you can use wax paper, but the glaze might pool a bit.
- Cookie scoop (about 1.5 tablespoons) — This gives you evenly sized cookies that bake at the same rate. I use a #40 scoop.
- Whisk — For the glaze. A small whisk works better than a fork for getting it smooth.
- Spatula — A flexible silicone spatula is perfect for scraping every last bit of brown butter out of the pan.
If you don’t have a cookie scoop, use two spoons to portion the dough—one to scoop, one to push it off. It’s not as neat, but it works. And if you don’t have parchment paper, you can grease the baking sheets lightly with butter or cooking spray.
Preparation Method
Let’s make these cookies. I’ve broken this down step by step, with all the little details I’ve learned from making them over and over. Take your time, and don’t rush the chilling step—it really matters.
Step 1: Reduce the Apple Cider
Pour 1 cup of apple cider into a small saucepan. Bring it to a boil over medium-high heat, then reduce the heat to medium-low and let it simmer. You want it to reduce down to about ¼ cup. This takes about 15-20 minutes. Swirl the pan occasionally. When it’s done, it should look syrupy and smell intensely of apples. Set it aside to cool completely. Don’t skip this step—it’s what gives these cookies their concentrated apple flavor without making the dough too wet.
Step 2: Brown the Butter for the Glaze
In the same small saucepan (rinsed and dried), add ¼ cup of butter. Melt it over medium heat, swirling the pan occasionally. The butter will foam, then bubble, then start to turn golden. Watch it carefully—when you see brown specks forming at the bottom and it smells nutty, take it off the heat immediately. Pour it into a small heatproof bowl to stop the cooking. Let it cool for about 10 minutes while you make the dough.
Step 3: Make the Cookie Dough
In a medium bowl, whisk together 2 cups flour, 1 teaspoon baking soda, 1 teaspoon cinnamon, ½ teaspoon nutmeg, ¼ teaspoon cloves, and ½ teaspoon salt. Set aside.
In a large mixing bowl, beat ¾ cup softened butter with ½ cup granulated sugar and ½ cup packed brown sugar until light and fluffy—about 3 minutes with a hand mixer on medium speed. Add 1 egg and 1 teaspoon vanilla, and beat until combined. The mixture should look smooth and creamy.
Pour in the cooled reduced apple cider and beat again until incorporated. The mixture might look a little separated at this point—that’s normal.
Gradually add the dry ingredients to the wet ingredients, mixing on low speed until just combined. Don’t overmix. The dough will be soft and slightly sticky. That’s exactly what you want.
Step 4: Chill the Dough
Cover the bowl with plastic wrap and refrigerate for at least 30 minutes. This step is crucial—chilled dough spreads less and produces thicker, softer cookies. If you’re in a hurry, you can pop it in the freezer for 15 minutes, but don’t skip the chill entirely.
Step 5: Preheat and Prep
While the dough chills, preheat your oven to 350°F (175°C). Line two baking sheets with parchment paper.
Step 6: Scoop and Bake
Using a 1.5-tablespoon cookie scoop, portion the dough into balls and place them about 2 inches apart on the prepared baking sheets. You should get about 24 cookies.
Bake one sheet at a time for 10-12 minutes. The edges should be lightly golden and the centers should look just set—slightly puffy and pale. They will continue to set as they cool. Let them rest on the baking sheet for 5 minutes, then transfer to a cooling rack to cool completely.
Step 7: Make the Glaze
While the cookies cool, make the glaze. In a medium bowl, combine the cooled brown butter with 1½ cups sifted powdered sugar, ½ teaspoon vanilla, and a pinch of salt. Add 2 tablespoons of milk and whisk until smooth. If the glaze is too thick, add the remaining tablespoon of milk, one teaspoon at a time, until it reaches a drizzling consistency. It should be thick enough to coat the back of a spoon but thin enough to drizzle.
Step 8: Glaze the Cookies
Once the cookies are completely cool, drizzle the glaze over them using a spoon or a piping bag with a small tip. I like to do a zigzag pattern—it looks pretty and covers more surface area. Let the glaze set for about 15-20 minutes before serving.
Cooking Tips & Techniques
I’ve made these cookies at least a dozen times now, and I’ve learned a few things the hard way. Here are my best tips for getting perfect results every time.
Don’t Rush the Cider Reduction
The first time I made these, I tried to speed up the cider reduction by cranking the heat. It boiled over, made a mess, and didn’t reduce properly. Low and slow is the way to go. Keep it at a gentle simmer, and swirl the pan every few minutes. You’ll know it’s done when it coats the back of a spoon and smells deeply caramelized.
Watch the Brown Butter Like a Hawk
I burned my first batch of brown butter. I mean, completely blackened it. The kitchen smelled like scorched popcorn for hours. Brown butter goes from perfect to ruined in about 30 seconds. Here’s my trick: as soon as you see the foam subside and brown specks appear, pull it off the heat and pour it into a cold bowl immediately. The residual heat in the pan will keep cooking it otherwise.
Chill the Dough, Seriously
I know, I know, you want cookies now. But warm dough spreads into flat, sad pancakes. Chilled dough gives you thick, soft cookies with that perfect chewy center. If you’re making these for a party, you can make the dough the night before and keep it in the fridge overnight. The flavor actually gets better.
Use a Cookie Scoop for Uniform Size
Uneven cookies bake unevenly. Some will be overdone while others are underdone. A cookie scoop ensures every cookie is the same size, so they all finish baking at the same time. Plus, it makes the process faster and less messy.
Let Cookies Cool Completely Before Glazing
I made this mistake exactly once. Warm cookies + glaze = a runny, drippy mess that slides right off. The glaze needs the cookies to be completely cool to set properly. Give them at least 20 minutes on the cooling rack before you start drizzling.
Variations & Adaptations
These cookies are pretty perfect as-is, but I love experimenting with different twists. Here are a few variations I’ve tried and loved.
Apple Cider Cookies with Maple Glaze
Swap the vanilla in the glaze for 1 tablespoon of pure maple syrup, and reduce the milk by 1 tablespoon. The maple flavor pairs beautifully with the apple cider and brown butter. This version is especially good for Thanksgiving or fall brunches.
Gluten-Free Version
I tested this with a 1:1 gluten-free baking flour blend (I used Bob’s Red Mill), and it worked surprisingly well. The cookies were slightly more delicate, so handle them gently when transferring to the cooling rack. Add an extra tablespoon of flour to the dough if it seems too sticky.
Vegan Version
Use vegan butter (I like Miyoko’s) in both the dough and the glaze. Replace the egg with a flax egg (1 tablespoon ground flaxseed mixed with 3 tablespoons water, let sit for 5 minutes). Use oat milk or almond milk in the glaze. The cookies will be slightly less tender, but still delicious.
Spiced Apple Cider Cookies
Add ½ teaspoon of ground ginger and ¼ teaspoon of allspice to the flour mixture. The extra warmth makes these taste even more like autumn in a bite. I made this version for a Friendsgiving gathering, and they disappeared before the turkey even hit the table.
Apple Cider Cookies with Caramel Drizzle
Instead of the brown butter glaze, drizzle cooled cookies with store-bought or homemade caramel sauce and a sprinkle of flaky sea salt. It’s decadent, over-the-top, and absolutely perfect for a special occasion.
Serving & Storage Suggestions
These cookies are best served at room temperature, with the glaze fully set. I like to arrange them on a wooden board or a pretty cake stand, with a few apple slices or cinnamon sticks scattered around for visual appeal. They look stunning on a dessert table next to a pumpkin pie or a plate of maple-glazed donuts.
For a dinner party, serve these with a hot cup of spiced chai or a glass of cold apple cider. They also pair beautifully with coffee—the nutty brown butter glaze complements the bitterness of the coffee perfectly.
Storage
Store cooled, glazed cookies in an airtight container at room temperature for up to 5 days. Layer them with parchment paper between each layer to prevent the glaze from sticking. They actually get softer and more tender on day two, so don’t be afraid to make them a day ahead.
Freezing
You can freeze the unglazed baked cookies for up to 3 months. Wrap them tightly in plastic wrap, then place them in a freezer-safe bag. When you’re ready to serve, thaw them at room temperature, then make the glaze fresh and drizzle it on. Do not freeze the glazed cookies—the glaze will get sticky and lose its shine.
Reheating
These cookies are best at room temperature, but if you want that just-baked warmth, pop one in the microwave for 8-10 seconds. Don’t overheat, or the glaze will melt and run off.
Nutritional Information & Benefits
Per cookie (based on 24 cookies): approximately 165 calories, 8g fat, 22g carbohydrates, 1g protein, 12g sugar. These are estimates and will vary based on ingredient brands and substitutions.
While these are definitely a treat, the apple cider does provide a small amount of vitamin C and antioxidants. Cinnamon has been linked to blood sugar regulation and has anti-inflammatory properties. And hey, the butter has vitamin A, right? Let’s call it a balanced indulgence.
If you’re watching your sugar intake, you can reduce the granulated sugar in the dough by 2 tablespoons without affecting the texture too much. The glaze is harder to adjust—it needs the powdered sugar for structure—but you can drizzle it more sparingly.
These cookies are not gluten-free, dairy-free, or vegan in their standard form, but I’ve included adaptations above for all three dietary needs. They do contain eggs, dairy, and gluten, so keep that in mind if you’re serving guests with allergies.
From a wellness perspective, I believe in enjoying food that makes you happy. These cookies are a celebration of fall flavors, meant to be shared with people you love. One cookie won’t derail your healthy habits—it’ll just make your day a little sweeter.
Conclusion
These Best Iced Apple Cider Cookies with Brown Butter Glaze are the kind of recipe that becomes a tradition. They’re easy enough for a Tuesday afternoon, but special enough for a holiday dessert table. The combination of concentrated apple cider and nutty brown butter is something you’ll find yourself craving all autumn long.
I still think about that afternoon on Sarah’s porch, standing there with a cookie in one hand and a ladder in the other. She had no idea she was giving me more than just a snack—she gave me the inspiration for a recipe that’s become one of my most-requested. That’s the thing about good food. It doesn’t have to be complicated or fancy. It just has to be made with care.
I’d love to hear how these turn out for you. Did you try any variations? Did they disappear at your dinner party? Drop a comment below and let me know! And if you’re looking for more fall baking inspiration, check out my cozy fall dessert recipes or this apple crisp with oat topping that’s perfect for a crowd. Happy baking, friends!
Frequently Asked Questions
Can I use apple juice instead of apple cider?
You can, but the flavor won’t be as rich. Apple cider is unfiltered and has a deeper, more complex taste. If you use apple juice, the cookies will be sweeter and less apple-forward. Reduce the sugar in the dough by 2 tablespoons to compensate.
Why did my cookies spread too much?
This usually happens for one of three reasons: the dough wasn’t chilled long enough, the butter was too soft when you mixed it, or you used too much sugar. Make sure to chill the dough for at least 30 minutes, and measure your ingredients accurately.
Can I make the dough ahead of time?
Absolutely. You can refrigerate the dough for up to 3 days. Let it sit at room temperature for about 10 minutes before scooping and baking—it will be firmer than fresh dough. You can also freeze the dough balls on a baking sheet, then transfer them to a freezer bag. Bake from frozen, adding 2-3 minutes to the baking time.
My glaze turned out too thick/thin. How do I fix it?
If your glaze is too thick, add milk one teaspoon at a time until it reaches a drizzling consistency. If it’s too thin, add more sifted powdered sugar, one tablespoon at a time, until it thickens. The perfect glaze should coat the back of a spoon and slowly drip off.
Can I double this recipe?
Yes, this recipe doubles beautifully. Just make sure you have enough baking sheets and cooling racks. You might need to bake in batches, and the dough will need a bit more time to chill since there’s more of it. I’ve doubled it for holiday cookie exchanges with great results.
Pin This Recipe!

Best Iced Apple Cider Cookies with Brown Butter Glaze

Soft, pillowy apple cider cookies with a nutty brown butter glaze that taste like autumn in every bite. Easy to make and perfect for fall gatherings.
- Prep Time: 30 minutes
- Cook Time: 12 minutes
- Total Time: 1 hour 45 minutes (includes chilling and cooling)
- Yield: 24 cookies 1x
- Category: Dessert
- Cuisine: American
Ingredients
- 1 cup (240 ml) apple cider
- ¾ cup (170 grams) unsalted butter, softened
- ½ cup (100 grams) granulated sugar
- ½ cup (100 grams) light brown sugar, packed
- 1 large egg, room temperature
- 1 teaspoon vanilla extract
- 2 cups (250 grams) all-purpose flour
- 1 teaspoon baking soda
- 1 teaspoon ground cinnamon
- ½ teaspoon ground nutmeg
- ¼ teaspoon ground cloves
- ½ teaspoon salt
- ¼ cup (57 grams) unsalted butter (for glaze)
- 1½ cups (180 grams) powdered sugar, sifted
- ½ teaspoon vanilla extract (for glaze)
- 2–3 tablespoons (30–45 ml) milk
- Pinch of salt (for glaze)
Instructions
- Reduce the apple cider: Pour 1 cup apple cider into a small saucepan. Bring to a boil over medium-high heat, then reduce to medium-low and simmer until reduced to about ¼ cup (15-20 minutes). Set aside to cool completely.
- Brown the butter for the glaze: In the same saucepan (rinsed and dried), melt ¼ cup butter over medium heat, swirling occasionally. When brown specks form and it smells nutty, remove from heat and pour into a heatproof bowl. Let cool for 10 minutes.
- Make the cookie dough: In a medium bowl, whisk together flour, baking soda, cinnamon, nutmeg, cloves, and salt. In a large bowl, beat ¾ cup softened butter with granulated sugar and brown sugar until light and fluffy (about 3 minutes). Add egg and 1 teaspoon vanilla; beat until combined. Pour in cooled reduced apple cider and beat until incorporated. Gradually add dry ingredients, mixing on low until just combined. Dough will be soft and slightly sticky.
- Chill the dough: Cover bowl with plastic wrap and refrigerate for at least 30 minutes.
- Preheat and prep: Preheat oven to 350°F (175°C). Line two baking sheets with parchment paper.
- Scoop and bake: Using a 1.5-tablespoon cookie scoop, portion dough into balls and place 2 inches apart on prepared sheets. Bake one sheet at a time for 10-12 minutes, until edges are lightly golden and centers are just set. Let rest on baking sheet for 5 minutes, then transfer to a cooling rack to cool completely.
- Make the glaze: In a medium bowl, combine cooled brown butter with sifted powdered sugar, ½ teaspoon vanilla, and a pinch of salt. Add 2 tablespoons milk and whisk until smooth. Add more milk if needed to reach drizzling consistency.
- Glaze the cookies: Once cookies are completely cool, drizzle glaze over them using a spoon or piping bag. Let glaze set for 15-20 minutes before serving.
Notes
Don’t skip reducing the apple cider—it concentrates the flavor. Watch the brown butter carefully as it can burn quickly. Chill the dough for at least 30 minutes to prevent spreading. Let cookies cool completely before glazing.
Nutrition
- Serving Size: 1 cookie
- Calories: 165
- Sugar: 12
- Sodium: 95
- Fat: 8
- Saturated Fat: 5
- Carbohydrates: 22
- Fiber: 0.5
- Protein: 1
Keywords: apple cider cookies, brown butter glaze, fall cookies, iced cookies, apple cookies