Love this? Save it for later!
Share the inspiration with your friends
I wasn’t supposed to be there for dinner. I’d stopped by my neighbor Leo’s place to grab a drill I’d loaned him weeks ago, and honestly, I planned to be in and out in two minutes. But the smell hit me before I even got past his screen door. It was this rich, savory, almost nutty aroma that stopped me mid-step. Leo was just standing at his stove, flipping chicken thighs in a cast iron skillet like it was absolutely nothing special. He barely looked up when I walked in.
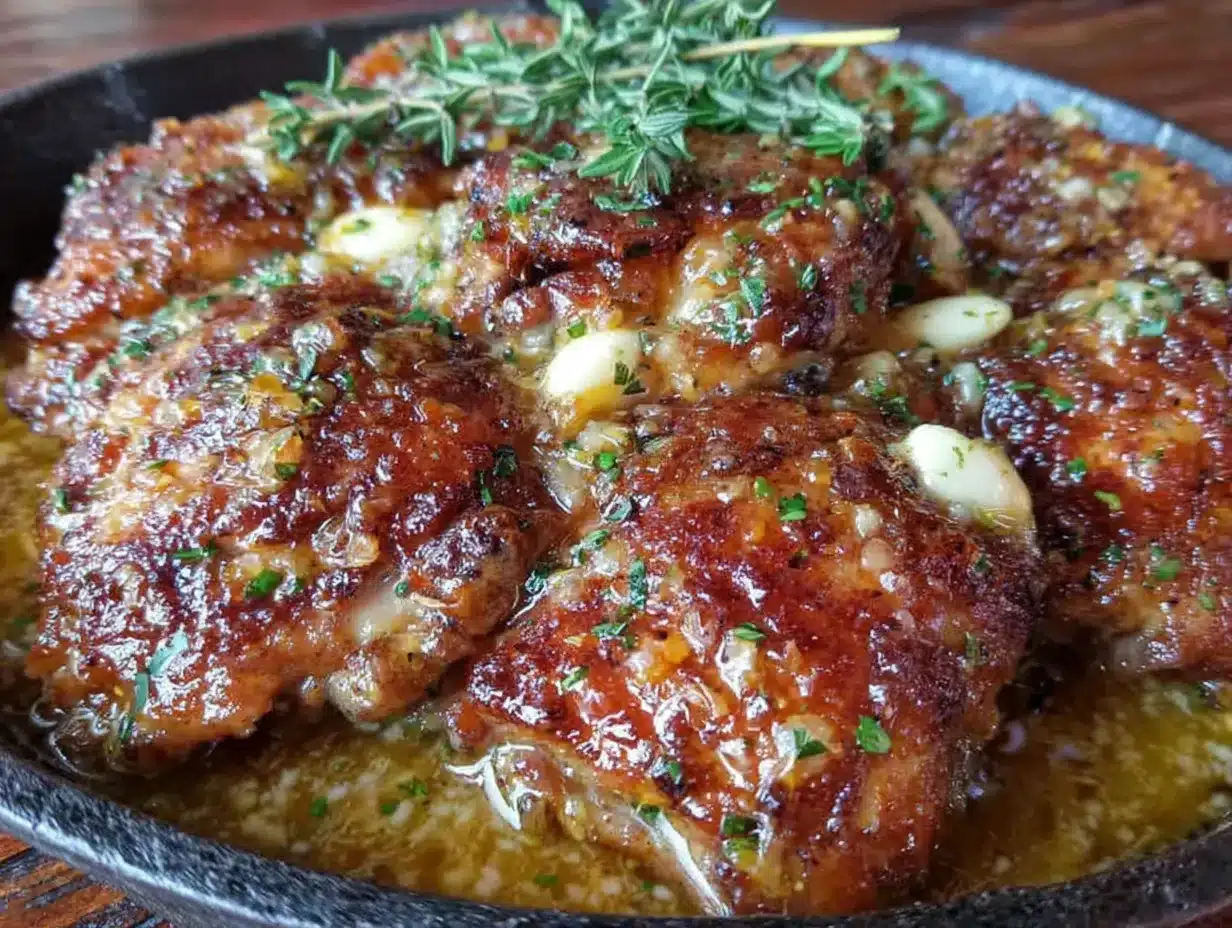
“Grab a plate,” he said, pointing with his spatula. “There’s extra.” That was it. No big announcement, no “you have to try this.” He just went back to his pan, adding a pat of butter and a few cloves of garlic as if he was doing the most mundane thing in the world. But let me tell you, that chicken was anything but mundane. The skin was shatteringly crisp, the meat was so tender it fell apart with a fork, and that garlic butter sauce pooled on the plate like liquid gold. I forgot all about the drill. I sat down, ate two thighs, and asked him what he did to make them so good.
He shrugged. “Just chicken, butter, garlic, and a hot pan.” That’s the thing about the best recipes—they’re never complicated. They’re just done right. This crispy one-pan garlic butter chicken thighs recipe is exactly that. It’s the kind of dinner you make when you want something that feels special but takes almost no effort. Maybe you’ve been there, standing in your kitchen on a Tuesday night, staring at a pack of chicken thighs, wanting something more than just plain baked chicken. That’s where this recipe comes in. It’s become my go-to for those nights when I want comfort without the fuss, and I keep making it because, honestly, it never fails to impress—even when you’re not trying to impress anyone at all.
Why You’ll Love This Recipe
After making this recipe dozens of times—and tweaking it until it was just right—I can tell you exactly why it’s become a staple in my kitchen. It’s not just another chicken dinner. It’s the one that solves all the little problems we face when we’re tired, hungry, and short on time.
- One Pan, Minimal Mess : Everything happens in a single skillet. No baking sheets, no extra pots, no mountains of dishes. You cook the chicken, make the sauce, and serve it all from the same pan. That’s it.
- Crispy Skin Without Frying : You don’t need a deep fryer or a vat of oil to get that golden, crackling skin. The secret is starting the chicken skin-side down in a cold pan and letting the fat render slowly. It’s a professional trick that works every single time.
- Pantry-Friendly Ingredients : Chicken thighs, butter, garlic, salt, and pepper. That’s the core. You probably have all of this right now. No special trips to the store, no obscure spices you’ll never use again.
- Ready in 30 Minutes : From the moment you start heating the pan to the moment you’re sitting down to eat, it’s about half an hour. That’s faster than takeout in most cases.
- Incredibly Forgiving : Chicken thighs are almost impossible to dry out. Even if you get distracted and cook them a few minutes too long, they stay juicy and tender. It’s the perfect protein for busy cooks.
- The Sauce is the Star : That garlic butter sauce isn’t just a drizzle. It’s a rich, silky, flavor-packed sauce that you’ll want to spoon over rice, mashed potatoes, or even crusty bread. I’ve caught myself drinking it straight from the spoon—no judgment.
This recipe is different because it focuses on technique over complexity. It’s not about a long list of ingredients or fancy equipment. It’s about understanding how to get the most out of simple things. When you take a bite of this chicken, you’ll understand what I mean. The skin shatters, the meat is juicy, and that garlic butter coats everything in pure comfort. It’s the kind of meal that makes you close your eyes after the first bite. And honestly, that’s exactly what dinner should be.
What Ingredients You Will Need
This recipe uses simple, everyday ingredients to create something truly special. The beauty of it lies in the quality of what you use and how you handle it. Here’s everything you’ll need, broken down so you know exactly what to look for.
For the Chicken
- 4 bone-in, skin-on chicken thighs (about 1.5 to 2 pounds total) — The bone keeps the meat moist and adds flavor to the pan drippings. The skin is non-negotiable for that crispy texture. Look for thighs that are roughly the same size so they cook evenly.
- 1 teaspoon kosher salt — I prefer Diamond Crystal brand for its consistent flake size. It seasons the skin without making it too salty.
- 1/2 teaspoon black pepper — Freshly ground is always better. It adds a subtle warmth that complements the garlic.
- 1/2 teaspoon garlic powder (optional but recommended) — This gives an extra layer of garlic flavor that penetrates the meat while it cooks.
For the Garlic Butter Sauce
- 3 tablespoons unsalted butter — Use good-quality butter here. It’s the backbone of the sauce, so you want something with a rich, creamy flavor. I usually go with Kerrygold or Plugrà.
- 6 cloves garlic, thinly sliced — Don’t mince it. Thin slices caramelize beautifully without burning, and they soften into sweet, buttery morsels that are absolutely delicious.
- 1 tablespoon fresh lemon juice (about half a lemon) — This brightens the sauce and cuts through the richness. Don’t skip it!
- 2 tablespoons chicken broth — Use low-sodium so you can control the salt. This deglazes the pan and incorporates all those browned bits into the sauce.
- 1 tablespoon fresh parsley, chopped — For garnish and a fresh finish. Flat-leaf parsley has more flavor than curly.
Substitution Guidance
If you don’t have bone-in thighs, boneless skinless thighs will work, but reduce the cooking time by about 5-7 minutes. You won’t get quite the same depth of flavor, but it’ll still be good. For a dairy-free version, use ghee or a high-quality plant-based butter. The flavor will change slightly, but the technique remains the same. If you’re out of fresh garlic, use 1 teaspoon of garlic paste or 1/2 teaspoon of granulated garlic. Just know that fresh garlic really makes this sauce shine.
I always recommend using fresh lemon juice rather than bottled. The bottled stuff has a flat, metallic taste that doesn’t do this sauce justice. And when it comes to the chicken, try to get thighs with the skin still attached. That skin is what gives you that incredible crispy texture. If your store only sells skinless, you can still make this recipe, but you’ll miss out on the best part.
Equipment Needed
You don’t need a professional kitchen to make this recipe. A few basic tools will get the job done perfectly.
- A 10-inch or 12-inch cast iron skillet — This is my top choice because it holds heat evenly and creates that beautiful golden crust. If you don’t have cast iron, a heavy-bottomed stainless steel skillet works great too. Avoid nonstick pans for this recipe—they don’t get hot enough to create a proper sear.
- Tongs — You’ll need these to flip the chicken without piercing the skin. A fork will tear the skin and let the juices escape.
- A sharp chef’s knife — For slicing the garlic thinly. A dull knife will crush the garlic instead of cutting it, releasing too much pungent flavor.
- A cutting board — Preferably wooden or plastic. Keep one for raw chicken and another for vegetables to avoid cross-contamination.
- A small whisk or wooden spoon — For stirring the sauce and scraping up the browned bits from the pan.
If you don’t have a cast iron skillet, don’t run out and buy one just for this recipe. A stainless steel pan will work, just make sure it’s heavy enough to hold heat. I’ve used a cheap stainless skillet from a discount store before, and while it wasn’t as good as my cast iron, it still produced a decent crust. Budget-friendly options are out there—just look for something with a thick bottom.
One tip: after you finish cooking, let your cast iron pan cool completely before washing it. Use a stiff brush and hot water, then dry it thoroughly on the stove over low heat. A quick rub with a thin layer of oil will keep it seasoned and ready for the next meal.
Preparation Method
Let’s get cooking. Follow these steps carefully, and you’ll have the crispiest, most flavorful chicken thighs of your life.
- Pat the chicken dry. This is the most important step. Use paper towels to thoroughly dry both sides of each chicken thigh. Moisture is the enemy of crispy skin. If the skin is wet, it will steam instead of sear, and you’ll end up with rubbery skin. Take your time here—really press those paper towels into the skin.
- Season generously. Place the chicken thighs on a plate and season both sides with salt, pepper, and garlic powder. Don’t be shy with the salt—it helps draw out moisture and creates that golden crust. Let the chicken sit at room temperature for 10 minutes while you prepare the garlic and parsley.
- Place your skillet over medium heat. Here’s the trick: start with a cold pan. Place the chicken thighs skin-side down in the cold skillet, then turn the heat to medium. This allows the fat to render slowly, giving you perfectly crispy skin without burning. I learned this the hard way after burning the skin on my first few attempts.
- Cook the chicken skin-side down for 12-14 minutes. Don’t touch it. Don’t move it. Let it cook undisturbed. You’ll hear a gentle sizzle, and the fat will start to render. After about 10 minutes, peek under one thigh. The skin should be deep golden brown and crispy. If it’s not there yet, give it another 2-3 minutes.
- Flip and cook the other side. Using your tongs, carefully flip each thigh over. Cook for another 8-10 minutes on the second side. The internal temperature should reach 165°F (74°C) when measured with an instant-read thermometer. If you don’t have a thermometer, cut into the thickest part—the juices should run clear, and the meat should no longer be pink.
- Remove the chicken and rest. Transfer the cooked thighs to a clean plate and tent loosely with foil. Let them rest while you make the sauce. This resting period allows the juices to redistribute, keeping the meat tender.
- Make the garlic butter sauce. Pour off all but 1 tablespoon of the rendered chicken fat from the skillet. (Save that fat! It’s liquid gold for roasting vegetables or making gravy.) Return the skillet to medium-low heat. Add the butter and let it melt, swirling the pan occasionally.
- Add the garlic. Once the butter is foamy, add the sliced garlic. Cook for 1-2 minutes, stirring constantly, until the garlic is fragrant and just starting to turn golden. Be careful—garlic burns quickly, and burnt garlic is bitter.
- Deglaze the pan. Pour in the chicken broth and lemon juice, scraping up all those browned bits from the bottom of the skillet with your wooden spoon. This is where all the flavor lives. Let the sauce simmer for 1-2 minutes until it thickens slightly.
- Return the chicken to the pan. Nestle the chicken thighs back into the skillet, skin-side up. Spoon the garlic butter sauce over the top of each thigh. Let everything warm through together for 1-2 minutes.
- Garnish and serve. Sprinkle the fresh parsley over the top and serve immediately. The sauce will continue to thicken as it sits, so don’t wait too long to dig in.
A few things to watch for: if the pan starts smoking during the initial cook, your heat is too high. Turn it down a notch. You want a steady sizzle, not a frantic one. Also, if the garlic starts to brown too quickly when you add it to the butter, remove the pan from the heat for a few seconds to slow things down.
Cooking Tips & Techniques
Over the years, I’ve made plenty of mistakes with this recipe. I’ve burned the garlic, dried out the chicken, and ended up with sauce that was too salty. Here’s what I’ve learned so you don’t have to make the same mistakes.
Start with a cold pan. This is the single most important technique for crispy skin. Most recipes tell you to preheat the pan, but that’s wrong for chicken thighs. Starting cold allows the fat to render slowly, giving you a deep, even crispiness. If you start with a hot pan, the outside burns before the fat has a chance to render.
Don’t overcrowd the pan. If you’re cooking more than four thighs, do it in batches. Overcrowding lowers the pan temperature and causes the chicken to steam instead of sear. You’ll end up with pale, soggy skin. I learned this when I tried to cook six thighs at once—it was a disaster.
Use an instant-read thermometer. Chicken thighs are forgiving, but they still need to reach 165°F (74°C) for food safety. A thermometer takes the guesswork out of cooking. I use a Thermapen, but any reliable instant-read thermometer will do. It’s worth the investment.
Let the chicken rest. I know it’s tempting to dig in immediately, but resting the chicken for 5 minutes before slicing makes a huge difference. The juices redistribute, and the meat stays tender. If you cut into it too soon, all those juices run out onto the plate, leaving you with dry chicken.
Save the rendered fat. That golden fat you pour off after cooking the chicken is pure flavor. Strain it into a jar and keep it in the fridge. Use it for roasting potatoes, sautéing vegetables, or making the flakiest pie crust you’ve ever had. It’s a free bonus from this recipe.
Multitasking tip: While the chicken is cooking, prep your garlic and parsley. Slice the garlic thinly and chop the parsley. This way, when the chicken is done, you can make the sauce immediately without scrambling for ingredients.
Variations & Adaptations
This recipe is a fantastic base, but it’s also incredibly versatile. Here are a few ways to change it up depending on your mood or what you have on hand.
Spicy Garlic Butter Chicken : Add 1/2 teaspoon of red pepper flakes along with the garlic. The heat cuts through the richness of the butter beautifully. I make this version when I want something with a little kick. You can also add a finely chopped bird’s eye chili if you really want to feel the burn.
Herb-Infused Version : Toss a few sprigs of fresh thyme or rosemary into the pan when you add the garlic. The herbs infuse the butter with their aromatic oils. I’ve also used sage leaves, which give the dish a slightly earthy, almost Thanksgiving-like flavor.
Lemon-Garlic with Capers : After making the sauce, stir in 1 tablespoon of drained capers. The briny, tangy capers are a fantastic contrast to the rich butter. This is my go-to for a dinner that feels a little more elegant.
Dairy-Free Adaptation : Use ghee or a high-quality plant-based butter. Ghee has a higher smoke point than regular butter, so it’s less likely to burn. I’ve used Miyoko’s vegan butter with great results—it still creates a rich, creamy sauce.
Oven-Finished Method : If you’re cooking for a crowd, sear the chicken on the stovetop as directed, then transfer the skillet to a 400°F (200°C) oven for 15-20 minutes to finish cooking. This frees up your stovetop for other dishes and ensures even cooking.
I once tried a version with smoked paprika and a pinch of cumin added to the seasoning. It was good—different, but good. The smokiness paired well with the garlic butter. Don’t be afraid to experiment. This recipe is forgiving enough that you can play around without ruining dinner.
Serving & Storage Suggestions
This chicken is best served hot, straight from the skillet. The skin is at its crispiest right after cooking, so don’t let it sit too long. Here’s how to make the most of it.
Serving temperature: Serve immediately while the skin is still crackling. The sauce should be warm and glossy. If you need to hold the chicken for a few minutes, keep it in a warm oven (200°F / 95°C) on a wire rack so the skin doesn’t get soggy.
What to serve with it: This chicken pairs beautifully with simple sides. I love it over a bed of fluffy white rice or creamy mashed potatoes to soak up all that garlic butter sauce. A side of roasted asparagus or a crisp green salad with lemon vinaigrette balances the richness. For a low-carb option, serve it with cauliflower mash or sautéed spinach.
Storage: Store leftovers in an airtight container in the refrigerator for up to 4 days. The skin will lose its crispiness, but the flavor will still be excellent. To reheat, place the chicken in a skillet over medium heat with a splash of chicken broth. Cover and heat until warmed through. This helps restore some of the moisture. Avoid using the microwave—it will make the skin rubbery.
Freezing: You can freeze the cooked chicken for up to 3 months. Wrap each thigh individually in plastic wrap, then place them in a freezer-safe bag. To reheat, thaw overnight in the refrigerator, then follow the stovetop reheating method above. The sauce may separate slightly after freezing, but a quick whisk will bring it back together.
Flavor development: Honestly, this dish tastes even better the next day. The flavors meld together as it sits, and the garlic butter sauce seeps into every nook and cranny. If you can resist eating it all the first night, you’re in for a treat the next day.
Nutritional Information & Benefits
Here’s the approximate nutritional breakdown for one serving (one chicken thigh with sauce):
| Nutrient | Amount per Serving |
|---|---|
| Calories | 380 |
| Protein | 28g |
| Fat | 28g |
| Saturated Fat | 12g |
| Carbohydrates | 3g |
| Fiber | 0g |
| Sugar | 1g |
| Sodium | 680mg |
Chicken thighs are a great source of high-quality protein, iron, and zinc. They also contain selenium, which supports thyroid function and acts as an antioxidant. The skin provides a good amount of healthy fats, including monounsaturated fat, which is good for heart health. Garlic is known for its anti-inflammatory and immune-boosting properties, thanks to a compound called allicin. Butter, when used in moderation, provides fat-soluble vitamins like A, D, and E.
This recipe is naturally gluten-free and can be made dairy-free with the substitutions mentioned earlier. It’s also low in carbohydrates, making it suitable for keto and low-carb diets. If you’re watching your sodium intake, use low-sodium broth and reduce the added salt.
I personally love that this recipe feels indulgent but is actually quite balanced. It’s comfort food that doesn’t leave you feeling heavy or guilty. The protein keeps you full, the healthy fats satisfy your cravings, and the garlic gives you a little immune boost. It’s a win all around.
Frequently Asked Questions
Can I use boneless, skinless chicken thighs?
Yes, you can. The cooking time will be shorter—about 6-8 minutes per side. You won’t get the same crispy skin, but the garlic butter sauce will still make it delicious. Just be careful not to overcook them, as boneless thighs dry out faster than bone-in.
Why is my chicken skin not getting crispy?
The most common reason is moisture. Make sure you pat the chicken very dry with paper towels before seasoning. Another reason could be that your pan isn’t hot enough. Start with a cold pan and medium heat to render the fat slowly. If the pan is too hot, the skin will burn before it crisps up.
Can I make this recipe in the oven instead of on the stovetop?
Absolutely. Sear the chicken in an oven-safe skillet on the stovetop, then transfer the skillet to a 400°F (200°C) oven for 15-20 minutes. This method is great for cooking larger batches. Just make sure your skillet is oven-safe—cast iron and stainless steel are fine, but nonstick pans with plastic handles are not.
How do I know when the chicken is fully cooked?
The safest way is to use an instant-read thermometer. Insert it into the thickest part of the thigh without touching the bone. The internal temperature should reach 165°F (74°C). If you don’t have a thermometer, cut into the thickest part—the juices should run clear, and the meat should no longer be pink.
Can I double this recipe?
Yes, but cook the chicken in batches to avoid overcrowding the pan. If you try to cook eight thighs at once, they’ll steam instead of sear, and you’ll lose that crispy skin. Cook them in two batches, then make the sauce in the same pan after all the chicken is done.
Conclusion
This crispy one-pan garlic butter chicken thighs recipe is proof that you don’t need a dozen ingredients or hours in the kitchen to make something incredible. It’s simple, it’s fast, and it delivers every single time. The crispy skin, the juicy meat, that luscious garlic butter sauce—it all comes together in one pan in under 30 minutes.
I love this recipe because it’s the kind of meal that makes you feel like a hero without any stress. You can serve it on a busy weeknight when you’re short on time, or dress it up with a side of roasted vegetables for a dinner party. It’s versatile, forgiving, and absolutely delicious.
Now it’s your turn. Give this recipe a try, and don’t be afraid to make it your own. Add a little heat, throw in some herbs, or keep it exactly as written. Whatever you do, let me know how it turns out. Drop a comment below, share your photos on Pinterest, or tag me in your recreations. I’d love to see your crispy, golden, garlicky creations. Happy cooking, friends!
Pin This Recipe!

Crispy One-Pan Garlic Butter Chicken Thighs: Best Easy Dinner

This crispy one-pan garlic butter chicken thighs recipe is proof that you don’t need a dozen ingredients or hours in the kitchen to make something incredible. It’s simple, fast, and delivers every single time with crispy skin, juicy meat, and a luscious garlic butter sauce.
- Prep Time: 10 minutes
- Cook Time: 25 minutes
- Total Time: 35 minutes
- Yield: 4 servings 1x
- Category: Main Course
- Cuisine: American
Ingredients
- 4 bone-in, skin-on chicken thighs (about 1.5 to 2 pounds total)
- 1 teaspoon kosher salt
- 1/2 teaspoon black pepper
- 1/2 teaspoon garlic powder (optional but recommended)
- 3 tablespoons unsalted butter
- 6 cloves garlic, thinly sliced
- 1 tablespoon fresh lemon juice (about half a lemon)
- 2 tablespoons low-sodium chicken broth
- 1 tablespoon fresh parsley, chopped
Instructions
- Pat the chicken dry with paper towels. This is the most important step for crispy skin.
- Season both sides of the chicken thighs with salt, pepper, and garlic powder. Let sit at room temperature for 10 minutes.
- Place the chicken thighs skin-side down in a cold 10-inch or 12-inch cast iron skillet. Turn the heat to medium.
- Cook the chicken skin-side down for 12-14 minutes without moving. The skin should be deep golden brown and crispy.
- Flip the chicken using tongs and cook for another 8-10 minutes on the second side. Internal temperature should reach 165°F (74°C).
- Transfer the cooked chicken to a clean plate and tent loosely with foil. Let rest while making the sauce.
- Pour off all but 1 tablespoon of rendered chicken fat from the skillet. Return the skillet to medium-low heat.
- Add the butter and let it melt, swirling occasionally. Once foamy, add the sliced garlic and cook for 1-2 minutes, stirring constantly, until fragrant and just starting to turn golden.
- Pour in the chicken broth and lemon juice, scraping up browned bits from the bottom of the skillet. Let simmer for 1-2 minutes until slightly thickened.
- Return the chicken to the skillet, skin-side up. Spoon the garlic butter sauce over the top. Warm through for 1-2 minutes.
- Garnish with fresh parsley and serve immediately.
Notes
Start with a cold pan for the crispiest skin. Don’t overcrowd the pan; cook in batches if needed. Save the rendered chicken fat for roasting vegetables. Let the chicken rest for 5 minutes before serving to keep it juicy.
Nutrition
- Serving Size: 1 chicken thigh with
- Calories: 380
- Sugar: 1
- Sodium: 680
- Fat: 28
- Saturated Fat: 12
- Carbohydrates: 3
- Protein: 28
Keywords: crispy chicken thighs, garlic butter chicken, one-pan dinner, easy chicken recipe, 30-minute meal, cast iron skillet chicken