Love this? Save it for later!
Share the inspiration with your friends
The quarterly office potluck was in six hours and I’d completely forgotten. Everyone else would be bringing their signature dishes — Karen’s famous seven-layer dip, Mark’s slow-cooker pulled pork that he talks about like it’s his firstborn, and Sarah who literally bakes sourdough from her own starter named “Gerald.” I had a half-empty jar of peanut butter, a sleeve of Oreos I’d been sneaking all week, and absolutely no time to bake anything. Let me tell you, the panic was real. I mean, I actually checked if the grocery store could deliver in under an hour. Spoiler: they could not.
So I did what any reasonable person would do when faced with professional humiliation — I started throwing things in a bowl and hoping for a miracle. Cream cheese? Sure. Peanut butter? Obviously. Those crushed Oreos at the bottom of the sleeve? That’s a crust, right? I wasn’t aiming for anything special, honestly. I was aiming for “edible” and hoping for “nobody asks who brought this.” But here’s the thing about desperation cooking — sometimes it works out better than the stuff you actually plan. By the time I slid that pie into the fridge to set, I had flour on my ceiling (don’t ask), a cracked mixing bowl, and zero confidence. But what came out a few hours later? Let me tell you, that pie didn’t just survive the potluck — it won. Karen asked for the recipe. Mark stopped talking about his pork. And someone actually said “this is the best thing here” while holding a forkful of my completely accidental, no-bake, lightened-up creation. Maybe you’ve been there — that moment when a recipe you threw together in a panic becomes the one everyone remembers. That’s this pie. And I’ve been making it ever since.
Why You’ll Love This Recipe
Look, I’ve tested this pie more times than I care to admit — mostly because I kept eating the test batches before anyone could judge them. After about seven versions (and one very memorable fail where I forgot the cream cheese entirely), I landed on this one. It’s the kind of recipe that makes you look like you tried way harder than you actually did.
- Quick & Easy : Comes together in about 20 minutes of active work. No oven, no fuss, no sweating over a double boiler. Just mix, pour, and let the fridge do the heavy lifting.
- Simple Ingredients : You probably have most of this in your kitchen right now. No weird specialty items that cost fifteen dollars and then sit in your pantry for three years. I’m looking at you, jar of molasses I bought for one recipe in 2019.
- Perfect for Last-Minute Everything : Potlucks, birthday parties, Tuesday nights when you need dessert and you need it now. This pie doesn’t judge your planning skills.
- Crowd-Pleaser : I’ve served this to kids who usually only eat chicken nuggets, to my health-conscious sister-in-law, and to my dad who thinks “lightened up” means “why bother.” Everyone goes back for seconds.
- Unbelievably Delicious : The texture is this perfect thing — creamy without being heavy, rich without being overwhelming. And that Oreo crust? It’s the kind of crust you’ll want to eat by itself. Not that I’ve done that. More than once.
What makes this different from every other peanut butter pie out there? Two things. First, I swap in Greek yogurt for some of the heavy cream — it keeps that luscious texture while cutting way back on the guilt. Second, I use a trick from my days working in a tiny bakery where the owner taught me to whip the cream cheese until it’s actually fluffy, not just blended. That extra minute of whipping makes the filling so light it almost floats. Almost. It’s still pie.
This isn’t just good for a lightened-up dessert. It’s good, period. The kind of good where you close your eyes after the first bite. The kind where you’re already thinking about when you can make it again before you’ve even finished your slice. Comfort food that doesn’t leave you feeling like you need a nap and a confession — that’s the sweet spot, right?
What Ingredients You Will Need
This recipe uses simple, wholesome ingredients to deliver that rich, creamy peanut butter flavor without the heavy feeling afterward. Most of these are pantry staples, which is exactly what you want when a dessert craving hits at 8 PM on a Wednesday.
For the Oreo Crust
- 24 Oreo cookies (regular or reduced-fat — both work fine, just don’t use the double-stuf ones or the crust gets too greasy)
- 4 tablespoons unsalted butter, melted (salted butter works too, just skip the pinch of salt I’d normally add)
For the Peanut Butter Filling
- 8 ounces cream cheese, softened to room temperature (I use the block kind, not the tub — the tub has more air and the texture gets weird)
- 1 cup creamy peanut butter (I prefer natural-style with just peanuts and salt, but regular Jif or Skippy works great too. Just don’t use the “natural” kind that separates — unless you want to stir it really, really well first)
- 1/2 cup powdered sugar (you can adjust this up or down depending on how sweet you like things)
- 1 teaspoon vanilla extract (the real stuff, not imitation — you can taste the difference here)
- 1/2 cup plain Greek yogurt (full-fat or 2% works best; nonfat makes the filling a bit thin)
- 1/2 cup heavy cream (cold from the fridge — this is important for whipping properly)
For the Topping (Optional but Recommended)
- 1/4 cup heavy cream (for whipping into clouds of happiness)
- 1 tablespoon powdered sugar
- 2-3 Oreo cookies, crushed for sprinkling on top
- Drizzle of melted peanut butter (about 2 tablespoons, warmed slightly so it drizzles nicely)
A quick note on ingredient selection: I’ve tested this with several peanut butter brands, and honestly, the one you like eating straight from the jar is the one you should use. If you love the flavor of a particular brand, that’s what will shine through in the pie. For the cream cheese, I recommend Philadelphia — it’s consistent and gives the creamiest result. The Greek yogurt brand matters less, but I use Fage because it’s thick and doesn’t make the filling watery.
If you’re dairy-free, you can substitute dairy-free cream cheese (Kite Hill works well) and coconut cream instead of heavy cream. The texture will be slightly different — a bit denser — but still delicious. For a vegan version, use vegan cream cheese, coconut cream, and vegan Oreos (which are actually accidentally vegan!).
Equipment Needed
Nothing fancy here — this is a no-bake recipe, so you don’t need stand mixers or food processors unless you want to use them. Here’s what you’ll actually need:
- 9-inch pie dish (glass or ceramic works best — metal can sometimes give a metallic taste to the crust)
- Mixing bowls (one large, one medium — I use my grandmother’s old Pyrex bowls that have seen better days but still work perfectly)
- Hand mixer or stand mixer (you could do this by hand with a whisk, but your arm will hate you. Trust me, I tried it once and regretted everything)
- Rolling pin or food processor (for crushing Oreos — a zip-top bag and a rolling pin works in a pinch, and honestly, it’s kind of therapeutic)
- Spatula (for scraping every last bit of filling into the crust because wasting peanut butter filling should be a crime)
- Measuring cups and spoons
If you don’t have a pie dish, you can use a 9-inch springform pan — it makes for prettier slices anyway. No hand mixer? A whisk and some determination will work, but give yourself an extra 5 minutes and expect your arm to be sore. I speak from experience on that one.
Preparation Method
Alright, let’s make this pie. I’ve broken it down into steps that even a distracted Tuesday-night cook can follow. Take your time with the first few steps — rushing the crust is the most common mistake I see people make.
Step 1: Make the Oreo Crust
Crush those 24 Oreos into fine crumbs. You can do this in a food processor (pulse about 15-20 times) or by hand — put the cookies in a zip-top bag and go to town with a rolling pin. I prefer the bag method because it lets me work out my frustrations. You want the crumbs to be mostly fine with a few slightly larger pieces for texture. Pour the crumbs into a medium bowl, add the 4 tablespoons of melted butter, and stir with a fork until every crumb is coated. It should look like wet sand — if it looks dry, add another tablespoon of melted butter. Press the mixture firmly into your pie dish, starting with the sides and working your way to the center. Use the bottom of a measuring cup to press it down flat and even. Pop it in the fridge while you make the filling — at least 15 minutes to firm up.
Step 2: Whip the Cream Cheese Base
In a large bowl, beat the softened cream cheese with a hand mixer on medium speed for about 2-3 minutes. And I mean really beat it — you want it light and fluffy, not just broken up. This is the trick I learned from that bakery owner. Scrape down the sides of the bowl with a spatula. Add the peanut butter and beat for another minute until completely combined. The mixture will be thick and smell incredible — try not to eat it all before the next step. I’m not saying I’ve done that, but I’m also not saying I haven’t.
Step 3: Add the Sweetness
Add the powdered sugar and vanilla extract to the peanut butter mixture. Beat on low speed at first (so the sugar doesn’t fly everywhere — learned that one the hard way) then increase to medium for about a minute. The mixture should be smooth and slightly stiff. Scrape down the bowl again — we’re thorough here.
Step 4: Fold in the Yogurt
Add the Greek yogurt and fold it in gently with a spatula. Don’t beat it — folding keeps the mixture light. You want to see the yogurt disappear into the peanut butter mixture, leaving no white streaks. This step adds that tangy creaminess that makes the lightened-up version work so well. It also adds protein, but we’re not thinking about that right now. We’re thinking about deliciousness.
Step 5: Whip the Cream
In a separate medium bowl (chilled if you have time, but not strictly necessary), pour in the 1/2 cup of cold heavy cream. Beat on medium-high speed until soft peaks form — about 2-3 minutes. You’re looking for cream that holds its shape when you lift the beaters but still looks soft and billowy. Don’t over-whip it or you’ll end up with butter. I’ve done that. It’s sad. Fold this whipped cream into the peanut butter mixture in three additions, using gentle strokes. Be patient here — you want the mixture to be uniform but you don’t want to deflate all that air you just whipped in. This is what gives the pie its light, mousse-like texture.
Step 6: Assemble and Chill
Pour the filling into your chilled Oreo crust. Spread it evenly with a spatula, making sure it reaches the edges. Give the pie dish a few gentle taps on the counter to release any air bubbles. Cover loosely with plastic wrap and refrigerate for at least 6 hours — overnight is even better. I know that’s a long time, but trust me, the filling needs that time to set properly. If you try to cut it too early, you’ll get a delicious mess instead of clean slices. Both are good, but one is more impressive for company.
Step 7: Add the Topping
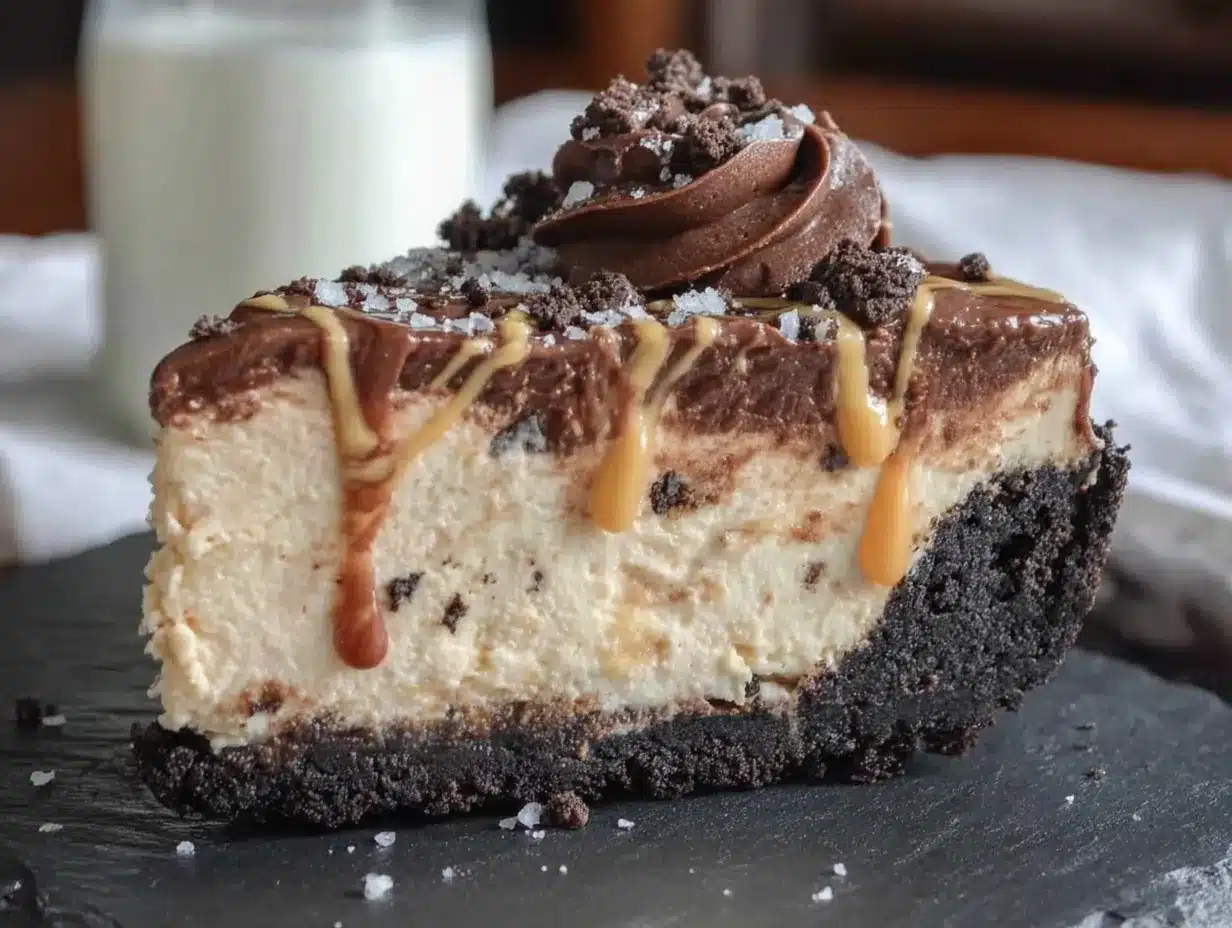
When you’re ready to serve, make the whipped cream topping. Beat the 1/4 cup heavy cream with 1 tablespoon powdered sugar until soft peaks form. Spread or pipe it over the set pie. Sprinkle with crushed Oreos and drizzle with warmed peanut butter. Slice with a sharp knife dipped in hot water and wiped dry between cuts — this gives you those clean, beautiful slices that look like they came from a bakery.
Cooking Tips & Techniques
After making this pie more times than I care to count, I’ve collected a few hard-won lessons. Let me save you from my mistakes.
The cream cheese must be room temperature. I cannot stress this enough. Cold cream cheese will give you lumpy filling, and no amount of beating will fix it completely. Take it out of the fridge at least an hour before you start. If you forgot (which I do, constantly), cut it into small cubes and microwave it for 10 seconds at a time until it’s soft but not warm.
Don’t skip the chilling time. I know, I know — six hours feels like forever when you want pie right now. But this is a no-bake pie, which means it sets in the fridge, not the oven. Short-changing the chill time means a filling that’s more like peanut butter soup than pie. I learned this when I made it for a dinner party and tried to serve it after four hours. The first slice was a tragedy. The second slice, after another two hours, was perfect. We ate the first one with spoons and pretended it was intentional.
Whip the cream cheese longer than you think you need to. That extra minute of beating makes the filling noticeably lighter. It’s the difference between a good pie and a great one. Set a timer if you have to — I do.
Use a metal spatula for the crust. The bottom of a measuring cup works, but a small offset metal spatula gives you more control, especially around the edges. You want that crust to be even — thin spots can get soggy, and thick spots are hard to cut through.
If your filling seems too soft after folding in the cream, pop it in the fridge for 15 minutes before pouring it into the crust. This gives it a head start on setting and makes spreading it easier.
Variations & Adaptations
This pie is incredibly forgiving, which is one of the reasons I love it. Here are some ways to make it your own:
Chocolate Peanut Butter Swirl
Melt 1/4 cup of semi-sweet chocolate chips and swirl it into the filling before pouring it into the crust. Use a knife to create figure-eight patterns through the filling. It looks gorgeous and adds that chocolate-peanut butter combo that people go crazy for. I made this version for a friend’s birthday and she texted me about it for three days afterward.
Gluten-Free Version
Use gluten-free chocolate sandwich cookies (like Glutino or Goodie Girl brands) for the crust. Everything else in the recipe is naturally gluten-free. I’ve tested this with Glutino cookies and honestly, the crust is just as good — maybe even a little crunchier.
Vegan Version
As I mentioned earlier, use vegan cream cheese, coconut cream (chilled and whipped), and vegan Oreos. The texture is a bit denser, but the flavor is still fantastic. I made this for a vegan potluck and it disappeared faster than anything else on the table.
Lower Sugar Option
Cut the powdered sugar down to 1/4 cup and use a sugar-free sweetener like monk fruit or allulose for the remaining 1/4 cup. The filling will be slightly less sweet, but the peanut butter flavor shines through more. I actually prefer this version — it lets the peanut butter be the star instead of the sugar.
Peanut Butter Cup Version
Chop up 4-5 peanut butter cups and fold them into the filling along with the whipped cream. Then sprinkle more on top with the crushed Oreos. This is the “go big or go home” version, and it’s absolutely ridiculous in the best way.
Serving & Storage Suggestions
This pie is best served cold — straight from the fridge. Let it sit at room temperature for about 5-10 minutes before slicing if you want slightly softer filling, but don’t let it sit too long or it loses that perfect texture.
For presentation, I like to serve it on a simple white plate with a drizzle of chocolate sauce and a few extra Oreo crumbs scattered around. It makes the pie look intentional and fancy, even though we know it came together in 20 minutes. A dollop of whipped cream on each slice never hurts either.
This pie pairs beautifully with a hot cup of coffee — the bitterness cuts through the sweetness perfectly. For a dessert spread, serve it alongside fresh berries or a simple fruit salad. The tartness of raspberries or strawberries is a wonderful contrast to the rich, creamy pie.
Storage: Cover the pie tightly with plastic wrap or transfer slices to an airtight container. It will keep in the refrigerator for up to 5 days — though in my experience, it never lasts that long. The crust will soften slightly over time, but the flavor actually gets better after a day or two as everything melds together.
Freezing: This pie freezes beautifully! Make it completely (without the whipped cream topping), wrap it tightly in plastic wrap and then foil, and freeze for up to 3 months. Thaw in the refrigerator overnight before serving. Add the fresh whipped cream and toppings after thawing. I usually make two at a time — one for now, one for later. Future me is always grateful.
For reheating (not that you need to with a cold pie), if you want a slightly softer texture, let individual slices sit at room temperature for about 15 minutes. Do not microwave — it will melt the filling and ruin the texture completely.
Nutritional Information & Benefits
Here’s the thing about this “lightened up” pie — it’s still dessert, but it’s dessert that won’t leave you feeling like you need to run a marathon to work it off. Per slice (based on 10 servings):
- Calories: Approximately 380
- Protein: 10g (thanks to the Greek yogurt and peanut butter)
- Fat: 26g (mostly from healthy peanut butter fats and cream cheese)
- Carbohydrates: 28g
- Fiber: 2g
- Sugar: 16g (significantly less than traditional peanut butter pies that can hit 30-40g per slice)
The Greek yogurt adds protein and probiotics, while the peanut butter provides healthy monounsaturated fats and a good dose of vitamin E. Compared to a traditional peanut butter pie that uses heavy cream and sweetened condensed milk, this version saves about 150 calories and 15 grams of sugar per slice. That’s a trade-off I can get behind — especially when the taste is this good.
For those watching their intake, this pie fits into most moderate eating plans. It’s not low-carb (that Oreo crust, you know), but it’s a reasonable indulgence that satisfies that peanut butter craving without derailing your whole week. I’ve served it to friends who are training for marathons and friends who are training for dessert-eating competitions. Everyone leaves happy.
Conclusion
Look, I’m not going to tell you this pie will change your life. But I will tell you that it’s saved mine — at least a few times. From that panicked potluck morning to countless last-minute dessert emergencies, this creamy no-bake peanut butter Oreo pie has been my secret weapon. It’s the recipe I turn to when I need to impress people without actually trying that hard. It’s the dessert I make when I want something indulgent but don’t want to feel terrible afterward. And honestly? It’s just really, really good.
I hope you make this pie your own. Add extra Oreos. Use crunchy peanut butter if that’s your thing. Top it with chocolate shavings or caramel sauce or nothing at all. The beauty of this recipe is how forgiving it is — it wants to be delicious, and it will be, no matter what you do to it.
If you make this, I’d love to hear about it. Drop a comment below and tell me how it turned out, what variations you tried, or if you also ended up with flour on your ceiling. And if you have a recipe that saved you from a similar moment of panic, share that too — we all need more of those in our lives.
Now go make some pie. You deserve it.
Frequently Asked Questions
Can I use natural peanut butter in this recipe?
You can, but be aware that natural peanut butters (the kind that separate) can sometimes make the filling a bit oily or grainy. If you use natural peanut butter, stir it really well before measuring, and consider adding an extra tablespoon of powdered sugar to help stabilize the texture. I’ve done it and it works — it’s just not quite as smooth as using processed peanut butter.
How far in advance can I make this pie?
You can make this pie up to 2 days in advance without the whipped cream topping. Just cover it tightly and keep it in the fridge. Add the whipped cream and toppings the day you plan to serve it for the best presentation. If you’re making it further ahead, freeze it (without toppings) for up to 3 months.
Can I use a different type of cookie for the crust?
Absolutely! Graham crackers, chocolate graham crackers, vanilla wafers, or even shortbread cookies all work beautifully. Just keep the ratio the same — about 24 cookies crushed and mixed with 4 tablespoons of melted butter. The flavor will change, but that’s part of the fun. I’ve made a version with Biscoff cookies that was absolutely incredible.
Why did my filling turn out runny?
This usually happens for one of three reasons: (1) your cream cheese wasn’t cold enough when you started whipping, (2) you over-whipped the cream and it started to separate, or (3) you didn’t chill the pie long enough. If your filling is runny, try chilling it for another 2-3 hours — it might just need more time to set. If it’s still runny after 8 hours, you can try freezing it for an hour before serving.
Is this pie really “lightened up”?
Compared to traditional no-bake peanut butter pies that use sweetened condensed milk and double the cream cheese? Yes, absolutely. This version saves about 150 calories and 15 grams of sugar per slice. Is it a health food? No — it’s still dessert. But it’s dessert that won’t send your blood sugar on a roller coaster or leave you feeling heavy and sluggish. It’s the kind of treat you can enjoy without guilt, and honestly, that’s the whole point.
Pin This Recipe!

Creamy No-Bake Peanut Butter Oreo Pie

A quick and easy no-bake peanut butter pie with an Oreo crust, lightened up with Greek yogurt. Perfect for last-minute potlucks or any dessert emergency.
- Prep Time: 20 minutes
- Cook Time: 0 minutes
- Total Time: 6 hours 20 minutes (includes chilling)
- Yield: 10 servings 1x
- Category: Dessert
- Cuisine: American
Ingredients
- 24 Oreo cookies (regular or reduced-fat)
- 4 tablespoons unsalted butter, melted
- 8 ounces cream cheese, softened to room temperature
- 1 cup creamy peanut butter
- 1/2 cup powdered sugar
- 1 teaspoon vanilla extract
- 1/2 cup plain Greek yogurt (full-fat or 2%)
- 1/2 cup heavy cream, cold
- 1/4 cup heavy cream (for topping)
- 1 tablespoon powdered sugar (for topping)
- 2–3 Oreo cookies, crushed (for topping)
- 2 tablespoons peanut butter, melted (for topping)
Instructions
- Crush 24 Oreos into fine crumbs. Mix with 4 tablespoons melted butter until it looks like wet sand. Press firmly into a 9-inch pie dish. Refrigerate for at least 15 minutes.
- In a large bowl, beat softened cream cheese with a hand mixer on medium speed for 2-3 minutes until light and fluffy. Add peanut butter and beat for another minute until combined.
- Add powdered sugar and vanilla extract. Beat on low speed then increase to medium for about 1 minute until smooth. Scrape down the bowl.
- Fold in Greek yogurt gently with a spatula until no white streaks remain.
- In a separate chilled bowl, beat 1/2 cup cold heavy cream on medium-high speed until soft peaks form, about 2-3 minutes. Fold into peanut butter mixture in three additions.
- Pour filling into chilled crust. Spread evenly and tap gently to release air bubbles. Cover and refrigerate for at least 6 hours or overnight.
- Before serving, beat 1/4 cup heavy cream with 1 tablespoon powdered sugar until soft peaks form. Spread or pipe over pie. Sprinkle with crushed Oreos and drizzle with melted peanut butter.
Notes
Cream cheese must be room temperature to avoid lumps. Chill pie for at least 6 hours for clean slices. For a vegan version, use dairy-free cream cheese, coconut cream, and vegan Oreos. The pie can be frozen for up to 3 months without the whipped cream topping.
Nutrition
- Serving Size: 1 slice
- Calories: 380
- Sugar: 16
- Sodium: 320
- Fat: 26
- Saturated Fat: 12
- Carbohydrates: 28
- Fiber: 2
- Protein: 10
Keywords: no-bake pie, peanut butter pie, Oreo crust, easy dessert, potluck dessert, creamy pie



