Love this? Save it for later!
Share the inspiration with your friends
Jen wasn’t trying to impress anyone. I’d stopped by her place on a random Tuesday evening to pick up a book I’d lent her, and the smell hit me before I even got through the front door. It was warm, buttery, and faintly sweet—like a bakery had somehow materialized in her tiny apartment kitchen. She waved me in with a flour-dusted hand, barely looking up from the baking sheet she was pulling out of the oven. “Oh, those are just something I threw together,” she said when I asked what smelled so incredible. “My mom used to make them, and I had a half-jar of jam that needed using up.”
She said it like it was nothing. Like she hadn’t just created these perfect little cookies with a jewel of raspberry in the center and a glossy drizzle of vanilla glaze on top. I stood there, still holding my keys, watching her move around her cramped kitchen with this effortless ease. She didn’t use a mixer—just a bowl and a wooden spoon. She didn’t measure the jam, just spooned it in by eye. And when she offered me one while it was still warm? Honestly, I think I made a sound that was borderline embarrassing. The cookie was tender, the almond flavor was subtle but present, and that raspberry center was pure, sticky sweetness.
Maybe you’ve been there—standing in someone else’s kitchen, watching them make something that looks like it belongs in a magazine, and they’re acting like it’s no big deal. That’s exactly what happened to me. I asked for the recipe before I left, and she scribbled it on a sticky note. That crumpled piece of paper lived on my fridge for two years. These cookies have become my go-to for everything from last-minute holiday treats to “I need a cookie right now” emergencies. They’re quick, they’re simple, and honestly, they make you look like you know what you’re doing in the kitchen. And the best part? They come together in under 30 minutes, start to finish.
Why You’ll Love These Raspberry Almond Thumbprint Cookies
Let me tell you why these cookies have earned a permanent spot in my rotation. First off, they’re ridiculously easy. We’re talking one bowl, no electric mixer, and about 15 minutes of active work. The dough comes together with just your hands or a wooden spoon, which means less cleanup and more time for actually eating cookies. For a busy weeknight when you’re craving something sweet but don’t want to spend an hour in the kitchen, these are perfect.
- Quick & Easy: From start to finish, these cookies are ready in under 30 minutes. The dough chills for just 15 minutes, and they bake in 12 to 14 minutes. That’s faster than ordering delivery, honestly.
- Simple Ingredients: You probably have most of these in your pantry right now. Butter, sugar, flour, almond extract, and a jar of raspberry jam. No fancy trips to specialty stores required.
- Perfect for Weeknight Baking: When you need a little something sweet after dinner but don’t want a huge production, these are your answer. They’re small, satisfying, and don’t leave you with a sink full of dishes.
- Crowd-Pleaser: I’ve brought these to potlucks, cookie swaps, and office parties, and they always disappear first. Kids love the jam center, and adults appreciate the sophisticated almond-vanilla flavor combo.
- Unbelievably Delicious: The texture is what gets me every time. The cookies are soft and tender with slightly crispy edges, and that raspberry center stays jammy and bright. The vanilla glaze on top adds just the right amount of extra sweetness.
What makes these different from other thumbprint cookie recipes? It’s the almond extract. Most recipes just use vanilla, but that touch of almond in the dough elevates the whole cookie. It pairs beautifully with the raspberry jam, creating a flavor that reminds me of those fancy French sablés you’d pay way too much for at a bakery. Plus, the glaze isn’t an afterthought—it’s a thin, glossy drizzle that makes these cookies look like you spent hours on them when you really didn’t.
These cookies are the kind that make you close your eyes after the first bite. They’re comfort food at its finest—quick to make, but with the same soul-soothing satisfaction as something that took all afternoon. Perfect for when you need to impress someone without the stress, or when you just want to turn a regular Tuesday night into something a little more special.
What Ingredients You Will Need
This recipe uses simple, wholesome ingredients that work together to deliver that perfect balance of buttery, nutty, and sweet. Most of these are pantry staples, so you might not even need a grocery run.
- Unsalted butter, softened — 1 cup (2 sticks or 226g). I always use unsalted so I can control the salt level. Let it sit out for about 30 minutes before you start. It should be soft enough that you can press a finger into it easily, but not melty.
- Granulated sugar — ⅔ cup (133g). Regular white sugar works perfectly here. It gives the cookies their structure and that slight crispness on the edges.
- Large egg yolk — 1 yolk. Save the egg white for something else, or honestly, just discard it. The yolk adds richness and tenderness to the dough without making it too wet.
- Almond extract — 1 teaspoon. This is the secret ingredient. Don’t skip it. I prefer McCormick or Nielsen-Massey for the purest flavor. It’s what gives these cookies that distinct, almost marzipan-like taste.
- Vanilla extract — 1 teaspoon. Use pure vanilla extract if you can. The imitation stuff works in a pinch, but the real thing makes a difference in the final flavor.
- All-purpose flour — 1 ½ cups (188g). Spoon and level your flour—don’t scoop directly from the bag, or you’ll end up with dry, crumbly dough. If you’re measuring by weight, even better.
- Salt — ¼ teaspoon. Just enough to balance the sweetness and bring out the other flavors.
- Raspberry jam or preserves — About ⅓ cup. Use a good quality jam. I like Bonne Maman or Smucker’s seedless raspberry jam. If you use preserves with seeds, that’s fine too—just know you’ll get little crunchy bits in the center. Some people love that.
- For the Vanilla Glaze:
- Powdered sugar — 1 cup (120g), sifted if you want it extra smooth.
- Vanilla extract — ½ teaspoon.
- Milk or heavy cream — 2 to 3 tablespoons. Start with 2 and add more until you get the consistency you want. Heavy cream makes a richer, glossier glaze.
Substitution Notes: If you’re out of almond extract, you can use all vanilla extract (1 ½ teaspoons total), but you’ll lose that signature almond flavor. For a gluten-free version, swap the all-purpose flour with a 1:1 gluten-free baking flour blend. I’ve tested this with King Arthur Measure for Measure and it works great. You can also use any other jam you have on hand—strawberry, apricot, or blackberry all work beautifully. And if you’re dairy-free, use plant-based butter (I like Miyoko’s) and a non-dairy milk for the glaze.
Equipment Needed
You don’t need a lot of fancy equipment for these cookies, which is part of why I love them. Here’s what you’ll need:
- Mixing bowls: One medium bowl for the dough and one small bowl for the glaze. Nothing fancy needed.
- Wooden spoon or rubber spatula: For mixing the dough by hand. A stand mixer works too, but honestly, it’s not worth the cleanup for this simple dough.
- Measuring cups and spoons: For accurate measurements. I cannot stress this enough—baking is a science, even for easy cookies.
- Baking sheet: A standard half-sheet pan works perfectly. Line it with parchment paper or a silicone baking mat for easy cleanup.
- Parchment paper or silicone baking mat: Trust me on this. The cookies won’t stick, and cleanup is a breeze.
- Small cookie scoop or teaspoon: For portioning the dough evenly. A #40 cookie scoop (about 1.5 tablespoons) is my go-to.
- Your thumb or the back of a teaspoon: For making the indentations. I use my thumb, but if you’re particular about uniformity, use the rounded end of a wooden spoon.
- Small piping bag or zip-top bag: For drizzling the glaze. A zip-top bag with a tiny corner snipped off works perfectly and costs nothing.
- Cooling rack: For letting the cookies cool completely before glazing. If you don’t have one, a clean countertop works—just flip the cookies over after a few minutes so air can circulate.
I’ve made these cookies with nothing but a bowl and a fork when I was traveling and didn’t have my usual tools. They still turned out great. The only non-negotiable is the parchment paper—without it, the jam can stick to the pan and make a mess.
Preparation Method
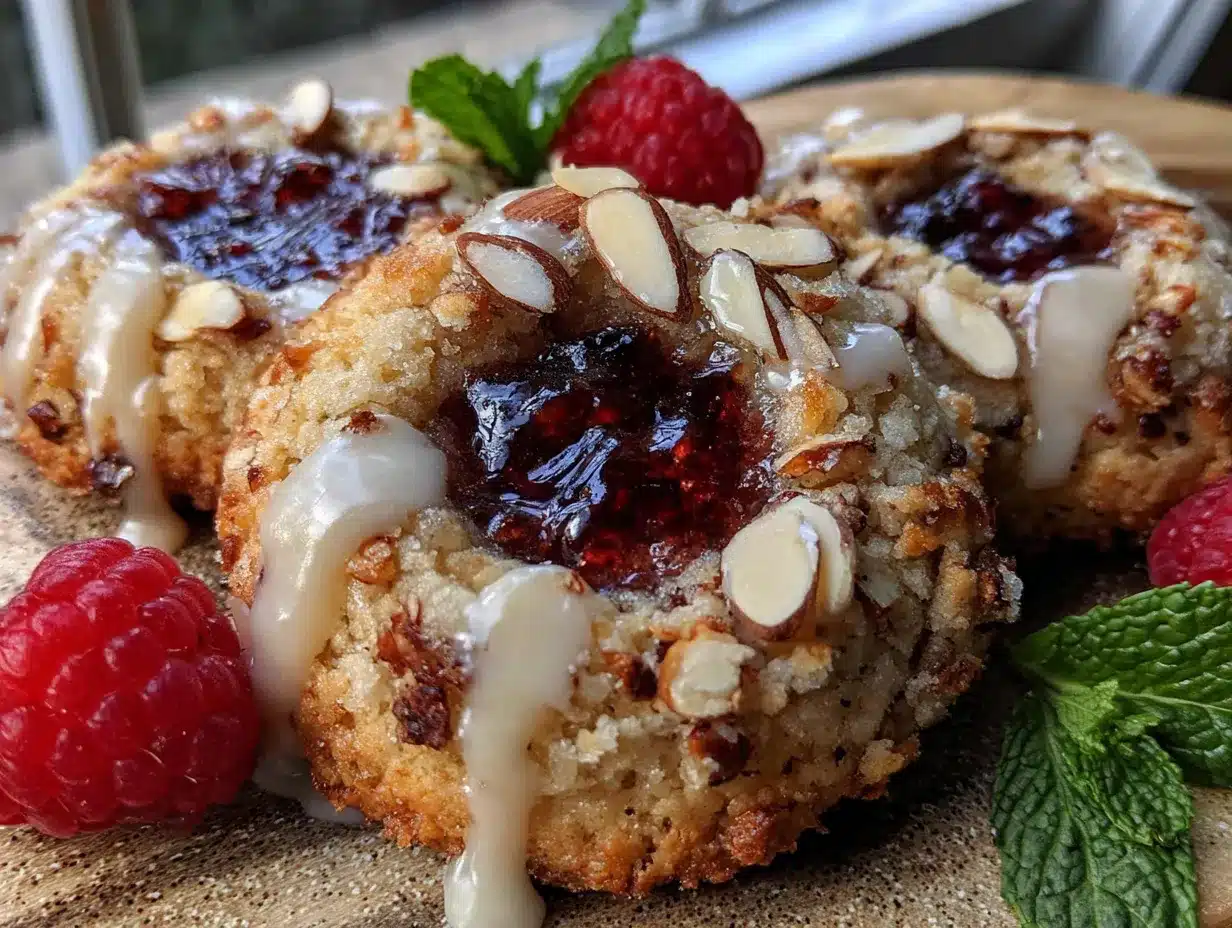
Let’s get to the fun part. Here’s how to make these cookies step by step. I’ll include all the little details I’ve learned from making these dozens of times.
- Preheat your oven to 350°F (175°C). Line a baking sheet with parchment paper or a silicone mat. Do this first so your oven is ready when you are.
- Cream the butter and sugar. In a medium mixing bowl, combine the softened butter and granulated sugar. Use a wooden spoon or rubber spatula to mix them together until they’re light and fluffy. This takes about 2 minutes by hand. You’re looking for a pale, creamy mixture that looks almost like frosting. If you’re using a stand mixer with the paddle attachment, use medium speed for about 1 minute.
- Add the wet ingredients. Add the egg yolk, almond extract, and vanilla extract to the butter-sugar mixture. Stir until everything is well combined. The mixture might look a little separated at this point—that’s normal. Just keep stirring until it comes back together into a smooth paste.
- Add the dry ingredients. Add the flour and salt to the bowl. Stir gently until just combined. You want to stop as soon as the flour disappears into the dough. Overmixing will make the cookies tough. The dough should be soft and slightly sticky but hold together when pressed.
- Chill the dough. Cover the bowl with plastic wrap and pop it in the fridge for 15 minutes. This is crucial—don’t skip it. Chilling the dough prevents the cookies from spreading too much in the oven. While the dough chills, you can clean up a bit or get your jam ready.
- Shape the cookies. Scoop out rounded tablespoons of dough (about 1.5 tablespoons each) and roll them into smooth balls. Place them on the prepared baking sheet, spacing them about 2 inches apart. You should get about 20 to 24 cookies.
- Make the indentations. Use your thumb or the back of a teaspoon to press a deep well into the center of each dough ball. Press almost to the bottom, but don’t go all the way through. The edges might crack a little—that’s totally fine. It gives the cookies a rustic look.
- Fill with jam. Spoon a small amount of raspberry jam into each indentation. Use about ½ teaspoon per cookie. Don’t overfill, or the jam will bubble over during baking. A little goes a long way.
- Bake. Place the baking sheet in the preheated oven and bake for 12 to 14 minutes. The cookies should be lightly golden around the edges but still pale on top. The jam will be bubbly and hot. Sensory cue: Your kitchen will smell like butter and almonds—that’s how you know they’re close.
- Cool. Let the cookies cool on the baking sheet for 5 minutes. This allows them to set up a bit. Then transfer them to a cooling rack to cool completely before glazing. If you glaze them while they’re warm, the glaze will just melt right off.
- Make the vanilla glaze. While the cookies cool, whisk together the powdered sugar, vanilla extract, and 2 tablespoons of milk or heavy cream in a small bowl. Add more liquid, 1 teaspoon at a time, until you get a smooth, drizzle-able consistency. It should be thick enough to hold its shape but thin enough to flow off a spoon.
- Drizzle the glaze. Once the cookies are completely cool, drizzle the glaze over the tops. I use a small piping bag or a zip-top bag with a tiny corner snipped off. You can also just use a spoon and drizzle it back and forth. Let the glaze set for about 15 minutes before serving.
Pro tip: If your dough is too sticky to roll into balls, pop it back in the fridge for another 10 minutes. Warm hands can soften the butter too much. And if the indentations close up during baking, just re-press them with the back of a teaspoon as soon as the cookies come out of the oven.
Cooking Tips & Techniques
I’ve made these cookies more times than I can count, and I’ve definitely learned a few things the hard way. Here are my best tips to make sure yours turn out perfect every time.
Don’t overmix the dough. This is probably the most common mistake. When you add the flour, mix just until it disappears. Overmixing develops the gluten in the flour, which makes the cookies tough and dense instead of tender and delicate. I learned this the hard way when I made a batch that came out more like hockey pucks than cookies.
Chill the dough, seriously. I know it’s tempting to skip this step when you’re in a hurry, but those 15 minutes in the fridge make a huge difference. Without chilling, the butter is too soft, and the cookies will spread into flat, jammy puddles instead of keeping their shape. One time I was rushing and skipped the chill—my cookies looked like sad little pancakes with jam in the middle.
Use seedless jam if you can. This is a personal preference thing, but I find that seedless jam gives a smoother, more elegant finish. If all you have is jam with seeds, that’s fine—just know you’ll get those little crunchy bits in the center. Some people actually prefer the texture. I’m a seedless girl myself.
Don’t overfill the indentations. It’s so tempting to pile in the jam, but trust me, less is more. About ½ teaspoon per cookie is plenty. If you add too much, the jam will bubble over during baking and create a sticky mess on your baking sheet. It’ll still taste good, but the cookies won’t look as pretty.
Let them cool completely before glazing. I know you’re excited, but warm cookies and glaze are not friends. The glaze will melt into a puddle and soak into the cookie, and you’ll lose that beautiful glossy drizzle effect. Patience, my friend. Give them a full 30 minutes on the cooling rack.
Multitasking strategy: While the dough chills, get your jam and glaze ingredients ready. While the cookies bake, clean up your mixing bowl. While they cool, make the glaze. This way, everything flows smoothly and you’re not scrambling at the end.
Variations & Adaptations
One of the best things about this recipe is how easy it is to change up. Here are some of my favorite variations.
Different jam flavors. Raspberry is classic, but don’t stop there. Strawberry, apricot, blackberry, or even fig jam all work beautifully. I made a batch with mango jam last summer, and it was incredible—the tropical sweetness paired perfectly with the almond. For a holiday twist, try cranberry jam or orange marmalade.
Chocolate version. If you’re a chocolate lover, swap the raspberry jam for a small piece of dark chocolate or a dollop of Nutella. Press the chocolate into the center before baking, and watch it melt into a gooey pocket of goodness. You can also add 2 tablespoons of cocoa powder to the dough for a double-chocolate experience.
Lemon-almond variation. Add 1 tablespoon of lemon zest to the dough along with the extracts. Use lemon curd instead of raspberry jam for the center. The bright, tangy lemon cuts through the richness of the butter and almond beautifully. Top with a lemon glaze instead of vanilla—just substitute lemon juice for the milk.
Gluten-free adaptation. I’ve tested this with a 1:1 gluten-free flour blend, and it works perfectly. No other adjustments needed. Just make sure your blend contains xanthan gum for structure. If it doesn’t, add ¼ teaspoon of xanthan gum to the dry ingredients.
Vegan version. Use plant-based butter (I like Miyoko’s) and replace the egg yolk with 1 tablespoon of aquafaba (the liquid from a can of chickpeas) or a flax egg (1 tablespoon ground flaxseed mixed with 3 tablespoons water, let sit for 5 minutes). Use non-dairy milk in the glaze. The texture will be slightly different—a bit more crumbly—but still delicious.
Spiced version. Add ½ teaspoon of cinnamon and ¼ teaspoon of cardamom to the flour. It gives the cookies a warm, cozy flavor that’s perfect for fall and winter baking. I made these for a Christmas cookie swap last year, and they were gone in minutes.
Serving & Storage Suggestions
These cookies are best served at room temperature, which means they’re ready to go whenever you are. The glaze should be fully set and firm to the touch, not sticky or wet. If you’re serving them at a party or gathering, arrange them on a pretty plate or platter. The red jam and white glaze make them look festive without any extra effort.
What to serve with them: A cup of hot coffee or tea is the obvious pairing, and honestly, it’s perfect. The bitterness of coffee balances the sweetness of the cookies. For a dessert spread, serve them alongside fresh berries, a cheese board, or a scoop of vanilla ice cream. They’re also great with a glass of cold milk—classic for a reason.
Storage: Store the cookies in an airtight container at room temperature. They’ll stay fresh for up to 5 days. Layer them between sheets of parchment paper to prevent the glaze from sticking to each other. If you live in a humid climate, the glaze might get a little sticky after a day or two—that’s normal, and they’ll still taste great.
Freezer instructions: These cookies freeze beautifully. You can freeze them either before or after baking. To freeze unbaked: shape the dough into balls, place them on a baking sheet, and freeze until solid. Then transfer to a freezer bag. When you’re ready to bake, place the frozen dough balls on a lined baking sheet, let them thaw for 10 minutes, then press the indentations and bake as directed. You might need to add 1 to 2 minutes to the baking time.
To freeze baked cookies: Let them cool completely, then place them in a single layer in a freezer-safe container with parchment paper between layers. Freeze for up to 3 months. Thaw at room temperature for about 30 minutes before serving. The glaze might lose some of its shine after freezing, but the flavor will still be there.
How flavors develop: Honestly, these cookies are even better the next day. The flavors meld together overnight, and the texture becomes even more tender. If you can resist eating them all on day one, you’ll be rewarded on day two.
Nutritional Information & Benefits
Let’s be real—these are cookies, not health food. But they’re made with simple, recognizable ingredients, and there’s something to be said for that. Here’s a rough estimate of the nutritional breakdown per cookie (based on 22 cookies):
| Nutrient | Amount per Cookie |
|---|---|
| Calories | 145 |
| Total Fat | 7g |
| Saturated Fat | 4g |
| Cholesterol | 25mg |
| Sodium | 35mg |
| Total Carbohydrates | 19g |
| Sugars | 12g |
| Protein | 2g |
Health highlights: Almond extract contains trace amounts of antioxidants, and raspberries are packed with vitamin C and fiber (even in jam form, you get some of the benefits). The butter provides vitamin A and healthy fats. If you’re watching your sugar intake, you can reduce the sugar in the dough to ½ cup and use a low-sugar jam. The cookies will be slightly less sweet but still delicious.
Dietary considerations: These cookies are vegetarian. For gluten-free or vegan options, see the variations section above. They contain dairy (butter, milk in glaze) and eggs, so they’re not suitable for those with allergies to those ingredients unless adapted.
My personal take? These cookies are a treat, and treats are meant to be enjoyed. I don’t stress about the numbers. I focus on the joy of sharing something homemade with the people I love. That’s worth a few extra calories.
Conclusion
These quick raspberry almond thumbprint cookies are everything I want in a recipe—simple, fast, and absolutely delicious. They’ve saved me more times than I can count, from last-minute dessert emergencies to “I need to bring something to a party” panic moments. And every single time, people ask for the recipe.
What I love most about them is how adaptable they are. You can change the jam, add some spice, or make them gluten-free, and they still turn out perfectly. They’re forgiving, they’re reliable, and they make you look like you know what you’re doing in the kitchen—even if you’re just a tired person on a Tuesday night who needs a cookie.
I hope you give these a try. And when you do, I’d love to hear about it. Drop a comment below and tell me what jam you used, or how you customized them. Did you make them for a party? A quiet night in? Did your kids help you press the thumbprints? Share your stories—I read every single comment, and honestly, they make my day.
Happy baking, my friend. Go make something delicious.
Frequently Asked Questions
Can I use salted butter instead of unsalted?
Yes, you can. Just reduce or omit the added salt in the recipe. The cookies will have a slightly saltier flavor, which actually works well with the sweet jam and glaze. I’ve done it when I was out of unsalted butter, and they turned out great.
Why did my cookies spread too much?
This usually happens for one of two reasons: the dough wasn’t chilled long enough, or the butter was too soft. Make sure you chill the dough for at least 15 minutes. If your kitchen is warm, chill it for 20 minutes. Also, if your butter was melted or very soft when you started, the dough will spread more.
Can I make the dough ahead of time?
Absolutely. You can make the dough up to 3 days in advance and keep it in the fridge. Just wrap it tightly in plastic wrap so it doesn’t dry out. When you’re ready to bake, let it sit at room temperature for about 10 minutes so it’s soft enough to scoop and shape.
My jam bubbled over during baking. What did I do wrong?
You probably overfilled the indentations. Use just about ½ teaspoon of jam per cookie. If you’re using a very thin jam, it’s more likely to bubble over. You can also try using a thicker jam or preserves, which hold their shape better during baking.
Can I use a different type of extract?
Yes! While almond extract is what makes these cookies special, you can experiment with other flavors. Try lemon extract for a citrusy twist, coconut extract for a tropical vibe, or peppermint extract for a holiday version. Just keep in mind that some extracts are stronger than others—start with ½ teaspoon and adjust to taste.
PrintQuick & Easy Raspberry Almond Thumbprint Cookies with Vanilla Glaze

These quick and easy raspberry almond thumbprint cookies come together in under 30 minutes with simple pantry ingredients. A buttery almond cookie base is filled with raspberry jam and drizzled with a vanilla glaze for a treat that looks bakery-worthy but is surprisingly simple to make.
- Prep Time: 15 minutes
- Cook Time: 12-14 minutes
- Total Time: 30 minutes
- Yield: 20-24 cookies 1x
- Category: Dessert
- Cuisine: American
Ingredients
- 1 cup (2 sticks or 226g) unsalted butter, softened
- ⅔ cup (133g) granulated sugar
- 1 large egg yolk
- 1 teaspoon almond extract
- 1 teaspoon vanilla extract
- 1 ½ cups (188g) all-purpose flour
- ¼ teaspoon salt
- ⅓ cup raspberry jam or preserves
- For the Vanilla Glaze:
- 1 cup (120g) powdered sugar, sifted if desired
- ½ teaspoon vanilla extract
- 2 to 3 tablespoons milk or heavy cream
Instructions
- Preheat your oven to 350°F (175°C). Line a baking sheet with parchment paper or a silicone mat.
- In a medium mixing bowl, combine the softened butter and granulated sugar. Mix with a wooden spoon or rubber spatula until light and fluffy, about 2 minutes by hand (or 1 minute with a stand mixer on medium speed).
- Add the egg yolk, almond extract, and vanilla extract to the butter-sugar mixture. Stir until well combined and smooth.
- Add the flour and salt to the bowl. Stir gently until just combined. The dough should be soft and slightly sticky but hold together when pressed.
- Cover the bowl with plastic wrap and chill in the fridge for 15 minutes.
- Scoop out rounded tablespoons of dough (about 1.5 tablespoons each) and roll into smooth balls. Place on the prepared baking sheet, spacing them about 2 inches apart. You should get about 20 to 24 cookies.
- Use your thumb or the back of a teaspoon to press a deep well into the center of each dough ball, pressing almost to the bottom but not all the way through.
- Spoon about ½ teaspoon of raspberry jam into each indentation. Do not overfill.
- Bake for 12 to 14 minutes, until the cookies are lightly golden around the edges but still pale on top. The jam will be bubbly and hot.
- Let the cookies cool on the baking sheet for 5 minutes, then transfer to a cooling rack to cool completely before glazing.
- While the cookies cool, make the vanilla glaze: In a small bowl, whisk together the powdered sugar, vanilla extract, and 2 tablespoons of milk or heavy cream. Add more liquid, 1 teaspoon at a time, until you get a smooth, drizzle-able consistency.
- Once the cookies are completely cool, drizzle the glaze over the tops using a small piping bag, zip-top bag with a tiny corner snipped off, or a spoon. Let the glaze set for about 15 minutes before serving.
Notes
Don’t skip chilling the dough—it prevents spreading. Use seedless jam for a smoother finish. Don’t overfill indentations with jam (about ½ teaspoon each). Let cookies cool completely before glazing. Cookies are even better the next day as flavors meld. Store in an airtight container at room temperature for up to 5 days. Freeze unbaked or baked for up to 3 months.
Nutrition
- Serving Size: 1 cookie
- Calories: 145
- Sugar: 12
- Sodium: 35
- Fat: 7
- Saturated Fat: 4
- Carbohydrates: 19
- Protein: 2
Keywords: thumbprint cookies, raspberry cookies, almond cookies, easy cookies, quick cookies, holiday cookies, jam cookies, vanilla glaze